This tutorial is about using a biometric sensor with Arduino for security purposes. The biometric domain includes all the human attributes which could distinguish each individual from the other, such as fingerprint mapping, eye retina scan, and facial recognition.
Fingerprint sensors are a common and cheap solution to add a biometric authentication layer to any security application. The fingerprint sensor uses optical and imaging technology to grasp the finger linings. Capacitive fingerprint sensors also exist; their use is only confined to mobile phones. Capacitive sensors’ pattern recognition resolution is lower than optical. You can increase their resolution at an additional cost.
Capacitive sensors can’t be tricked like optical which take image and image can be replicated. Capacitive sensors have an array of capacitors. Upon finger touching with its surface, the capacitance of capacitors increases/decreases. Capacitors states are then stored in flash as a finger lining pattern of a single finger which could later be used for matching purposes.
Project circuit
I am using a fingerprint sensor and Arduino dual relay board. With relays, I will drive an alarm and an electric door lock. The system will be installed on the main door of a house. Alarm and electric door locks require more power than Arduino. That’s the reason behind the actuator’s isolation and relay usage. Arduino digital pins directly control the relay board.
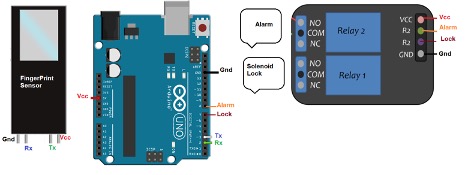
The fingerprint sensor communicates with an external controller on UART protocol. UART pins of the sensor are attached with serial-1 pins (2 & 3) of Arduino Uno. Two digital pins, 7 & 8, are used to activate/deactivate relays when required. Alarm and electronic locks normally require 12 volts for operation. I isolated them from Arduino and placed a relay in between so that their power doesn’t affect Arduino.
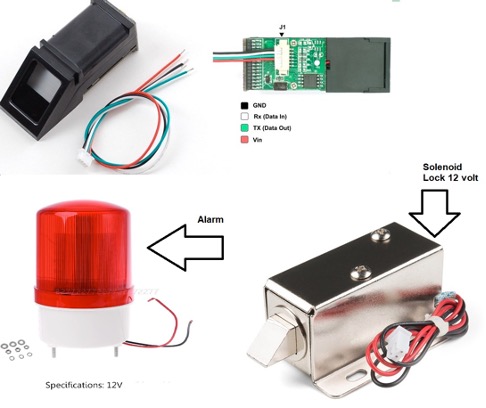 Alarm and electronic locks are simple devices. They have two power lines to energize. You need to cut one wire and control it with a relay. I suppose you know how to wire them with the relay. The fingerprint sensor from Adafruit is shown in the above picture. Almost all the fingerprint sensors have the same pinout as Adafruit.
Project code
Arduino predefined libraries are a great resource to get started with. For fingerprint sensors, Adafruit libraries provide a nice and clean library with plenty of getting started examples. Download the Adafruit fingerprint sensor library from their website or directly install it using the “Library Manager” feature from Arduino IDE.
Once you have downloaded the libraries, now it’s time to enroll the fingerprints in the sensor. Fingerprints of those whom we want to give permission to access a particular house must first be uploaded and stored in the sensor. Later for entering the house, those fingerprints will be matched when a person approaches the house and requests entrance.
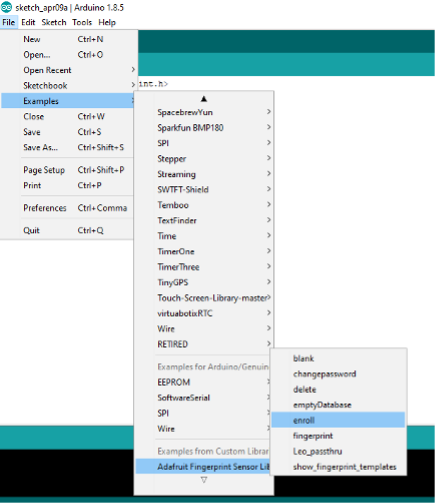
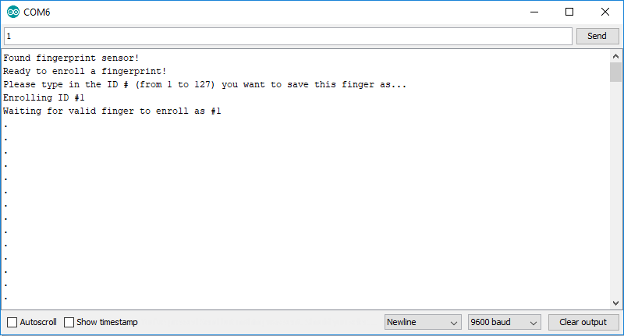
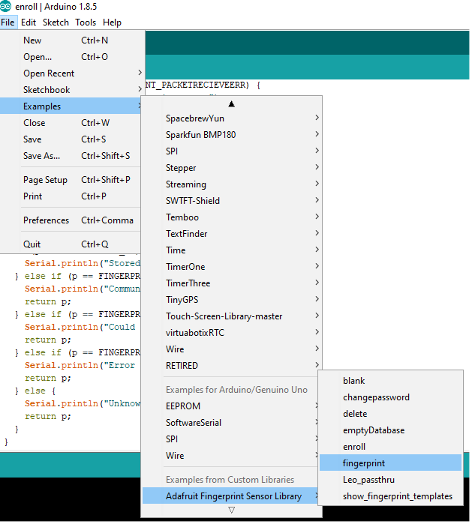
Open Arduino ide go to File>Examples>Adafruit Fingerprint Sensor Libraries> enroll. Upload the sketch in Arduino. Now open the Arduino serial monitor at 9600 bps. You will see Arduino popping up a message to enroll a fingerprint with ID. Manually enter the ID. ID must be between 1 to 127. The fingerprint sensor can only store 127 fingerprints.
After ID entrance, place your finger on the sensor, and it will start grabbing the fingerprint. After successful input, it may or may not ask you to place the same finger on the sensor for verification. Repeat the same step for all the fingers and persons.
Once all the fingerprints are uploaded, it is time to place the sensor at the door and start its operation. Again, go to File>Example’s> Adafruit Fingerprint Sensor Libraries> Fingerprint. This example matches the fingerprints with the one which is already uploaded to the sensor.
We need to modify the example for alarm and lock control. First, define the pins. The setup function declares their output and defines their initial state, alarm switched off, and lock closed.
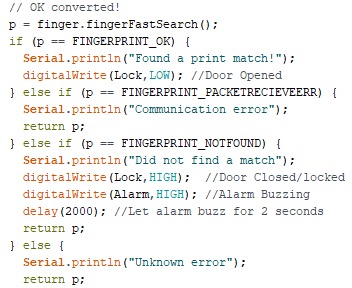
The following code in the example matches the fingerprint with the ones stored in it. If a match is found, it displays “Found a print match!” on the serial monitor. At the same instance, I added the door open statement. If no match, let the door remain closed and buzz the alarm. I decided to buzz the alarm for 2 seconds; you can change it.
The code is quite lengthy, but it’s easy to understand. Predefined examples are a great resource to start developing our code. It saves time, and you don’t need to go through lengthy datasheets and configuration, etc.
Let’s DIY the project: Where to buy parts?
Mouser: Fingerprint sensor
Mouser: Alarm Siren
Mouser: Arduino Uno
Mouser: Dual relay module
Mouser: Electronic Lock
You may also like:


Filed Under: Arduino, Microcontroller Projects

Questions related to this article?
👉Ask and discuss on Electro-Tech-Online.com and EDAboard.com forums.
Tell Us What You Think!!
You must be logged in to post a comment.