It was not that late, Beaglebone, which was already striving to provide open-source hardware and software platform since 2008, too decided to compete the niche and launched even more powerful computing device – Beaglebone Black. Beaglebone already had introduced the open-source products like BeagleBoard and BeagleBoard-xM. These boards were costlier compared to Raspberry Pi. So was the Black launched in 2013 to compete with Pi and lure the electronics enthusiasts. Now after Raspberry Pi 2 and Pi 3, Beaglebone Black seems to be losing the edge. Let us see how well these boards fair over each other.
Raspberry Pi or Beaglebone Black are for What?
These single board computers are made for electronics hobbyists and computer professionals who are willing to develop software-oriented embedded electronics applications where complicated programs to operate a range of analog and/or digital peripherals need to be built and run on an operating system. A web server for broadcasting audio and video messages or an IOT application are some good examples.
Prerequisites for working on Pi or Black
For working on Pi or Black, it is important that the aspirant has fundamental understanding of Linux operating systems and basic knowledge of electronics. These boards run on Linux derivatives and aim to be used in embedded electronics projects. If one has some experience of working on microcontrollers like 8051, AVR or PIC or on microcontroller boards like Arduino that may help in hardware aspect but the real skill development on these boards goes on with the software aspect particularly exploiting the Linux ecosystem in making embedded applications.
Form-Factors : Beaglebone Black WAS designed to be superior than Raspberry Pi but WHAT NOW?
Pi 1 was already in market when Black was introduced. For obvious reasons, Black was designed to be a superior computing device than Pi. After the launch of third generation Pi, a lot of form-factors that gave an edge to the Beaglebone Black are no more relevant. While Black comes with a 1GHz AM3359 ARM Cortex A8 processor which uses ARMv7 instruction set, the new Raspberry Pi Model 3 has a 1.2GHz 64-bit quad-core ARMv8 CPU. The Raspberry Pi 2 was also competent and using ARMv7 instruction set same as the Black. The new Pi has a greater clock speed and now never needs to be over clocked to match against the Black. ARMv8 instruction set used by the new Pi is the latest top-up on ARM architecture. It is a fundamental change in ARM architecture made to add 64-bit architecture and Pi foundation has not missed to exploit this. With 64-bit processor architecture and multiple cores, the Raspberry Pi 3 is not just tad faster. Moreover, ARMv8 provides user-space compatibility with the 32-bit ARMv7 instruction set.
In terms of RAM, Raspberry Pi 2 was already upgraded to 1GB RAM compared to 512 MB RAM in Black. Here, Pi 3 maintains the legacy. The black have an advantage of having 4GB on-board eMMC storage along with MicroSD card option, while both the latest models of Pi comes with the SD card option for storage.
Definitely, Beaglebone Black has no showdown in terms of processing power and raw form-factors compared to Pi boards anymore.
| Form-Factors | Raspberry Pi 2 | Raspberry Pi 3 | Beagleboard |
|---|---|---|---|
| Processor | 900MHz quad-core
ARM Cotex-A7 CPU |
1.2 GHz 64-bit quad-core
ARMv8 CPU |
1GHz TI Sitara AM3359
ARM Cortex A8 |
| Architecture | 32-Bit | 64-Bit | 32-Bit |
| Instruction Set | ARMv7 | ARMv8 | ARMv7 |
| RAM | 1 GB LPDDR2 | 1 GB LPDDR2 | 512MB DDR3L |
| Storage | SD | SD | 4GB on-board
eMMC,MicroSD |
Connectivity and Expandability
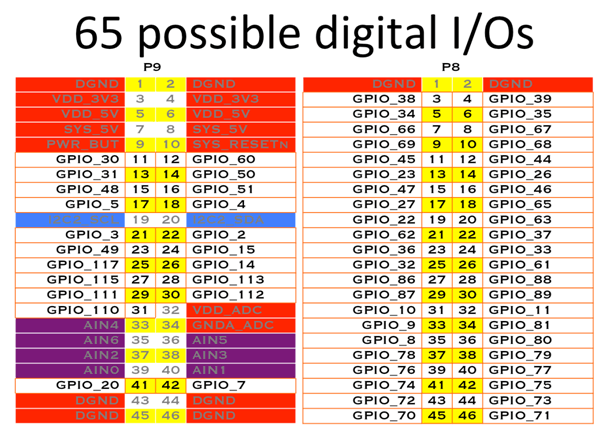
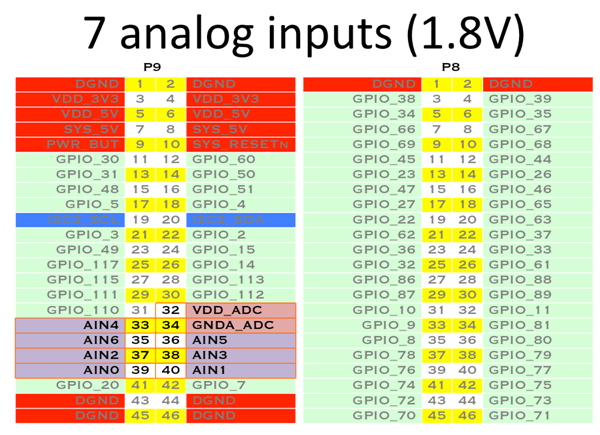
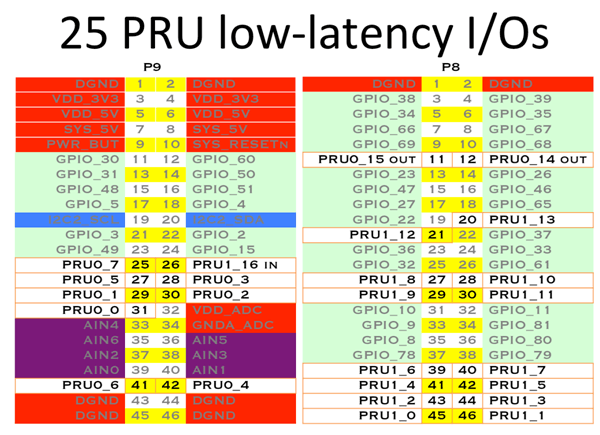
Connectivity has been one realm where Beaglebone Black still outshines. It has 2 46-pin headers making 92 connections possible, of which many despite of being reserved can be reconfigured for use. Out of the 92 connections, the Beaglebone Black has 65 GPIO (General Purpose Input/output) pins, 2 I2C buses, 2 SPI buses, 7 analog inputs, 8 PWM outputs, 4 Timers, 4 UARTs and 25 PRU low-latency Input/output. Each digital I/O pin of the Black supports 8 different modes including the GPIO. The pin mapping of Beaglebone Black is as follows – :
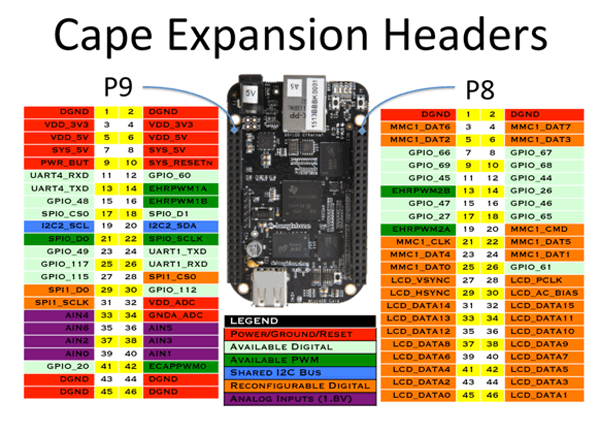


Beaglebone also provides a large central repository of Beaglebone capes. Beaglebone Capes are add-on boards that can be connected to the header pins for augmenting external peripherals to the Beaglebone SBC. A large number of Beaglebone Capes are available on official CircuitCo Capes Page. Additionally, many third-party capes can also be found and purchased to use with the Beaglebone board.
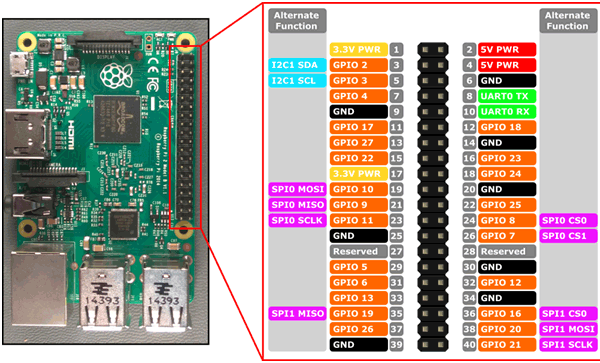
Even the new Pi models are not much competent in this regard. The new Raspberry Pi 3 and Raspberry Pi 2 have a 40 pin header of which there are 24 GPIO, one I2C bus, 2 SPI buses, 8 Ground pins, JTAG, 2 5V power pins and 2 3.3V power pins. The pin map of Raspberry Pi 2 and 3 is as follows – :
The Raspberry Pi can also be augmented with external peripherals by connecting Hardware On Top (HAT) boards to the header pins of the Pi. However, compared to Beaglebone, Pi has scarce add-on boards and lack a central repository to grab one. However, due to large community support, it is not really difficult to find a suitable HAT for an application. And yes, there is one thing that has enhanced the expandability of Raspberry Pi unimaginably and that is Raspberry Pi to Arduino Shields Connection Bridge. It can be purchased from a third-party seller and has amazing forth to-dos. One can connect any shield made available for Arduino to Raspberry Pi using these types of connection bridges. Arduino is a legendary class in itself when hardware interfacing has to be considered. These connection bridges have granted totally different dimension and scope to Raspberry Pi usage. One of these connection bridge can be purchased from Cooking Hacks.
So, choose a Beaglebone if the number of connections is all important for your project otherwise Raspberry Pi can also do a nice job for connectivity and hardware interfacing.
Multimedia Applications
No software based application can impress without graphics and audio. Practically, working on any single board computer requires interfacing a display unit to the board and getting the visual hint of whatever goes on the code execution. Here again, Raspberry Pi seems to be the winner. The Pi comes with dual core VideoCore IV and provides Open GL ES 2.0, hardware accelerated OpenVG and 1080p H.264 high profile decoding. The In-Built GPU is capable of 1Gpixels/1.5Gtexels or 24 GFLOPs with texture filtering and DMA infrastructure. It is equipped with full-size HDMI port along with composite video out for lower quality video streaming. The Pi supports audio on HDMI and also provides 3.5 mm audio jack.
On the other hand Beaglebone Black has In-built graphics accelerator that supports 1024X786, 1280X720, 1440X900 and 1920X1080 resolutions with maximum resolution supported being 1280X1024. It also does not have on-board audio jack and needs to attach a cape for audio in and out. Even if graphical requirements of a project may not be high, Beaglebone requires working on HDMI for any audio or video processing. This can be pretty difficult for any newbie. On the other hand Pi has greater graphical specifications and it allows to process audio from on-board audio Jack and video through HDMI or composite video connector which is easier for beginners.
Networking
The New Pi 3 has additional on-board networking connections that makes it exclusive for any networking application. The PI has 4 USB ports to communicate with other microcomputers, smart phones or desktop computers. Along with Ethernet port, the Raspberry Pi 3 comes with on-board 802.11 Wireless LAN, Bluetooth 4.1 and Bluetooth Low Energy. Beaglebone have single USB host and client ports and only contains an on-board Ethernet port for network communication. Obviously, it is easier to connect a Raspberry Pi to a wireless network while Beaglebone Black will need a cape for it. Both the boards can be connected to a LAN easily while more peripheral connections can be made on Raspberry Pi due to multiple USB ports.
Power Consumption
Power consumption is one factor where nothing can be said certainly. Beaglebone provides an extensive manual where current drawn by different sections of the board can be found. On a Raspberry Pi, such specifications are not open as it uses a proprietary processor and SoC. The power consumption by different sections of a Pi board should be measured manually and the reading can differ from one board to the other. Beaglebone can be said to have slightly lower power consumption and have open hardware specifications to check this out.
Set-Up and Cost
Despite of Raspberry Pi looking more lucrative, in fact it is easier to start with a Beaglebone. It comes with on-board flash memory and default Linux derivative Debian installed. It may not take more than five minutes to configure a Beaglebone Black and start off. But beware for graphical and audio applications, the Black needs the engineer to derive audio and video from HDMI. There’s no other option. Due to on-board flash memory and default Linux installation all needed to begin with Beaglebone Black is Micro-HDMI cable, a Micro-SD card (optional but recommended) and a Keyboard and Display Screen (having HDMI port) to connect with. On the other hand, a Raspberry Pi needs to purchase SD card as it does not come with flash memory and requires installation of Raspbian or other Linux derivative manually. This can be a bit time consuming but thanks to large community base of Raspberry Pi, will need less efforts as guide for installing and running a Raspberry Pi can be easily found. For setting up Raspberry Pi, SD card, HDMI Cable and Micro-USB cable are additional items that needs to be mandatorily purchased.
Though Raspberry Pi 3 Model B costs $29.99 and a Beaglebone Black costs $50, the cost at the end of the day for configuring either board may turn out to be the same. The capes for Beaglebone or HAT boards for Raspberry Pi may incur additional cost depending upon the target application.
Community Support
Raspberry Pi has a large community base and is quite more popular among electronics hobbyist. It will be easier to find a solution for any application, if made on a Raspberry Pi with the available guidance. Beaglebone is just picking upon the popularity chart but community support is still not that wide. If the project undertaken depends heavily on available community support, Raspberry Pi has a definite edge over the Beaglebone. However, nobody has stopped to rely on own intelligence and brainstorming, if Beaglebone seems to be quick to setup and start experimenting.
Open-source Factor
Raspberry Pi is definitely more popular among hobbyists, but for prototyping a product, Beaglebone can be a better choice. Beaglebone is open hardware and open software platform. All the hardware specifications are open and can be found directly in the Beaglebone Black Manual. The manual is quite extensive and covers all details including hardware schematics and chip specifications. The Raspberry Pi has open source hardware except ARM processor and Broadcom SoC . Its firmware is too closed-source. Due to use of ARM processor and Broadcom SoC, the Pi Foundation is bound by a Non-Disclosure Agreement with ARM and Broadcom and cannot open chip or processor specifications. However, the Pi foundation maintains that the Pi boards can be used commercially with recommendation that anywhere on the product be mentioned “Powered by Raspberry Pi”. Beaglebone being a complete open-source platform can be modified and used in a commercial product without doubt. Again, due to lack of open hardware specifications of processor and SoC, modifying a Raspberry Pi is practically not possible. But, one can make own version of Beaglebone easily.
Conclusion
Setting up a Beaglebone is easy and direct but it lacks extensive community support to progress further. Thus, for making a custom application on Beaglebone will require a bit of brainstorming due to lack of guidance and online support. In such a case, the Beaglebone Black manual is the ultimate and most reliable guide to experiment. Setting up a Raspberry Pi is manual and takes time and effort the first day but appreciations to large Raspberry Pi community, progressing on a Pi is lot easier.
Choose a Raspberry Pi blindly for any embedded systems application that requires better computing power, high resolution graphics, easy access to audio, connection with a wireless network or serial communication with other devices on a USB or need to realize the application through Arduino Shields. Go for a Beaglebone for more hardware connections, easy expandability with capes, low resolution graphics application, tinkering with graphics and audio on HDMI port, reliable power consumption and modification of the SBC board itself.
You may read our blog and article section for more topics on electronics engineering, industry, and technology.
Filed Under: BeagleBone, Tech Articles
Log in to leave a comment:
Lost your password?
Don't have an account? Register here