Engineers Garage

  • Electronic Projects & Tutorials
    • Electronic Projects
      • Arduino Projects
      • AVR
      • Raspberry pi
      • ESP8266
      • BeagleBone
      • 8051 Microcontroller
      • ARM
      • PIC Microcontroller
      • STM32
    • Tutorials
      • Sensor Series
      • Engineering Deep Dives
      • AI
      • ARDUINO Compatible Coding
      • Audio Electronics
      • Battery Management
      • Beginners Electronics Series
      • Brainwave
      • Digital electronics (DE)
      • Electric Vehicles
      • EMI/EMC/RFI
      • EVs
      • Hardware Filters
      • IoT tutorials
      • LoRa/LoRaWAN
      • Power Tutorials
      • Protocol
      • Python
      • RPI Python Programming
      • Sensors
      • USB
      • Thermal management
      • Verilog
      • VHDL
    • Circuit Design
    • Project Videos
    • Components
  • Articles
    • Tech Articles
    • Insight
    • Invention Stories
    • How to
    • What Is
  • News
    • Electronic Product News
    • Business News
    • Company/Start-up News
    • DIY Reviews
    • Guest Post
  • Forums
    • EDABoard.com
    • Electro-Tech-Online
    • EG Forum Archive
  • DigiKey Store
    • Cables, Wires
    • Connectors, Interconnect
    • Discrete
    • Electromechanical
    • Embedded Computers
    • Enclosures, Hardware, Office
    • Integrated Circuits (ICs)
    • Isolators
    • LED/Optoelectronics
    • Passive
    • Power, Circuit Protection
    • Programmers
    • RF, Wireless
    • Semiconductors
    • Sensors, Transducers
    • Test Products
    • Tools
  • Learn
    • Design Guides
    • Learning Center
    • Tech Toolboxes
    • Tech Terms
    • Webinars & Digital Events
  • Resources
    • EE Training Days
    • LEAP Awards
    • Podcasts
    • White Papers
  • Guest Post Guidelines
  • Advertise
  • Subscribe

Hello World Program using Qt in Raspberry Pi- (Part 30/38)

By Ajish Alfred September 18, 2013

The Raspberry pi is a mini computer which is designed in a single board with all the essential components required for running an operating system. The Raspberry pi board runs on the Broadcom controller chip which is a SoC (System on Chip). This SoC has the powerful ARM11 processor which runs on 700 MHz at its core. This powerful processor and the controller having the peripherals like timers, interrupt controller, GPIO, PCM / I2S, DMA controller, I2C, SPI slave, PWM, UART, USB, graphical processing unit (GPU) which includes VideoCore, MPEG-2 and MPEG-4 and a 512 MB SDRAM makes it a mini-computer.

The Raspberrypi board is powerful enough to run large operating systems like Linux, Mac and Windows. Linux operating systems especially Ubuntu is preferred for all kind of programming and development.The board is provided with a RCA connector which can be used to connect it directly to a TV screen which is based on PAL and NTSC standard. The board also has a HDMI connector output which can be used to connect the board to a HD TV. A board capable of generating graphics on standard display screen needs a perfect application using which the programmers can exploit that capability. The ‘QT’ is a widely used platform for creating GUIs in Linux environment.Qt is an application which helps indeveloping the UI framework using the Qt IDE.

Qt uses standard C++ but it also supports support many compilers, including the GCC C++ compiler and the Visual Studio suite. This article explains how start with the QT with the help of a ‘hello world’ program which displays a simple window with a text “HELLO WORLD”.


Installing the QT in Raspberry pi is very easy using the command line, but it will take 30 minutes to 4 hours to finish the installation depending upon the speed of the internet connection. Downloading and installing the fourth version, QT4 using commands are already discussed in a previous article.In this project the Raspberrypi board is loaded with Ubuntu and is remotely accessed using VNC.

Once the installation is complete the user can find them listed under the installed programs for ‘Programming’ as shown in the following image:

Fig. 2: QT Listed in Istalled Programs

The list includes “Qt 4 Assistant”, “Qt 4 Designer”, “Qt 4 Linguist” and “Qt Creator”. The “Qt 4 Assistant” is basically provides help in the form of documentations related to the topics in QT. “Qt 4 Designer” is where the user can create a design and save it as a ‘.ui’ file which can then be used in QT projects. The “Qt 4 Linguist” provides a language view of the design created. The “Qt Creator” is where all these things can be done in the same IDE which helps in creating a GUI using QT.

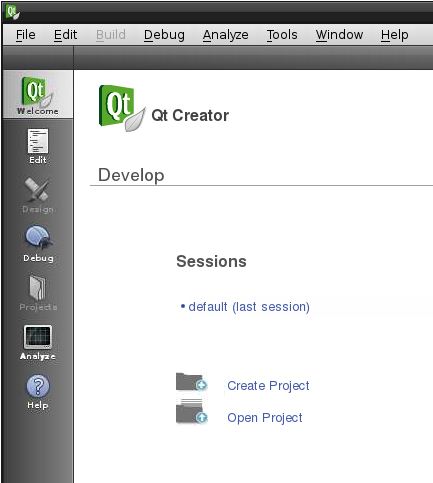
Click on the “Qt Creator” and the following window opens up which includes options for creating a project, editing the code, design the UI and even option for debugging. Options are available in the same window for compile, build and run also.
 

Qt Creator

Fig. 3: Qt Creator Window For Programming In Raspberry Pi


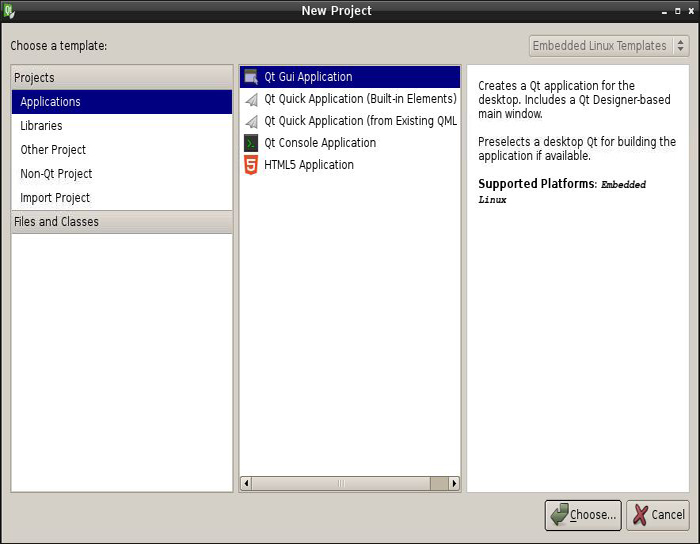
For creating a new application double click on the “Create Project” and the following window appears.
New Project in Qt

Fig. 4:  Create New Aplication With Qt GUI Apllication In New Project Window


Select the “Applications” >> “QtGui Applications” and click on the “Choose” button. The following steps are about the files to be generated and the location where they need to be generated.
Qt GUI Application

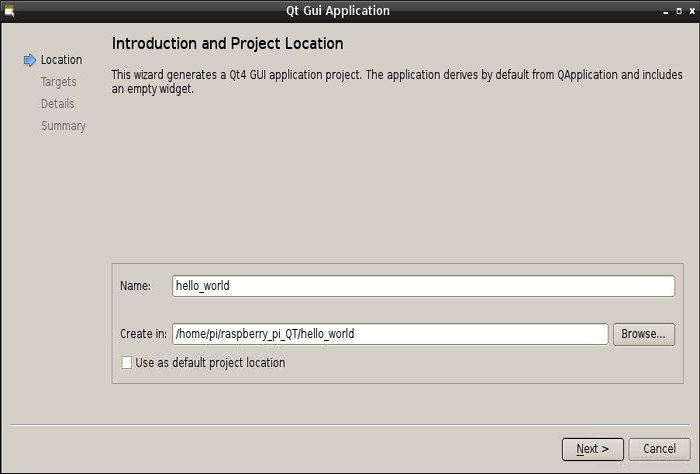
Fig. 5: Create Project Introduction And Location In Qt GUI Apllication Window Of Raspberry Pi

This window asks the location where the project files need to be saved. It is suggested to create a separate folder for each and every QT project since they will generate many numbers of files for a single project. Here a folder named “hello_world” has been created for the project at /home/pi/raspberry_piQT/hello_world and the name of the project is also given as ‘hello_world’.

Click on the “Next” button and the following window appears:

Embedded Linux

Fig. 6: Target Setup In QT Creator Window For Programing In Raspberry Pi

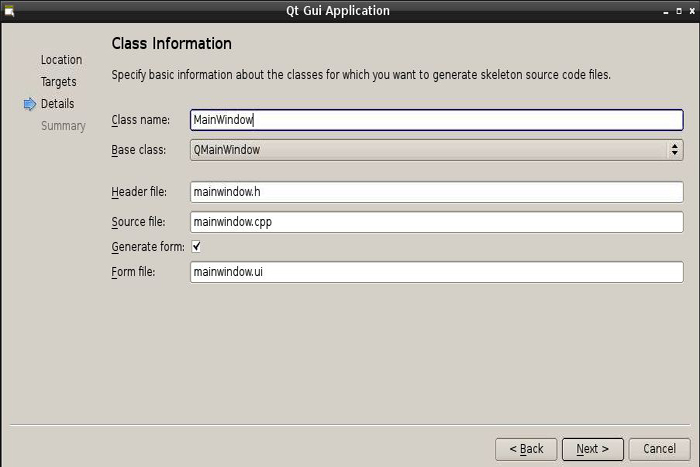
Check the “Embedded Linux” and then click the “Next” button. The next window will list the source code files that will be available for programming.
 

Qt GUI Application

Fig. 7:  Source Code Files Options For Programming In QT

Click the “Next” button and the following window displays a list of the files that are generated for the project.
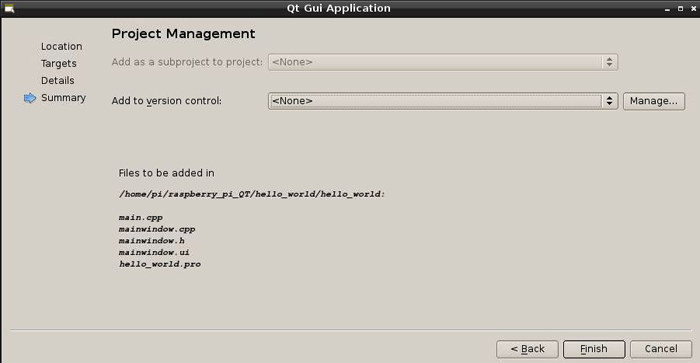
 

Embedded Linux in Raspberry Pi

Fig. 8: List Of The Files Generated For The Project In Raspberry Pi


As soon as the “Finish” button is clicked the “Edit” window of the Qt Creator will open up as shown in the following image:
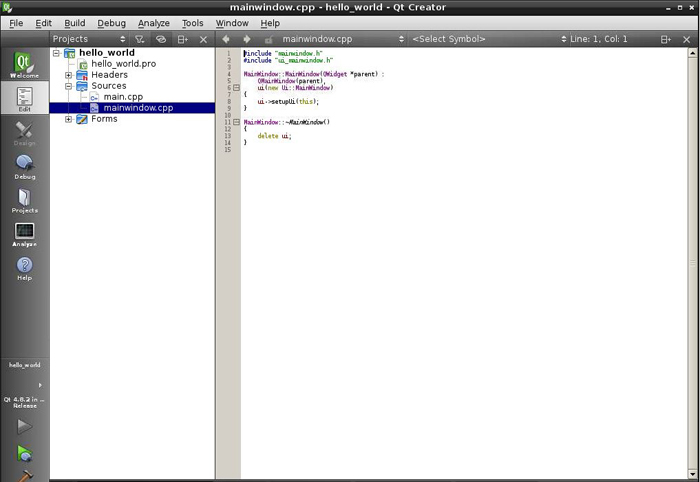
Qt Creator

Fig. 9: Edit Window In Qt Creator For Programming 

Expand the “Forms” where the “mainwindow.ui” can be seen listed.
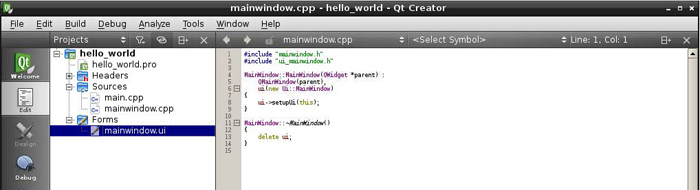
running Qt Creator

Fig. 10: “mainwindow.ui” Listed In Forms Of QT Creator 


Now double click on the “mainwindow.ui” and the Qt Creator’s “Design” window opens up:
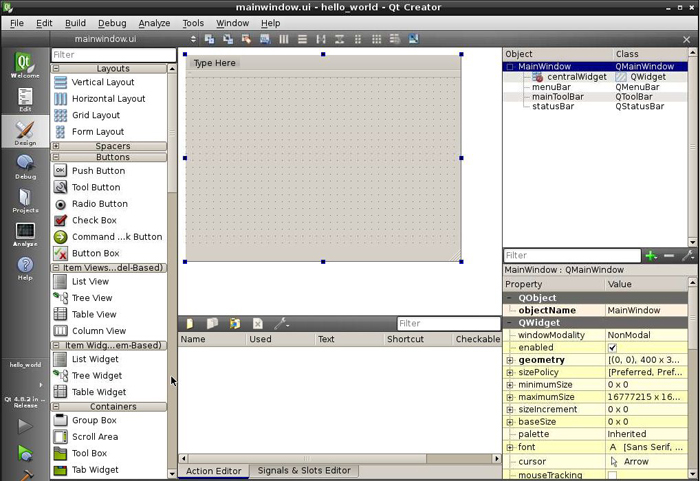
Qt Creator design

Fig. 11: Qt Creator’s “Design” Window On Raspberry Pi

This is where the user can enjoy designing the GUI with the help of Drag & Drop components on the left hand side of the window.

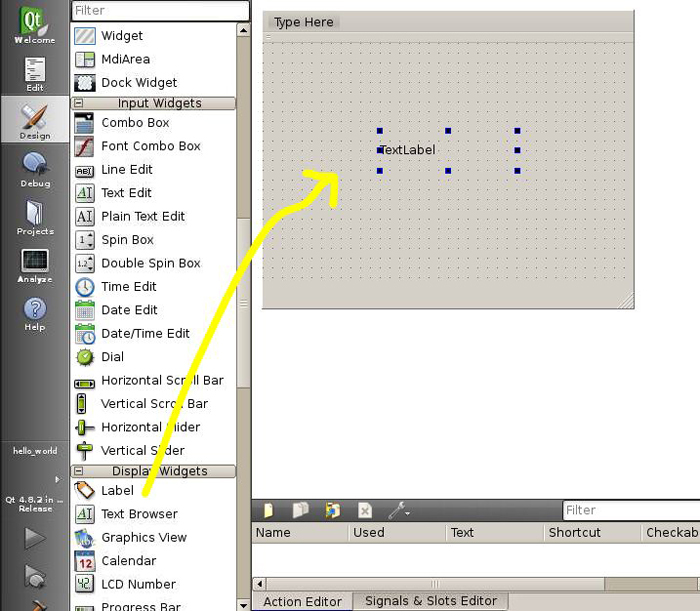
For this simple project a simplest text displaying component called “Label” can be dragged out of the “Display Widgets” to the main dialogue box as shown in the following image:
Qt Creator in Raspberry Pi

Fig. 12: Drag Text Lable From ” Display Widgets” to type Hello World


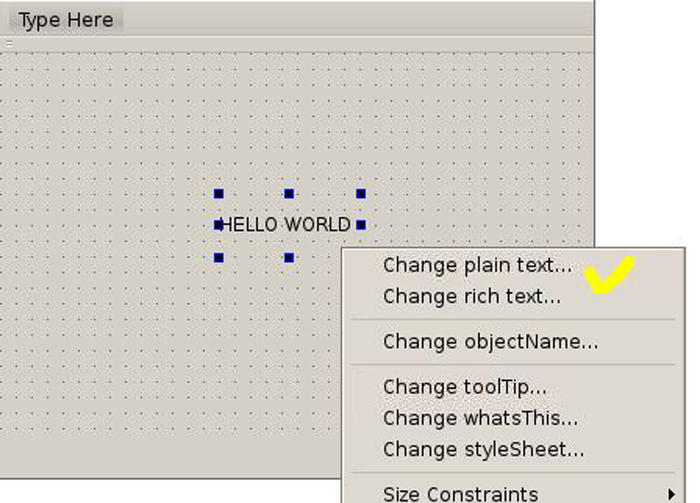
Right click on the “Label” and change the default text to “HELLO WORLD” using the “Change Plain Text” option.
Project in Qt Creator

Fig. 13: Changing Default Text To “HELLO WORLD” QT Creator Window


This simple project finishes the design part with that and moving on to the compiling and running parts which are discussed in the following;

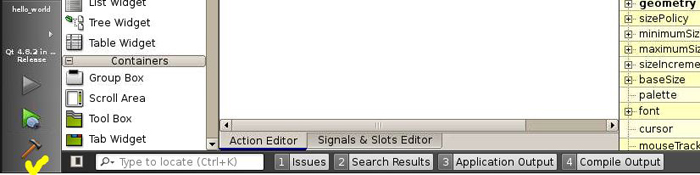
There is a button at the bottom left corner of the window as marked in the following image, which can be used to build the project.
 

Compile Project in Qt creator

Fig. 14: Build Project With Button In QT Creator Tool Bar 

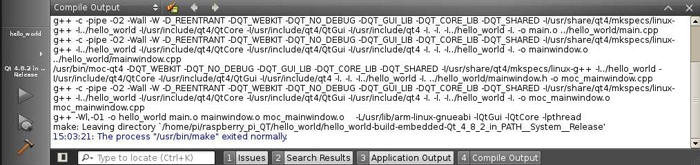
Use the “Compile Output” tab to read the compilers output while compiling the code. Once the compilation is finished successfully the last line reads as “The process /usr/sbin/make exited normally”, otherwise the errors will be displayed along with the line where the error occurred.
Raspberry Pi Qt Creator

Fig. 15: Compilation Successful Message

To execute the application one method is to use the command line and change the directory to where the project is saved. Another folder can be seen inside that named “hello_world-build-embedded-Qt_4_8_2_in_PATH__System__Release”. List the files in the directory using the following command:

ls –color

ls --color

Fig. 16: Command To List Files In Directory In QT

The green colored file is the executable file here and which can be executed using the following command:

./hello_world

The simple window with a text “HELLO WORLD” appears shown in the following image:
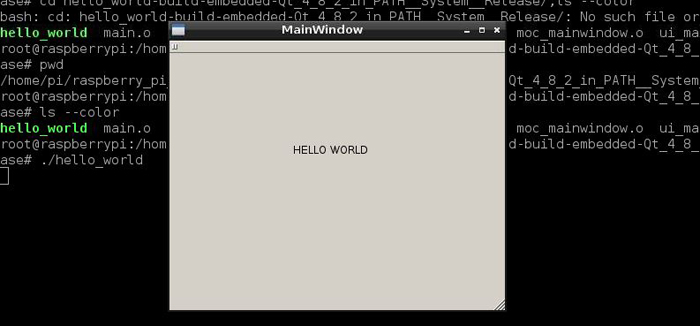
Hello World_Raspberry Pi

Fig. 17: “Hello World” Program On Screen Using QT In Raspberry Pi


Filed Under: Raspberry pi
Tagged With: hello world, qt, Raspberry Pi
 

Next Article

← Previous Article
Next Article →

Questions related to this article?
👉Ask and discuss on EDAboard.com and Electro-Tech-Online.com forums.


Tell Us What You Think!! Cancel reply

Log in to leave a comment:

Lost your password?

Don't have an account? Register here

Submit a Guest Post

submit a guest post

EE TECH TOOLBOX

“ee
Tech Toolbox: Wide Bandgap Semiconductors
Moving from silicon to GaN or SiC feels like a whole new ballgame, doesn’t it? It isn’t just about faster switching; it’s about managing the layout parasitics and thermal realities that come with that speed. This month’s Tech Toolbox features a curated eBook that tackles these design hurdles head-on.

EE Learning Center

EE Learning Center
“engineers
EXPAND YOUR KNOWLEDGE AND STAY CONNECTED
Get the latest info on technologies, tools and strategies for EE professionals.

HAVE A QUESTION?

Have a technical question about an article or other engineering questions? Check out our engineering forums EDABoard.com and Electro-Tech-Online.com where you can get those questions asked and answered by your peers!


RSS EDABOARD.com Discussions.

  • 230VAC Relay can safely withstand DC Voltage
  • min length
  • Please help me understand how to design a dual band antenna on hfss software
  • SMPS noise reduction
  • Hv rescue help

RSS Electro-Tech-Online.com Discussions

Featured Tutorials

Learn - AWS IoT Tutorials

  • Arduino compatible coding 03: Basics of Arduino sketches and Embedded C
    Arduino compatible coding 03: Basics of Arduino sketches and Embedded C
  • Arduino compatible coding 04: Interfacing and driving LED by digital output
    Arduino compatible coding 04: Interfacing and driving LED by digital output
  • Arduino compatible coding 05: Interfacing buttons for digital input
    Arduino compatible coding 05: Interfacing buttons for digital input
  • Arduino compatible coding 06: Analog output (PWM) on Arduino and LED fading
    Arduino compatible coding 06: Analog output (PWM) on Arduino and LED fading
  • Introduction to batteries and their types
    Introduction to batteries and their types
  • Controlling IoT Devices through Emails over IMAP Protocol – IOT Part 48
    Controlling IoT Devices through Emails over IMAP Protocol – IOT Part 48
More Tutorials >

Recent Articles

  • Acromag releases 6U VMEbus SBC
  • Bourns adds LTCC diplexer for GNSS front ends
  • Raltron expands SAW filters for GPS and Wi-Fi
  • TDK adds flat-wire chokes for EMI filtering
  • DigiKey and Arduino launch edge AI project challenge

EE ENGINEERING TRAINING DAYS

engineering
Engineers Garage
  • Analog IC TIps
  • Connector Tips
  • Battery Power Tips
  • EDABoard Forums
  • EE World Online
  • Electro-Tech-Online Forums
  • EV Engineering
  • Microcontroller Tips
  • Power Electronic Tips
  • Sensor Tips
  • Test and Measurement Tips
  • 5G Technology World
  • Subscribe to our newsletter
  • About Us
  • Contact Us
  • Advertise

Copyright © 2026 Arrowfly LLC. All Rights Reserved. The material on this site may not be reproduced, distributed, transmitted, cached or otherwise used, except with the prior written permission of Arrowfly
Privacy Policy

Search Engineers Garage

  • Electronic Projects & Tutorials
    • Electronic Projects
      • Arduino Projects
      • AVR
      • Raspberry pi
      • ESP8266
      • BeagleBone
      • 8051 Microcontroller
      • ARM
      • PIC Microcontroller
      • STM32
    • Tutorials
      • Sensor Series
      • Engineering Deep Dives
      • AI
      • ARDUINO Compatible Coding
      • Audio Electronics
      • Battery Management
      • Beginners Electronics Series
      • Brainwave
      • Digital electronics (DE)
      • Electric Vehicles
      • EMI/EMC/RFI
      • EVs
      • Hardware Filters
      • IoT tutorials
      • LoRa/LoRaWAN
      • Power Tutorials
      • Protocol
      • Python
      • RPI Python Programming
      • Sensors
      • USB
      • Thermal management
      • Verilog
      • VHDL
    • Circuit Design
    • Project Videos
    • Components
  • Articles
    • Tech Articles
    • Insight
    • Invention Stories
    • How to
    • What Is
  • News
    • Electronic Product News
    • Business News
    • Company/Start-up News
    • DIY Reviews
    • Guest Post
  • Forums
    • EDABoard.com
    • Electro-Tech-Online
    • EG Forum Archive
  • DigiKey Store
    • Cables, Wires
    • Connectors, Interconnect
    • Discrete
    • Electromechanical
    • Embedded Computers
    • Enclosures, Hardware, Office
    • Integrated Circuits (ICs)
    • Isolators
    • LED/Optoelectronics
    • Passive
    • Power, Circuit Protection
    • Programmers
    • RF, Wireless
    • Semiconductors
    • Sensors, Transducers
    • Test Products
    • Tools
  • Learn
    • Design Guides
    • Learning Center
    • Tech Toolboxes
    • Tech Terms
    • Webinars & Digital Events
  • Resources
    • EE Training Days
    • LEAP Awards
    • Podcasts
    • White Papers
  • Guest Post Guidelines
  • Advertise
  • Subscribe