Engineers Garage

  • Projects and Tutorials
    • Circuit Design
    • Electronic Projects
      • 8051
      • Arduino
      • ARM
      • AVR
      • PIC
      • Raspberry pi
      • STM32
    • Tutorials
    • Components
    • Contributions
  • Articles
    • EG Blogs
    • Insight
    • Invention Stories
    • How to
    • What Is
    • News
      • EE Design News
      • DIY Reviews
      • Guest Post
      • Sponsored Content
  • Forums
    • EG Forum Archive
    • EDABoard.com
    • Electro-Tech-Online
  • Digi-Key Store
    • Cables, Wires
    • Connectors, Interconnect
    • Discrete
    • Electromechanical
    • Embedded Computers
    • Enclosures, Hardware, Office
    • Integrated Circuits (ICs)
    • Isolators
    • LED/Optoelectronics
    • Passive
    • Power, Circuit Protection
    • Programmers
    • RF, Wireless
    • Semiconductors
    • Sensors, Transducers
    • Test Products
    • Tools
  • EE Resources
    • DesignFast
    • LEAP Awards
    • Oscilloscope Product Finder
    • Video
    • White Papers
    • Webinars
  • EE Learning Center
  • Women in Engineering

Making and displaying Custom characters on lcd with Arduino Uno and 16×2 lcd

August 13, 2019 By EG Projects

This project is about displaying custom characters on 16×2 character lcd using arduino uno microcontroller. With ardunio uno its very easy to display custom characters on lcd. In arduino their is built in structure to generate custom character like many other features which make it perfect board for embedded system projects or diy(do it yourself) projects etc. 

What are custom characters?

Custom characters are self made characters which we design by our self. We have full control on designing them with some constraints which i will discuss later. Like if we want to display a smiley 🙂 on 16×2 lcd. We don’t have an ASCII character for smiley to display it on 16×2 lcd. Example of custom characters is below.     
Example of custom characters displayed on 16x2 lcd

Example of custom characters displayed on 16×2 lcd

How custom characters are made and displayed on 16×2 lcd?

Before beginning any further i recommend you to please take the 16×2 lcd display introduction tutorial. Taking the tutorial will let you know about the pin out and internal structure of 16×2 lcd.   

  • 16×2 lcd working and internal structure

16×2 lcd has an internal ​CG-RAM(character generated ram) in which we can generate or place our custom character. CG-RAM size is 64 bytes. We can generate/place 8 characters of size 5×8 at a time in CG-RAM. We can also place 5×10 size characters in CG-RAM but only 4.

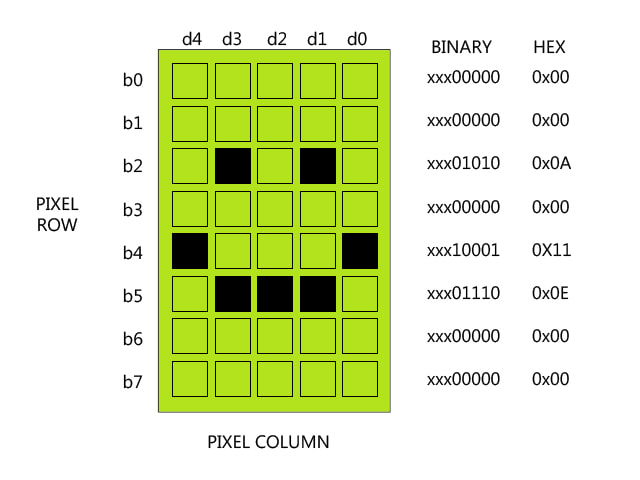
5×8 represents the dimension of the matrix in which a particular character can be displayed. 5 represents the number of coulombs and 8 represents the number of rows. 5×8 combined is a matrix size. Matrix is composed of pixels which we turn on and off to represent or make a character. For example to display a smiley 🙂 in 5×8 dimension individual pixels on and off will be same like below.   

5x8 pixel dimension of custom character display

5×8 pixel dimension of custom character display

For each 5×8 matrix with custom character in it we have to translate it in to its equivalent bits. For example the binary value of rows in 5×8 matrix is shown below. Against each binary value its HEX code is also given.

  • Each switched on pixel binary value is ‘1‘.
  • Each switched off pixel binary value is ‘0‘.
16x2 custom character smiley binary bits

16×2 custom character smiley binary bits

The above binary or hex values are then arranged in a byte array. Byte array is then placed in to CG-RAM of 16×2 lcd. Now when we want to display this smiley character on lcd screen we just call its address in CG-RAM and finally the character will appear on 16×2 lcd screen.

I almost explained every thing above, about generating custom characters in 16×2 lcd CG-RAM and displaying them on lcd screen. But still their are few things which are not part of this tutorial. Like custom character address in CG-RAM. Its because the arduino ide has pre-defined library which places the custom characters in CG-RAM and call it when needed for display. If you want to know about whats happening behind the library then  i 
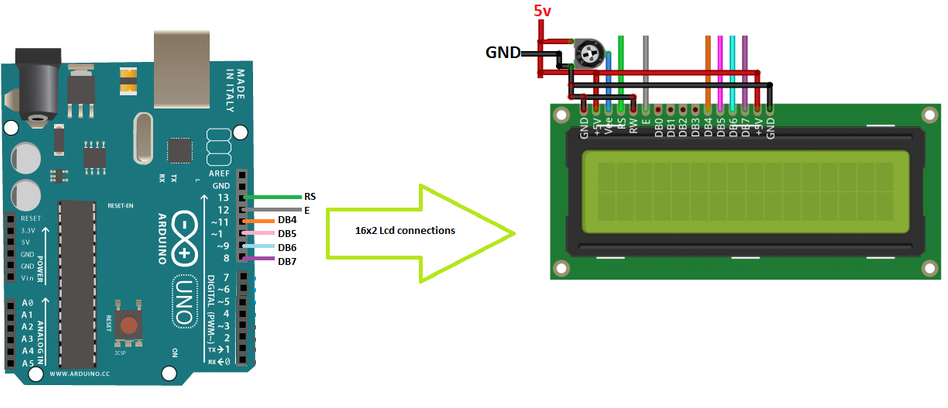
recommend you to please learn about the custom character generation in internal hardware level first before proceeding.

  • How to generate and display custom characters on 16×2 lcd.

Arduino custom characters displayed on 16×2 lcd – Circuit diagram

For this project you only need a 16×2 character lcd and arduino uno microcontroller/board. You can use any other character lcd according to your wish but remember to change the lcd.begin(no of coulombs of lcd, no of rows of lcd) command in code and insert the dimensions of the lcd you are interfacing with arduino uno. Almost all the character lcd’s have same pin out and uses same hd44780 lcd controller. So their will be no difference in circuit diagram or remaining code. Hd44780 lcd controller is responsible to display characters on character lcd, communicate with external devices and CG-RAM also resides in HD44780 lcd controller.  

In this project i am using 16×2 lcd in 4-bit mode so you have to make pin connections according to the 4-bit mode. Its not very hard just connect in the order given below

  • LCD RS pin to digital pin 13 of arduino uno
  • LCD Enable pin to digital pin 12 of arduino uno
  • LCD D4 pin to digital pin 11 of arduino uno
  • LCD D5 pin to digital pin 10 of arduino uno
  • LCD D6 pin to digital pin 9 of arduino uno
  • LCD D7 pin to digital pin 8   of arduino uno
Custom characters displayed on 16x2 lcd using arduino uno

Custom characters displayed on 16×2 lcd using arduino uno

Arduino custom character display – Project code

The code of the project is simple. I am going to display 8 custom character on 16×2 lcd. First the required characters byte array are declared in code. Byte arrays are declared in binary as well as hexadecimal format.

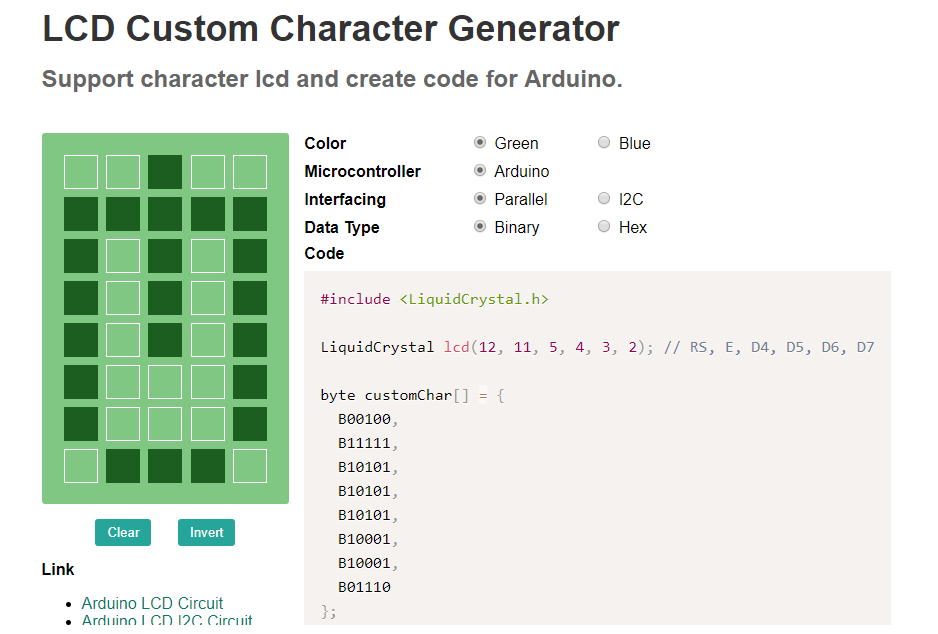
The createChar() command in ardunio ide is very important. It creates/puts the character matrix/array against an addres in CG-RAM of 16×2 lcd. In other microcontrollers we have to write the memory address where we want to place our newly created custom character but in ardunio the createChar() command creates the required character automatically and place it against an address in CG-RAM. createChar() function is part of LiquidCrystal library. If we open the library and see the function statements they are communicating with the HD44780 lcd controller and CG-RAM address are defined in the function. 

Arduino code steps to create and display custom characters on 16×2 lcd

byte a[8]={B00000,B01010,B00100,B00100,B00000,B01110,B10001,};
The above statement is a byte array of a custom character in binary format.
lcd.createChar(2 , a);
The above command places the a[] byte array custom character against address 2 in CG-RAM. Real address is different its not 2 see library for real address.
lcd.write(2);
The above command displays the custom character placed against the address 2 in CG-RAM. 
Numerous custom character generators are available online i usually use maxpromer its easy to use and biggest advantage of it is. It can generate whole arduino code in just seconds. Just give it a try i bet you gone love it.
maxpromer custom character generator online

maxpromer custom character generator online

More projects regarding custom characters, arduino and other microcontroller. All the projects are open source. Each and every statement with circuit diagram of the projects are well explained in the tutorials. 

Custom urdu language display on lcd with arduino uno

8051 microcontroller and 16×2 lcd custom characters display

Custom character display on 16×2 lcd using pic microcontroller

Download the project code written in arduino ide. Code is open source. Please provide us your feed back on the project. Write your questions and queries in the comments section below.
Arduino custom character code

Related Articles Read More >

A Bluetooth-controlled datalogger robot
touch bell push
How to design a touchless bell push using Arduino
SMS-enabled scrolling message board using Arduino
Interfacing stepper motor with 8051(89c51,89c52 ) microcontroller

Featured Tutorials

  • Capacitive Touch Controlled Robot using X-Bee Module
  • Keypad Controlled RF based Wireless Robot
  • A Bluetooth-controlled datalogger robot
  • Keypad Controlled And Industrial Gas Monitoring Wireless Robot
  • Joystick Controlled Wireless Robot
  • CAN Protocol – Understanding the Controller Area Network Protocol

Stay Up To Date

Newsletter Signup

EE Training Center Classrooms

“ee

“ee

“ee

“ee

Recent Articles

  • How to build an IR remote-operated RGB LED strip using Arduino
  • Maxim launches automotive-grade secure authenticator for enhanced vehicle safety
  • Samsung offers compact, WiFi-enabled VRF air-conditioning systems
  • Nexperia launches industry’s first 80-V RET family for high-voltage circuits
  • The Amazing World of Robotics and its Promising Future
...

RSS EDABOARD.com Discussions

  • Rippe current rating of aluminium electrolytic capacitor is very low.
  • Radiated emissions problems
  • Same geometry but slightly different results
  • Mic preamp and Tx on MAX260x
  • Security for IoT

RSS Electro-Tech-Online.com Discussions

  • new to Ardunio but trying to compile
  • Security for IoT
  • Can this rail fault cause the oscillator to give bad signal ?
  • watchdog in stop mode
  • First time using MOSFETs project
Engineers Garage
  • Analog IC TIps
  • Connector Tips
  • DesignFast
  • EDABoard Forums
  • EE World Online
  • Electro-Tech-Online Forums
  • Microcontroller Tips
  • Power Electronic Tips
  • Sensor Tips
  • Test and Measurement Tips
  • 5G Technology World
  • About Us
  • Contact Us
  • Advertise

Copyright © 2021 WTWH Media LLC. All Rights Reserved. The material on this site may not be reproduced, distributed, transmitted, cached or otherwise used, except with the prior written permission of WTWH Media
Privacy Policy | Advertising | About Us

Search Engineers Garage

  • Projects and Tutorials
    • Circuit Design
    • Electronic Projects
      • 8051
      • Arduino
      • ARM
      • AVR
      • PIC
      • Raspberry pi
      • STM32
    • Tutorials
    • Components
    • Contributions
  • Articles
    • EG Blogs
    • Insight
    • Invention Stories
    • How to
    • What Is
    • News
      • EE Design News
      • DIY Reviews
      • Guest Post
      • Sponsored Content
  • Forums
    • EG Forum Archive
    • EDABoard.com
    • Electro-Tech-Online
  • Digi-Key Store
    • Cables, Wires
    • Connectors, Interconnect
    • Discrete
    • Electromechanical
    • Embedded Computers
    • Enclosures, Hardware, Office
    • Integrated Circuits (ICs)
    • Isolators
    • LED/Optoelectronics
    • Passive
    • Power, Circuit Protection
    • Programmers
    • RF, Wireless
    • Semiconductors
    • Sensors, Transducers
    • Test Products
    • Tools
  • EE Resources
    • DesignFast
    • LEAP Awards
    • Oscilloscope Product Finder
    • Video
    • White Papers
    • Webinars
  • EE Learning Center
  • Women in Engineering