 One of the main attractions of the Raspberry Pi platform is its camera module. At present, Raspberry Pi Foundation offers three camera modules:
• Camera Module 2
• Camera Module 2 NoIR
• Raspberry Pi High-Quality Camera
The camera module 2 is a replacement for the original camera module in April 2016. The V2 module has a Sony IMX219 8-Megapixel Sensor compared to the OmniVision OV5647 5-Megapixel sensor in the original module. The module is compatible with Raspberry Pi 1, 2, 3, and 4. It can be easily attached to the Camera Serial Interface (CSI port) of any Raspberry Pi. The V2 camera module supports 1080p30, 720p60 and VGA90 video modes. The new module is not just high in resolution. It is far better in image quality, low-light performance, and color fidelity. The infrared camera module 2 is the same as the regular module 2, except it does not employ an infrared filter. The Pi NoIR camera is much useful for night photography and video capturing. The high-quality camera is a 12.3 Megapixel Sony IMX477 sensor that supports C- and CS-mount lenses.
You can develop many exciting projects with the Raspberry Pi camera module. Well, by just installing a camera module with your tiny pocket computer, you can explore the vast world of image processing, video processing, and even machine learning. In this article, we explore how to get started with the camera module and control it using Python.
What you need
All that you need is a Raspberry Pi (1/2/3/4) and the camera module. The standard camera module is used to take pictures in light. The NoIR Pi camera takes pictures in the dark and requires an additional infrared light source. In this article, we are working with the standard camera module. The camera module must come with a flexible ribbon cable to attach to the CSI port. For attaching the camera with Raspberry Pi Zero, a smaller cable is required.
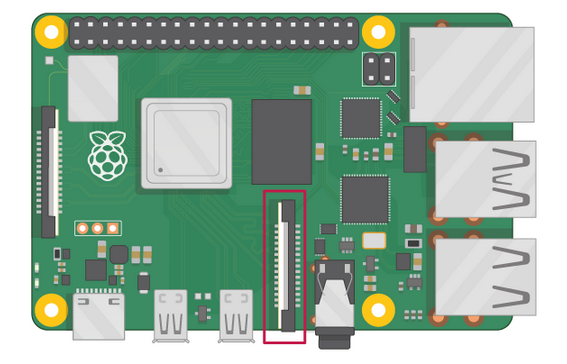
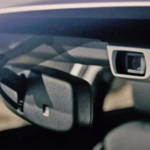
How to connect the camera module
All Raspberry Pi have a Camera Serial Interface (CSI port). The camera module attaches to the CSI port. It is common to confuse the CSI port with the display port. The location of the CSI port on Raspberry Pi is indicated below.
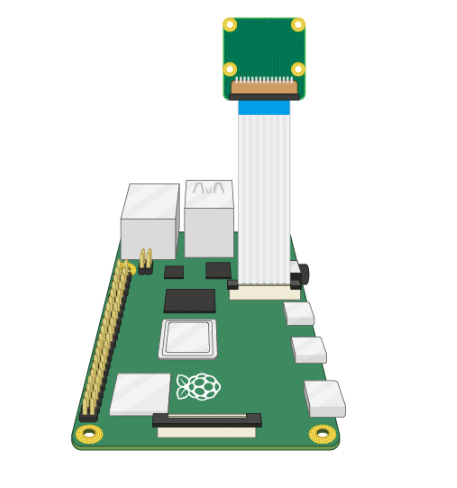
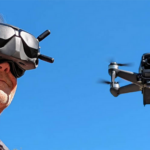
Example of Raspberry Pi Camera Module 2
To install the camera module, locate the CSI port. Gently remove the plastic clip of the port. Insert the camera module’s ribbon cable in the CSI port such that connectors at the bottom of the cable face the contacts in the port. Place the plastic clip back so that the ribbon cable is secured. The camera module attached to the Raspberry Pi looks like as shown below.
Position of CSI port on Raspberry Pi
Enable Raspberry Pi camera
The camera module is not enabled by default. After attaching the camera module, boot up the Raspberry Pi. Go to the main menu and open the Raspberry Pi configuration tool. You can also open the configuration tool from the terminal by typing sudo raspi-config.
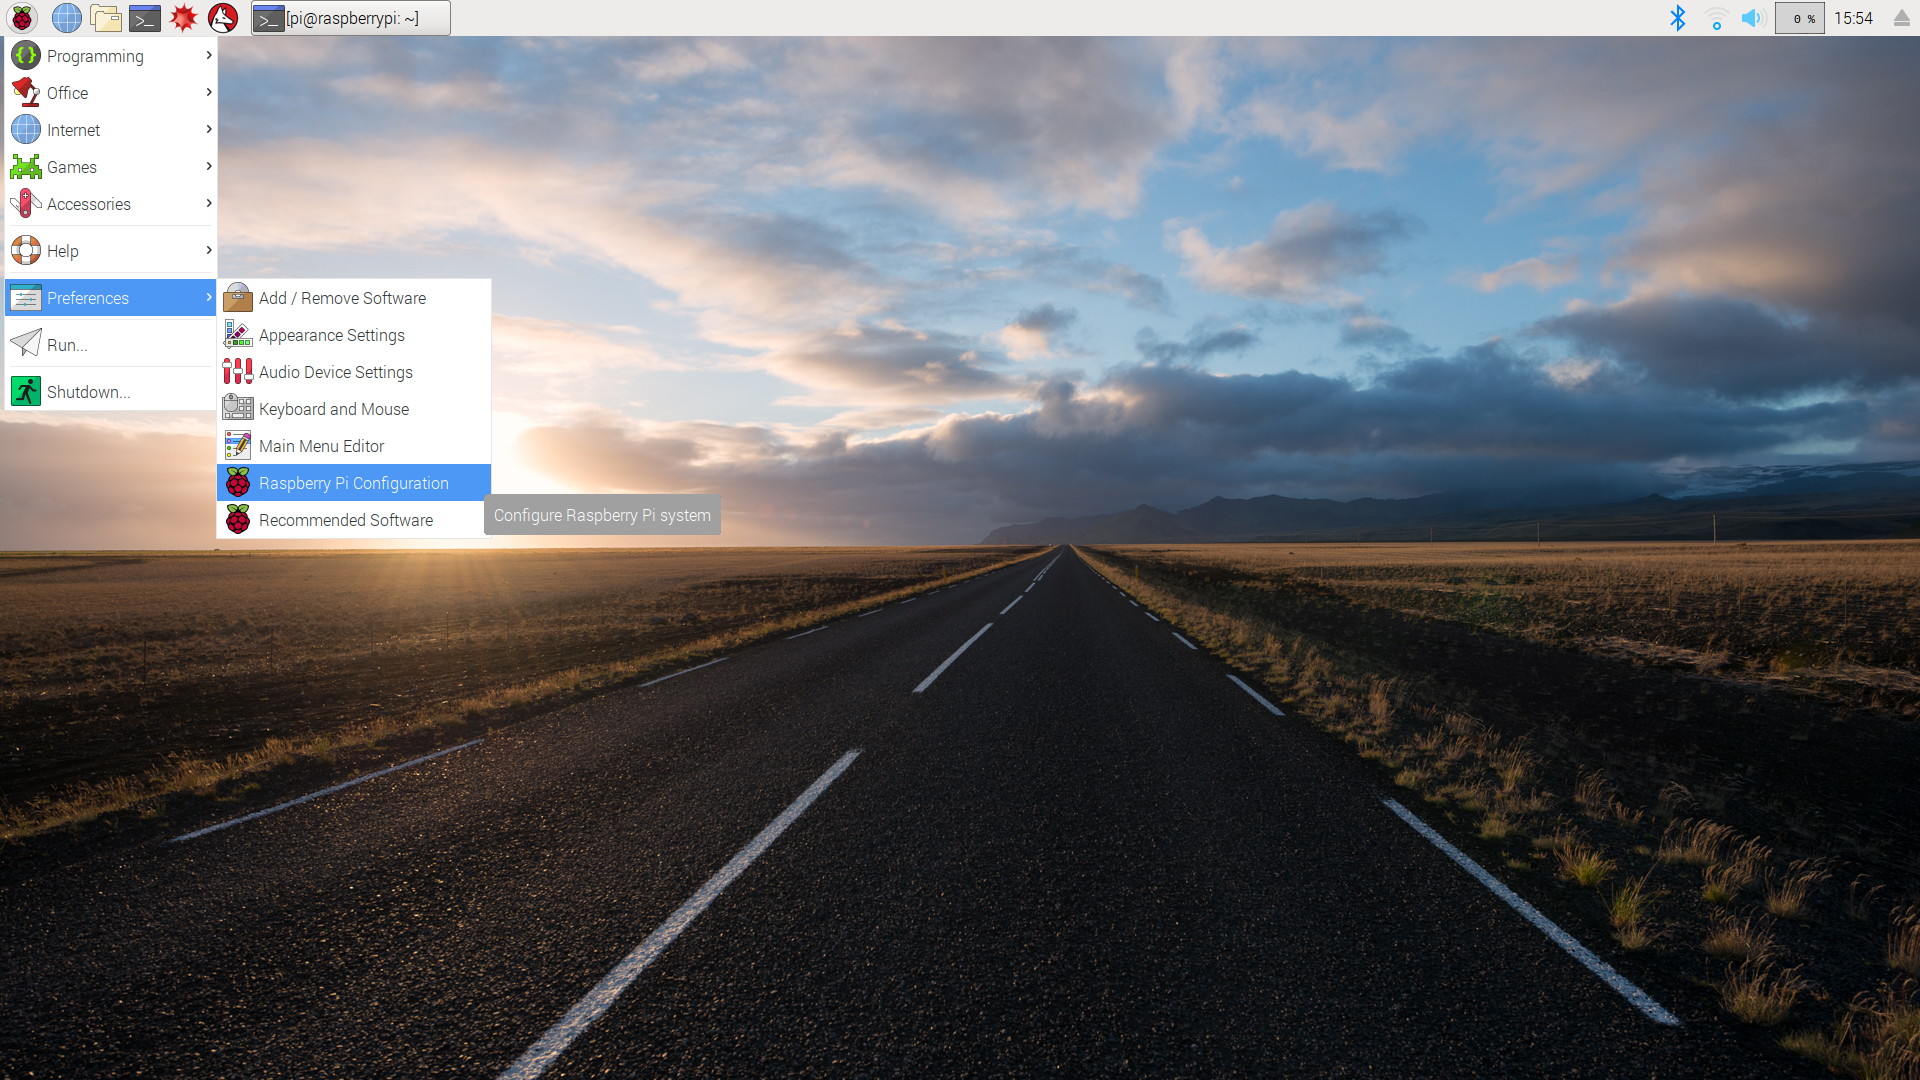
Installing Raspberry Pi Camera
In the configuration tool, select the interfaces tab and make sure the camera is enabled.
 If not enabled, enable the camera and reboot Raspberry Pi.
Taking pictures from the command line
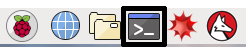
Once the camera module is installed and enabled, it’s time to test the module. The best place to test the camera module is the Raspberry Pi’s command line i.e., the Bash shell. Open the terminal window by clicking the terminal icon in the taskbar.
 For taking a picture, type the following command and press Enter.
raspistill -o Desktop/image.jpg
The above command takes a still picture using the camera module and saves it to the Desktop. The camera preview opens for five seconds when the above command runs and closes when a still picture is captured. The pictures can be saved in any other location provided the specified folder exists in the Raspberry Pi directory structure.
Capturing a video from the command line
To record a video using the camera module, type the following command and press Enter.
raspivid -o Desktop/video.h264
The above command captures a video recording and saves the recorded video to a specified folder when interrupted. Like pictures, the videos can also be saved in any location provided the specified folder exists in the Raspberry Pi directory structure. The saved videos can be played using a VLC player.
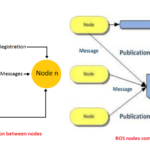
Controlling the camera module with Python
The camera module can be controlled using Python. This requires the picamera library. In Raspberry Pi 3/4, the picamera library is already installed with the IDLE or Thonny Python IDE. If the picamera library is missing, it can be installed for all users using the following commands.
$ sudo apt-get install python-picamera
Remember to upgrade the installation after installing the picamera library using the following commands.
$ sudo apt-get update
$ sudo apt-get upgrade
The picamera library can also be installed for all users using PIP.
$ pip install picamera
In a Python script, the picamera library can be imported using the following commands.
from picamera import PiCamera
For using the camera module in a Python script, an object of the picamera class needs to be instantiated as follows.
camera = PiCamera()
Testing the camera module with Python
To test the camera module with Python, the best way is to run the camera preview for some time. If the camera module is properly installed and working with the Raspberry Pi board, a red LED will blink on the camera module whenever the Raspberry Pi board is booted. The red LED remains ON when the camera is active.
Save the following Python script to a .py file and run the code to see camera preview.
from picamera import PiCamera
from time import sleep
camera = PiCamera()
camera.start_preview()
sleep(5)
camera.stop_preview()
It should be noted that the file should never be saved as picamera.py. It should also be noted that camera preview works only when a monitor is connected to the Raspberry Pi. It does not work with remote access, either SSH or VNC.
The start_preview() method starts a camera preview. When the camera preview is active, the monitor’s entire screen is occupied by the camera preview. The camera preview can be stopped from the Python code using the stop_preview() method. If you missed adding a code line to stop the camera preview, it could be stopped only by exiting the script execution. As the entire screen is occupied by the camera preview, press Ctrl+F2 to stop the code execution. This will safely exit from the camera preview.
Taking still pictures with Raspberry Pi Camera using Python
The still pictures can be taken using capture() method the picamera class. The method requires a file path to store the image with a properly specified image format. Run the following code to capture a still image using Python.
from picamera import PiCamera
from time import sleep
camera = PiCamera()
camera.start_preview()
sleep(5)
camera.capture(‘/home/pi/Desktop/image.jpg’)
camera.stop_preview()
The sleep() method must be called for at least 2 seconds before capturing the image. The camera sensor requires some time to sense the light levels. A few seconds after starting the camera preview gives the module some time to adjust to the ambient light.
The above code runs the camera preview for 5 seconds. It takes a still picture and saves it to the specified folder. The folder must exist in the Raspberry Pi directory structure, and the image name must be specified in a recognized format like jpg, jpeg, or png.
For taking multiple pictures, a for loop can be used as follows.
from picamera import PiCamera
from time import sleep
camera = PiCamera()
camera.start_preview()
for i in range(5):
sleep(5)
camera.capture(‘/home/pi/Desktop/image%s.jpg’ % i)
camera.stop_preview()
The above code opens a camera preview, takes five pictures at an interval of 5 seconds, and finally closes the camera preview.
Recording video with Raspberry Pi Camera using Python
A video can be recorded using picamera library’s start_recording() and stop_recording() methods. The start_recording method starts the recording of a video. A sleep() method can be called after it for the intended duration of the recorded video. The video recording can be stopped using stop_recording() method. Run the following code to record a video using Python.
from picamera import PiCamera
from time import sleep
camera = PiCamera()
camera.start_preview()
camera.start_recording(‘/home/pi/Desktop/video.h264’)
sleep(10)
camera.stop_recording()
camera.stop_preview()
The above code records a video using a Raspberry Pi camera for a duration of 10 seconds. The recorded video is saved to the specified location. The specified location must exist in the Raspberry Pi directory structure. The name of the video must be specified in proper file format. The picamera library supports h264 and mjpeg video formats.
Rotating the camera preview
It is possible to get a disoriented camera preview to the monitor due to the odd installation of the camera module. The camera preview can be rotated to 90˚, 180˚, and 270˚ using the rotation property of the camera object. If the camera preview is upside-down, use the following code.
camera = PiCamera()
camera.rotation = 180
Making the camera preview see-through
It is possible to make the camera preview see-through. It is useful to see the compilation errors of the code while the camera preview is active. This is done by setting the alpha level of the camera preview. It is passed as an argument to the start_preview() method. The value of an alpha parameter can be set between 0 and 255.
camera = PiCamera()
camera.start_preview(alpha=200)
Changing the brightness of the camera preview
The brightness of the camera preview can be set by altering the brightness property of the camera object. The brightness can be set between 0 and 100.
camera = PiCamera()
camera.start_preview()
camera.brightness = 70
Changing the contrast of camera preview
The contrast of the camera preview can be set by altering the contrast property of the camera object. The contrast can be set between 0 and 100.
camera = PiCamera()
camera.start_preview()
camera.contrast = 70
Changing resolution and frame rate
By default, the resolution of the captured images is set to the resolution of the monitor. The maximum resolution of still images can be 2596×1944 and for video recording is 1920×1080. The minimum resolution is 64×64. The resolution can be changed by altering the resolution property of the camera object. It should be noted if high resolution is selected, the frame rate should be reduced for proper working by altering the framerate property of the camera object.
camera = PiCamera()
camera.resolution = (2592, 1944)
camera.framerate = 15
Adding text to the images
It is possible to add text to the still images by specifying annotate_text property of the camera object.
camera = PiCamera()
camera.start_preview()
camera.annotate_text = “EEWORLDONLINE”
Changing the font and color of added text
The font size, color and background color of the added text can be changed by specifying annotate_text_size, annotate_foreground, and annotate_background properties of the camera object. For adding color to text, the color class needs to be imported from picamera as well. The text size can be set between 6 and 160. The default text size is 32.
from picamera import PiCamera, Color
from time import sleep
camera = PiCamera()
camera.start_preview()
camera.annotate_text_size = 50
camera.annotate_background = Color(‘blue’)
camera.annotate_foreground = Color(‘yellow’)
camera.annotate_text = “EEWORLDONLINE”
sleep(5)
camera.capture(‘/home/pi/Desktop/image.jpg’)
camera.stop_preview()
Changing the exposure of captured images
The exposure of the captured images can be set by altering exposure_mode property of the camera object. The default mode is auto. The supported exposure modes by the picamera library are off, auto, night, nightpreview, backlight, spotlight, sports, snow, beach, verylong, fixedfps, antishake, and fireworks.
camera = PiCamera()
camera.start_preview()
camera.exposure_mode = ‘beach’
sleep(5)
camera.capture(‘/home/pi/Desktop/beach.jpg’)
camera.stop_preview()
Run the following code to loop through all the exposure modes in the camera preview.
camera = PiCamera()
camera.start_preview()
for exmode in camera.EXPOSURE_MODES:
camera.exposure_mode = exmode
camera.annotate_text = “Exposure Mode: %s” % exmode
sleep(5)
camera.stop_preview()
Changing white balance of the image
The white balance of the captured images can be set by altering awb_mode property of the camera object. The default mode is auto. The supported white balance preset modes by the picamera library are off, auto, night, sunlight, cloudy, shade, tungsten, fluorescent, incandescent, flash, and horizon.
camera = PiCamera()
camera.start_preview()
camera.awb_mode = ‘sunlight’
sleep(5)
camera.capture(‘/home/pi/Desktop/beach.jpg’)
camera.stop_preview()
Run the following code to loop through all the white balance modes in the camera preview.
camera = PiCamera()
camera.start_preview()
for awbmode in camera.AWB_MODES:
camera. awb_mode = awbmode
camera.annotate_text = “White Balance Mode: %s” % awbmode
sleep(5)
camera.stop_preview()
Adding image effects
The picamera library also supports adding image effects to captured images. For adding an image effect, the image_effect property of the camera object needs to be altered. The supported image effects are none, negative, solarize, sketch, denoise, emboss, oilpaint, hatch, gpen, pastel, watercolor, film, blur, saturation, colorswap, washedout, posterize, colorpoint, colorbalance, cartoon, deinterlace1, and deinterlace2.
camera = PiCamera()
camera.start_preview()
camera.image_effect = ‘oilpaint’
sleep(5)
camera.capture(‘/home/pi/Desktop/beach.jpg’)
camera.stop_preview()
Run the following code to loop through all the image effects in the camera preview.
camera = PiCamera()
camera.start_preview()
for effect in camera.IMAGE_EFFECTS:
camera.image_effect = effect
camera.annotate_text = “Effect: %s” % effect
sleep(5)
camera.stop_preview()
Conclusion
Raspberry Pi Camera Module is really fun. The picamera library is well-written and powerful. It allows taking pictures, recording videos, streaming videos, streaming videos to a network, and even image processing with openCV. The camera module is easy to install and get started with endless possibilities of making many exciting things.
You may also like:


Filed Under: Featured Contributions, Python, Raspberry pi

Questions related to this article?
👉Ask and discuss on Electro-Tech-Online.com and EDAboard.com forums.
Tell Us What You Think!!
You must be logged in to post a comment.