In this article, we will learn how to control our IoT home appliances using the messaging app WhatsApp to easily and effectively communicatie with those devices.
So we will be sending WhatsApp messages to a number of “lights on,” and lights at our house will turn ON.
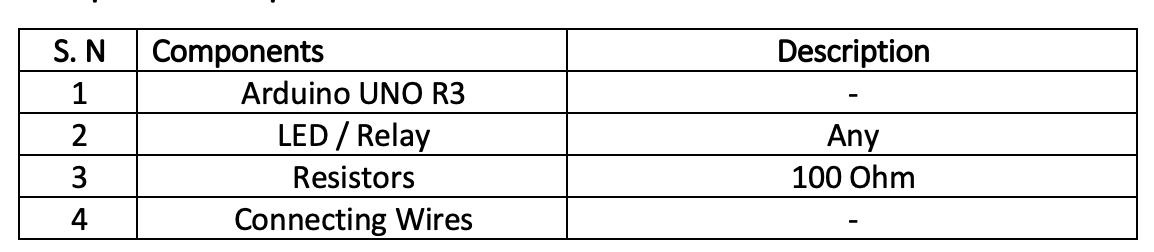
Components required
 Tools Required/ libraries required:
- WhatsApp API library – Yowsup
- Python-based Serial communication library – pyserial
- Linux Based machine
- Arduino IDE
Technical Insights
To control anything from the internet, we will need a protocol. WhatsApp works on XMPP (Extensible Messaging and Presence Protocol). We will be using its API to send and receive messages. The received messages will work as commands for a specific task like turning the light ON/OFF.
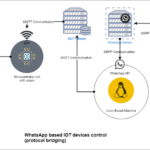
Block Diagram
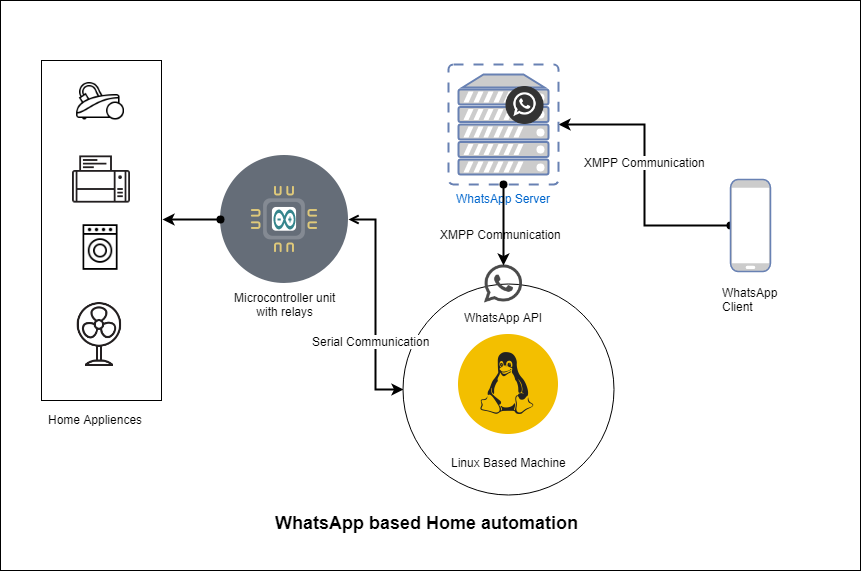
Figure 1 WhatsApp based home automation
- Home appliances are connected with a relay to a microcontroller which controls them when specific ON/OFF command is received using serial communication.
- The microcontroller (Arduino UNO 3 board) is connected to a Linux-based system using serial communication.
- A WhatsApp API (Yowsup) is installed in the system with a phone number. Which can send and receive messages from WhatsApp.
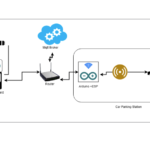
Circuit Diagram
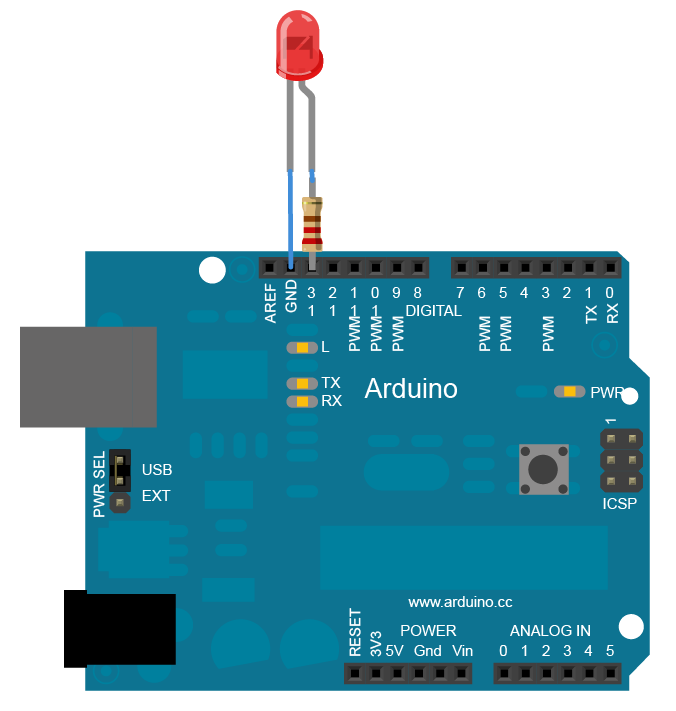
Figure 2 LED connected to Arduino Uno
How the system works?
- When someone sends a message to the number at which the WhatsApp is installed in the Linux system.
- The message is received in the system through a Python script running a message receiving the script and analyzed for commands like “turn lights on/off”.
- When any command is matched with the predefined commands, the script sends that command to the microcontroller connected to the serial communication port.
- If “turn lights on” command is received in a message, the script understands that it is to turn the light on, so it will send the “ON” command to the microcontroller through serial communication. The controller will turn the light on by turning the relay on.
IoT devices do not directly support the WhatsApp API, so the data must be transferred from one protocol to another. In the next article, “Protocol bridging”, we will see how to redirect messages sent from WhatsApp to MQTT.
Installing the WhatsApp API in Linux
Step 1 – Preparing the system
This API works on python, so we need to set the environment first to install it in the system. We can do that by entering the following command in the terminal.
Sudo apt-get update
sudo apt-get install python-dateutil
sudo apt-get install python-setuptools
sudo apt-get install python-dev
sudo apt-get install libevent-dev
sudo apt-get install ncurses-dev
Step 2 – Downloading the API
Type the following command in the terminal.
git clone git://github.com/tgalal/yowsup.git
Now go to the folder youwsup and type the following to install it into the system
sudo python setup.py install
now we have installed that in our system it’s time for registering the WhatsApp number.
Note- Only one number per device is allowed in WhatsApp, so you need a new number to install WhatsApp in Linux.
Step 3 – Setting up the API
- The Yowsup API comes with a command-line utility used for registration.
- To register the phone number, we need to download WhatsApp latest APK and do some stuff which is as followed.
- We need to download the latest version of WhatsApp and calculate some MD5 hash and write them to a file in WhatsApp API. So, WhatsApp does not crash and asks for an update.
- To do so follow the steps.
- Download this file – py
- Download WhatsApp – apk
- Put them in a folder and type the following command
python dexMD5.py WhatsApp.apk
- You will see the following output
Version: 2.17.344
ClassesDex: OxVSHnBDYNBZmsgagatF9+A==
- Now write Version and ClassessDex values to a file inside the API location
yowsup/env/env_android.py
- Now type the following command to reinstall API
python setup.py build
python setup.py install
Step 4. – Registering the user
4.1 – Getting the verification code
Now comes the registration with the WhatsApp server, which can be done by the command-line utility “yowsup-cli”, by using the following command.
python yowsup-cli registration –requestcode sms –phone 91xxxxxxxxxx –cc 91 –mcc 222 –mnc 10 -E android
Enter your phone number at 91XXXXXXXXX
The codes MCC and MNC can be found at this link – http://www.mcc-mnc.com
After entering the following command, you will receive a message with a verification code of 6 digits. Keep that number stored. It will be used in the next step.
4.2 – Getting password for login
To login to WhatsApp, we will need a password string, a base64 string. We can obtain that by replacing the xxx-xxx with the six-digit number.
python yowsup-cli registration –register xxx-xxx –phone 91xxxxxxxxxx –cc 91 -E android
After this you will see output like this
status: ok
kind: free
pw: xxxxxxxxxxxxxxxxxx= #this is the password
price: ₹ 55
price_expiration: 1509040085
currency: INR
cost: 55.00
expiration: 4444444444.0
login: 91xxxxxxxxxx
type: new
With this installation, we got two things: a phone number at which our API is installed and a password for login. Keep them stored.
Note – Phone number must be used with country code
Phone – 91XXXXXXXX
Password – Gbuioa254ui25j2=XXXXX
Developing the source code
To develop the code for automation, we have to go through how the API can be called. Also, we need to write a small script in Arduino to control the relay/led. There can be following steps to understand how the source code works.
Linux System Code
This side we will implement these features.
- Understanding the architecture of the API
- Calling the API
- Controlling the Appliances
Understanding the API architecture
The Yowsup python app works on stacks of layers. Data can be transferred from layer to layer.
If we want to send a message, we will push that message to the lower layer.
self.toLower(outgoingMessageProtocolEntity)
If you want to receive messages, they will be accessed from the top layer, which will be the current layer of the stack.
Calling the API
To call the API we will be making two python scripts. One will be to pass the object like username and passwords in the stack and start the stacking. The second will be our main message receiving layer on which we will receive messages and perform the tasks.
So, the two files will be run.py and layer.py
Understanding File Run.py
- We will call our libraries at the top of the file
from yowsup.stacks import YowStackBuilder
from yowsup.layers.auth import AuthError
from yowsup.layers import YowLayerEvent
from yowsup.layers.network import YowNetworkLayer
from yowsup.env import YowsupEnv
- We will also attach the layer file on the top because the main class “Echolayer” exists inside that file.
from layer import EchoLayer
- We can name the layer file anything, but we have to put the same name here.
- Inside the py, we will declare our main variable for password and events we want to occur.
credentials = (“91xxxxxxxxxx”, “HkhWVW5/Wnr493HXK8NKl/htpno=”)
- Now we pass them to the layer and build the stack. Also, the loop which will keep the connection live is called.
stack.setCredentials(credentials) stack.broadcastEvent(YowLayerEvent(YowNetworkLayer.EVENT_STATE_CONNECT)) #sending the connect signal
stack.loop() #this is the program mainloop
Understanding File layer.py
This file contains the class which will receive any messages incoming to this number, and that will be a callback entity so any other loop can be run inside the file.
@ProtocolEntityCallback(“message”)
def onMessage(self, messageProtocolEntity):
if True:
Message data and the number from which the message arrived can be obtained using the following.
incomming_message_data = messageProtocolEntity.getBody()
This will get the message body which is the real message. It will store in a string variable “incomming_message_data”
incomming_message_sender = messageProtocolEntity.getFrom()
This line will store incoming message contact number in the string variable “incomming_message_sender”
By using those two values, we can do anything one receiving any specific message or from a specific number. This function will always keep receiving the data when arrived.
Below is how we will use them to make our home automation project.
Controlling the Appliances
To control the home appliances, we need to write a code that can interact with the code written in Arduino.

We will use this simple approach in which we will write a code in Arduino that can control a pins output when such commands are received.
We now open the serial port for communicationSo, in the code we will import our “pyserial” library.
import serial
ser = serial.Serial(port, baud, timeout=1)
To turn any pins on or off in Arduino, we need to send data on serial. Also, first, we need to read the incoming message from WhatsApp.
elif(“lights on” in incomming_msg):
ser.write(“on”.encode(‘ascii’))
This line says if there is “lights on” in the string “incoming_msg” (which is the message we received), then send the string “on” at the serial port.
The rest can be understood from inside the Arduino code.
For sending the message back to WhatsApp, we will use this line,
outgoingMessageProtocolEntity = TextMessageProtocolEntity(message_send,to = sender_jid)
Hardware Code (Arduino)
In the Arduino, we will simply write a code that listens for incoming strings at the serial port, and then if it says “on,” turn a pin at which the LED is connected HIGH, or if it says “off,” turn the LED pin LOW.
If(Serial.available()){
String data = Serial.readString();
if(data == “on”){
digitalWrite(13,HIGH);
}
Else if(data == “off”){
digitalWrite(13,LOW);
}
}
This is how our automation code works. To learn more about XMPP read our previous articles.
Note:
- Do not use WhatsApp API (Yowsup) with Raspbian OS, or your number will get banned from using WhatsApp. Install it in Ubuntu or any other Linux distribution.
- WhatsApp from one number can be installed on only one device at a time.
- Message sending frequency must not be fast like 30 messages in a minute is the limit you can go, above that there are chances that your number might get blocked from WhatsApp.
You may also like:


Filed Under: Electronic Projects, Featured

Questions related to this article?
👉Ask and discuss on EDAboard.com and Electro-Tech-Online.com forums.
Tell Us What You Think!!
You must be logged in to post a comment.