Engineers Garage

  • Electronic Projects & Tutorials
    • Electronic Projects
      • Arduino Projects
      • AVR
      • Raspberry pi
      • ESP8266
      • BeagleBone
      • 8051 Microcontroller
      • ARM
      • PIC Microcontroller
      • STM32
    • Tutorials
      • Complete Sensor Guide
      • Engineering Deep Dives
      • AI
      • ARDUINO Compatible Coding
      • Audio Electronics
      • Battery Management
      • Beginners Electronics Series
      • Brainwave
      • Digital electronics (DE)
      • Electric Vehicles
      • EMI/EMC/RFI
      • EVs
      • Hardware Filters
      • IoT tutorials
      • LoRa/LoRaWAN
      • Power Tutorials
      • Protocol
      • Python
      • RPI Python Programming
      • Sensors
      • USB
      • Thermal management
      • Verilog
      • VHDL
    • Circuit Design
    • Project Videos
    • Components
  • Articles
    • Tech Articles
    • Insight
    • Invention Stories
    • How to
    • What Is
  • News
    • Electronic Product News
    • Business News
    • Company/Start-up News
    • DIY Reviews
    • Guest Post
  • Forums
    • EDABoard.com
    • Electro-Tech-Online
    • EG Forum Archive
  • DigiKey Store
    • Cables, Wires
    • Connectors, Interconnect
    • Discrete
    • Electromechanical
    • Embedded Computers
    • Enclosures, Hardware, Office
    • Integrated Circuits (ICs)
    • Isolators
    • LED/Optoelectronics
    • Passive
    • Power, Circuit Protection
    • Programmers
    • RF, Wireless
    • Semiconductors
    • Sensors, Transducers
    • Test Products
    • Tools
  • Learn
    • Design Guides
    • Learning Center
    • Tech Toolboxes
    • Tech Terms
    • Webinars & Digital Events
  • Resources
    • EE Training Days
    • LEAP Awards
    • Podcasts
    • White Papers
  • Guest Post Guidelines
  • Advertisers
    • Advertise
    • PR Submissions
    • Eblast Submissions
  • Subscribe

Multitasking on Raspberry Pi using Execve and Fork Commands -(Part 15/38)

By Ajish Alfred September 6, 2013

The advantage of having an Operating System running on a microcontroller board other than simple embedded c code is Multitasking. The Raspberrypi is a microcontroller board which is powerful enough to run large operating systems like Linux, Mac and Windows. The Raspberrypi is a microcontroller board which runs on a SoC chip from the Broadcom with ARM11 processor at the core. The Board is a mini computer itself without any input or output devices but ports provided to connect them.

The Raspberrypi is called a mini-computer because the SoC has the powerful ARM11 processor which runs on 700 MHz at its core and having the peripherals like timers, interrupt controller, GPIO, PCM / I2S, DMA controller, I2C, SPI slave, PWM, UART, USB, graphical processing unit (GPU) which includes VideoCore, MPEG-2 and MPEG-4 and a 512 MB SDRAM. There is an Ethernet port which can be used to connect the board to a computer network. Those who don’t want to use a HDTV and separate keyboard and mouse for the Rspberrypi board can plug the board using a LAN cable to the Ethernet port of the PC and do remote access in TUI or GUI mode.

Linux operating systems especially Ubuntu is preferred for all kind of programming and development. The operating systems like Archlinux ARM, OpenELEC, Pidora, Raspbmc, RISC OS and the Raspbian and also Ubuntu versions are available for the Raspberrypi board. This article discusses how to perform Single User Multitasking in a Raspberrypi board by executing a single C code with the help of fork () and execve () functions. 


The term ‘Process’ refers to the piece of code which is currently in execution. The fork () is a function which can be used in the C code to start a new process as a ‘Child process’. The process or the code which is in execution which makes a call to the function fork () is called the ‘Parent process’ and the new process created by the fork () is called a ‘Child process’. The ‘Parent process’ and the ‘Child process’ executes parallel (high speed processor makes it feel like parallel processing) and independently and thus achieves multi-tasking. The fork () most of the time uses the execve () function to create a new process as Child.

In this project the Raspberrypi board is loaded with Ubuntu and is remotely accessed using VNC. The Raspberrypi board is also connected to the internet. There are 26 connectors which can be taken out from the connector port of the Raspberrypi board. All the connector pins are taken out using 13*2 pin female connectors and at the other end of their wire 26 pin Burg stick male connectors are attached. The Burg stick male connectors allow each pin out from the Raspberrypi board to be plugged into the holes of a breadboard.  To access the pins that coming out of the Broadcom controller of the Raspberrypi board using C language, a C library is available called “bcm2835” which has been downloaded and installed.

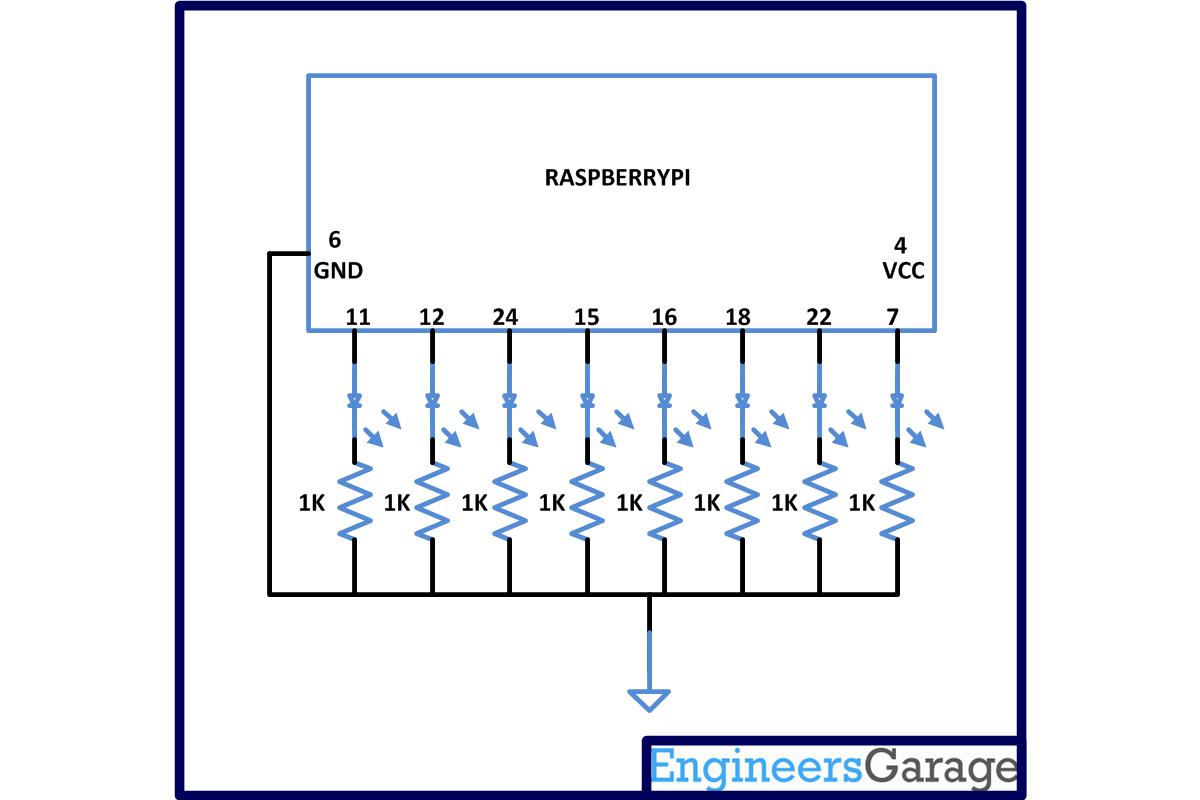
There are eight general purpose IO pins on the 13*2 pin connectors of the Raspberrypi board and to each one of them a LED is connected through 1K resistor. Separate code has been written to blink the LEDs individually and made them into executable files named blink2, blink3, blink4, blink5, blink6, blink7 and blink8. It is suggested to keep all the .c files and the executable files in a single folder for this particular project.

The user can run any of the LED blinking programs from the command line. For example to execute the file ‘blink1’, the user can use the following command;


./blink1

The user can perform multi-tasking on them by entering the following commands one after the other. The user can perform multi-tasking with the eight LED codes by entering the following eight commands one after the other.

 ./blink1 &

./blink2 &

./blink3 &

./blink4 &

./blink5 &

./blink6 &

./blink7 &

./blink8 &

All the above process can be generated as ‘Child processes’ of a single ‘Parent process’ with the help of fork () and execve () functions.

fork ()

As far as a Parent process is concerned it simply executes the code from top to bottom including the fork () statements. As soon as the fork () function is called a new Child process is created which starts executing the following statements from the point where the fork () is being called. The process is called a Child process because it is identical to the Parent process in terms of memory like the variables, functions etc. The Child is but independent from the Parent as it has its own process id, and the memory is not shared with the Parent process.

The fork is a function which takes no argument but has two return values unlike most of the C functions. When the Parent calls the fork (), it always returns a positive value on success. The positive value is the process id of the newly created Child process. The Child process however get a value ‘0’ from the same fork () function call. This is very helpful to limit the execution of Child process to a particular area of the main code which the Parent executes, with the help of conditional statements. The idea is to keep the entire child process inside a condition;

if ( !fork () )

{

            // execute a process here using execve //

            _exit ( 0 );

}

else;


The Parent process reads the condition as false and does not execute the process inside the if condition, but the Child process reads this condition as true and execute the process inside the condition as child and after execution the Child process simply exits.

To execute the ‘blink1’, ‘blink2’ … ‘blink8’ etc. as Child processes of a main process simply open up a new .c file in vim editor  and write down the following simple code;


#include <unistd.h>

int main ( void )

{

            if ( !fork () )

            {

                        execve ( “./blink1”, 0, 0 );       

                        _exit ( 0 );

            }

            else;


            if ( !fork () )

            {

                        execve ( “./blink2”, 0, 0 );       

                        _exit ( 0 );

            }

            else;


// similarly create other child process from blink3 to blink7 //


            if ( !fork () )

            {

                        execve ( “./blink8”, 0, 0 );       

                        _exit ( 0 );

            }

            else;


}


Save this file with a name, say “fork_blink_all.c” and then compile them into an executable file “fork_blink_all”.

To execute the code use the following command;

./fork_blink_all

Use the following command to view all the process with their process id, which are currently in execution;

ps -e

*** Make sure that all the executable files blink1, blink2 etc. are there in the same folder with the executable file “execve_blink_all”.

***Note that in this project the latest version of library “bcm2835” is used with an old version of Raspberrypi board. It is not possible to access the pin number 13 of the old board with the latest library version and hence in the code “blink3.c” the pin number 24 is used to blink the 3rd LED. The circuit diagram is also drawn accordingly. Those who have the latest version of the board can use the pin 13 without any trouble.

To find the ‘Revision’ and other important details about the Raspberrypi board, use the following command;

cat /proc/cpuinfo

*******************************************************************************
Note:
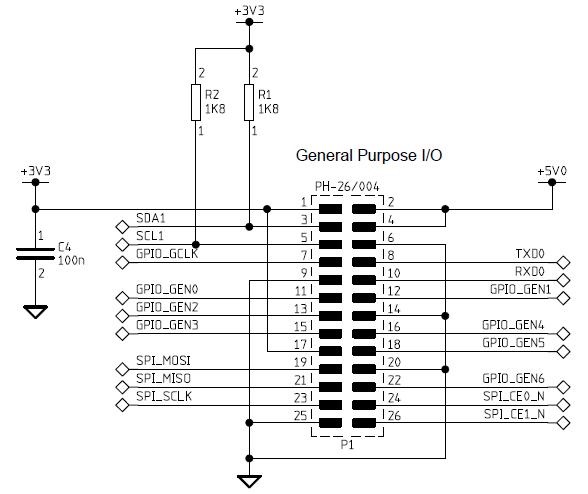
In this project the Raspberrypi board version 2 is used, but a previous version of the “bcm2835” library is installed. Accessing the GPIO pin 13 is not possible with this library and hence the 3rd IO pin is selected as pin24 of the P1 port of the Raspberrypi. The circuit and the code are modified accordingly. Those who have the version 2 of the Raspberrypi and the latest version of the “bcm2835” library can use the GPIO pin 13 using “RPI_V2_GPIO_P1_13” instead of “RPI_GPIO_P1_13” in the pin definition.
For example to define a ‘PIN’ as 13th pin of P1 port of Raspberrypi board version2, use the following statement in the code;
#define PIN RPI_V2_GPIO_P1_13


*******************************************************************************

Circuit Diagrams

Circuit-Diagram-Multitasking-Raspberry-Pi-using-Execve-Fork-Commands

Project Components

  • LED
  • Resistor

Project Video


Filed Under: Raspberry pi
Tagged With: execve, fork, Raspberry Pi
 

Next Article

← Previous Article
Next Article →

Questions related to this article?
👉Ask and discuss on Electro-Tech-Online.com and EDAboard.com forums.


Tell Us What You Think!! Cancel reply

Log in to leave a comment:

Lost your password?

Don't have an account? Register here

Submit a Guest Post

submit a guest post

EE TECH TOOLBOX

“ee
Tech Toolbox: Wide Bandgap Semiconductors
Moving from silicon to GaN or SiC feels like a whole new ballgame, doesn’t it? It isn’t just about faster switching; it’s about managing the layout parasitics and thermal realities that come with that speed. This month’s Tech Toolbox features a curated eBook that tackles these design hurdles head-on.

EE Learning Center

EE Learning Center
“engineers
EXPAND YOUR KNOWLEDGE AND STAY CONNECTED
Get the latest info on technologies, tools and strategies for EE professionals.

HAVE A QUESTION?

Have a technical question about an article or other engineering questions? Check out our engineering forums EDABoard.com and Electro-Tech-Online.com where you can get those questions asked and answered by your peers!


RSS feed: EDABOARD.com Discussions. EDABOARD.com Discussions.

  • Odd shape board is expensive
  • Power Engineers - What ECAD software you use?
  • Linear regulator eLoad using wired FET
  • What do they connect Y capacitors to in ships?
  • Built an FPGA-based all-in-one bench instrument (scope, AWG, logic analyzer, PSU, VNA, DMM). Looking for feedback on the design

RSS feed: Electro-Tech-Online.com Discussions Electro-Tech-Online.com Discussions

  • Coin Battery Case 261104
  • How Can You Identify the Main Causes of Noise in an Analogue Circuit?
  • Best way to check charge and discharge many mixed batteries?
  • Heater Circuit
  • Microchip PICDEM Lab Development Board

Featured Tutorials

LoRa and LoRaWAN: A Complete Guide to Wireless Communication

  • Best practices for securing LoRa networks
    Best practices for securing LoRa networks
  • Understanding LoRa architecture: nodes, gateways, and servers
    Understanding LoRa architecture: nodes, gateways, and servers
  • Revolutionizing RF: LoRa applications and advantages
    Revolutionizing RF: LoRa applications and advantages
  • How to build a LoRa gateway using Raspberry Pi
    How to build a LoRa gateway using Raspberry Pi
  • How LoRa enables long-range communication
    How LoRa enables long-range communication
  • How communication works between two LoRa end-node devices
    How communication works between two LoRa end-node devices
More Tutorials >

Recent Articles

  • pSemi adds wideband RF switch
  • Infineon launches RISC-V MCU platform
  • Würth Elektronik adds compact common-mode chokes
  • Intepro Systems adds regenerative grid simulator
  • Bourns adds four-terminal shunt resistors

EE ENGINEERING TRAINING DAYS

engineering
Engineers Garage
  • Analog IC TIps
  • Connector Tips
  • Battery Power Tips
  • EDABoard Forums
  • EE World Online
  • Electro-Tech-Online Forums
  • EV Engineering
  • Microcontroller Tips
  • Power Electronic Tips
  • Sensor Tips
  • Test and Measurement Tips
  • 5G Technology World
  • Subscribe to our newsletter
  • About Us
  • Contact Us
  • Advertise

Copyright © 2026 Arrowfly LLC. All Rights Reserved. The material on this site may not be reproduced, distributed, transmitted, cached or otherwise used, except with the prior written permission of Arrowfly
Privacy Policy

Search Engineers Garage

  • Electronic Projects & Tutorials
    • Electronic Projects
      • Arduino Projects
      • AVR
      • Raspberry pi
      • ESP8266
      • BeagleBone
      • 8051 Microcontroller
      • ARM
      • PIC Microcontroller
      • STM32
    • Tutorials
      • Complete Sensor Guide
      • Engineering Deep Dives
      • AI
      • ARDUINO Compatible Coding
      • Audio Electronics
      • Battery Management
      • Beginners Electronics Series
      • Brainwave
      • Digital electronics (DE)
      • Electric Vehicles
      • EMI/EMC/RFI
      • EVs
      • Hardware Filters
      • IoT tutorials
      • LoRa/LoRaWAN
      • Power Tutorials
      • Protocol
      • Python
      • RPI Python Programming
      • Sensors
      • USB
      • Thermal management
      • Verilog
      • VHDL
    • Circuit Design
    • Project Videos
    • Components
  • Articles
    • Tech Articles
    • Insight
    • Invention Stories
    • How to
    • What Is
  • News
    • Electronic Product News
    • Business News
    • Company/Start-up News
    • DIY Reviews
    • Guest Post
  • Forums
    • EDABoard.com
    • Electro-Tech-Online
    • EG Forum Archive
  • DigiKey Store
    • Cables, Wires
    • Connectors, Interconnect
    • Discrete
    • Electromechanical
    • Embedded Computers
    • Enclosures, Hardware, Office
    • Integrated Circuits (ICs)
    • Isolators
    • LED/Optoelectronics
    • Passive
    • Power, Circuit Protection
    • Programmers
    • RF, Wireless
    • Semiconductors
    • Sensors, Transducers
    • Test Products
    • Tools
  • Learn
    • Design Guides
    • Learning Center
    • Tech Toolboxes
    • Tech Terms
    • Webinars & Digital Events
  • Resources
    • EE Training Days
    • LEAP Awards
    • Podcasts
    • White Papers
  • Guest Post Guidelines
  • Advertisers
    • Advertise
    • PR Submissions
    • Eblast Submissions
  • Subscribe