Engineers Garage

  • Electronics Projects and Tutorials
    • Electronic Projects
      • Arduino Projects
      • AVR
      • Raspberry pi
      • ESP8266
      • BeagleBone
      • 8051 Microcontroller
      • ARM
      • PIC Microcontroller
      • STM32
    • Tutorials
      • Audio Electronics
      • Battery Management
      • Brainwave
      • Electric Vehicles
      • EMI/EMC/RFI
      • Hardware Filters
      • IoT tutorials
      • Power Tutorials
      • Python
      • Sensors
      • USB
      • VHDL
    • Circuit Design
    • Project Videos
    • Components
  • Articles
    • Tech Articles
    • Insight
    • Invention Stories
    • How to
    • What Is
  • News
    • Electronic Product News
    • Business News
    • Company/Start-up News
    • DIY Reviews
    • Guest Post
  • Forums
    • EDABoard.com
    • Electro-Tech-Online
    • EG Forum Archive
  • DigiKey Store
    • Cables, Wires
    • Connectors, Interconnect
    • Discrete
    • Electromechanical
    • Embedded Computers
    • Enclosures, Hardware, Office
    • Integrated Circuits (ICs)
    • Isolators
    • LED/Optoelectronics
    • Passive
    • Power, Circuit Protection
    • Programmers
    • RF, Wireless
    • Semiconductors
    • Sensors, Transducers
    • Test Products
    • Tools
  • Learn
    • eBooks/Tech Tips
    • Design Guides
    • Learning Center
    • Tech Toolboxes
    • Webinars & Digital Events
  • Resources
    • Digital Issues
    • EE Training Days
    • LEAP Awards
    • Podcasts
    • Webinars / Digital Events
    • White Papers
    • Engineering Diversity & Inclusion
    • DesignFast
  • Guest Post Guidelines
  • Advertise
  • Subscribe

How to build a LoRa gateway using Raspberry Pi

By Ayush Jain September 15, 2024

As its name suggests, long-range wide-area network or LoRaWAN technology is widely used for long-range, low-power communication in Internet-of-things (IoT) applications.

In this article, we’ll guide you through the process of connecting an SX130x 868M LoRaWAN Gateway Module to a Raspberry Pi 4 using hardware attached on top (HAT). This setup creates a LoRaWAN gateway, allowing Raspberry Pi (RPi) to communicate with LoRaWAN-enabled devices.

 What’s required

  • Raspberry Pi 4 (Model B or higher is recommended) – link
  • The SX130x 868M LoRaWAN Gateway Module – link
  • A LoRa antenna that’s compatible with the module – and comes with SX1302
  • A MicroSD card with Raspbian OS installed (instructions below) – 32 GB
  • An SD card reader
  • Power supply for Raspberry Pi – Link
  • An Internet connection

Step 1. Gather the hardware
Before starting, You’ll need all required hardware components, including Raspberry Pi 4, the SX130x 868M LoRaWAN Gateway Module, a LoRa antenna, and a functional MicroSD card with Raspbian OS.

Step 2. Assemble the hardware
Insert the MicroSD card into Raspberry Pi (after RPi is installed — see Step 3 for instructions)

Attach the SX130x LoRaWAN Gateway Module to Raspberry Pi’s GPIO pins. Make sure the pins align correctly and the module is securely attached. It’s a HAT, so it should fit perfectly. 

Figure 1. The assembled hardware between the SX130x LoRaWAN Gateway Module and the Raspberry Pi’s GPIO pins.

Step 3. Install Raspberry Pi with OS
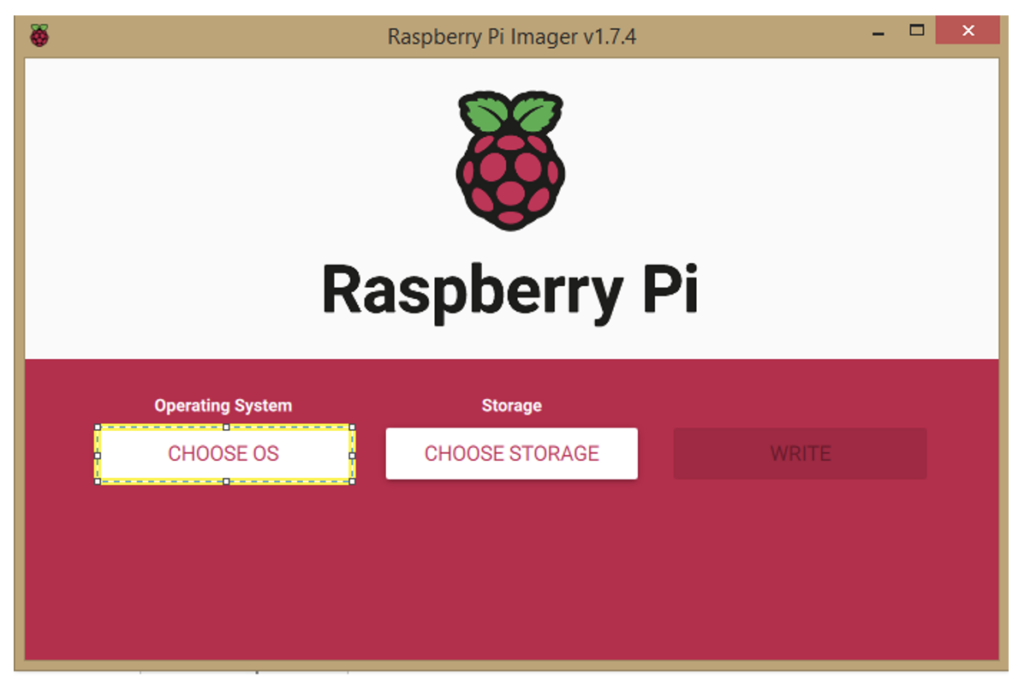
Install Raspberry Pi Imager Software by using this link to download the software for installation on Windows.

Figure 2. The Raspberry Pi Imager Software

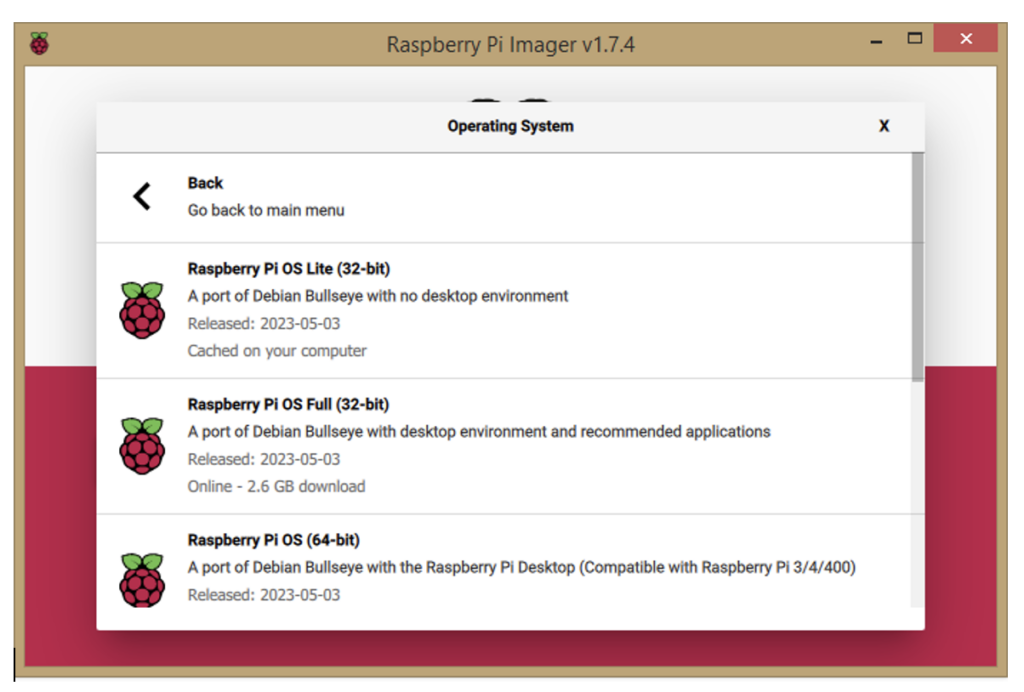
Click on ‘CHOOSE OS.’

Figure 3. Select ‘OS’ from the Imager Software.

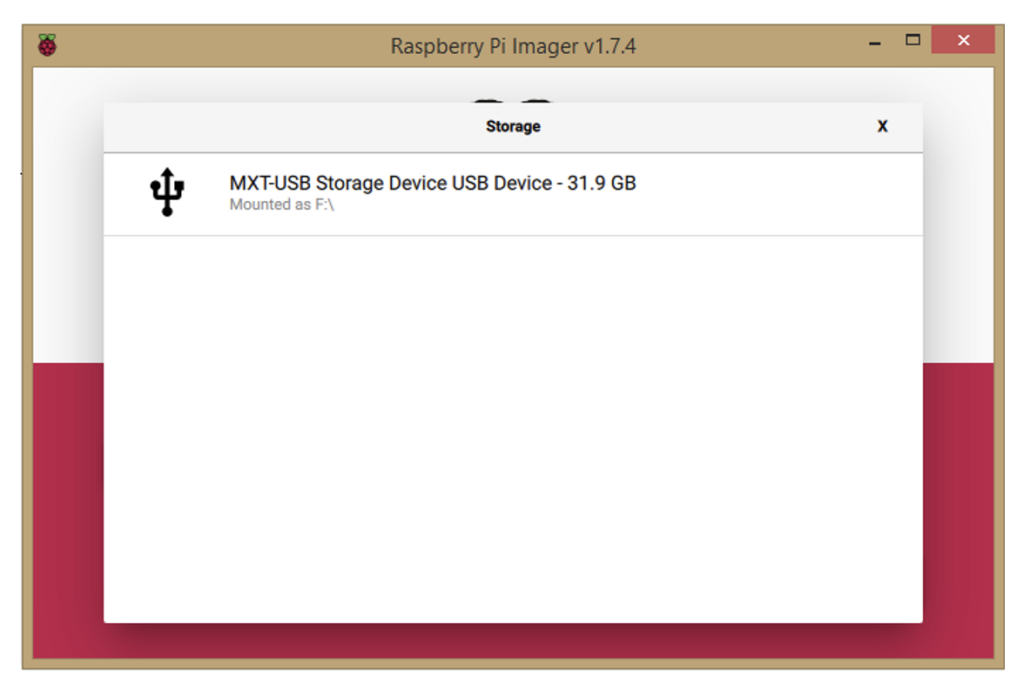
Choose the OS Lite version (32-bit), and then choose the Storage Device option in the next step.

Figure 4. Select the Storage Device option.

Next, insert the SD card into your computer using the SD card reader. Select the displayed SD card. Be sure to click on the gear icon before clicking on the ‘Write’ button.
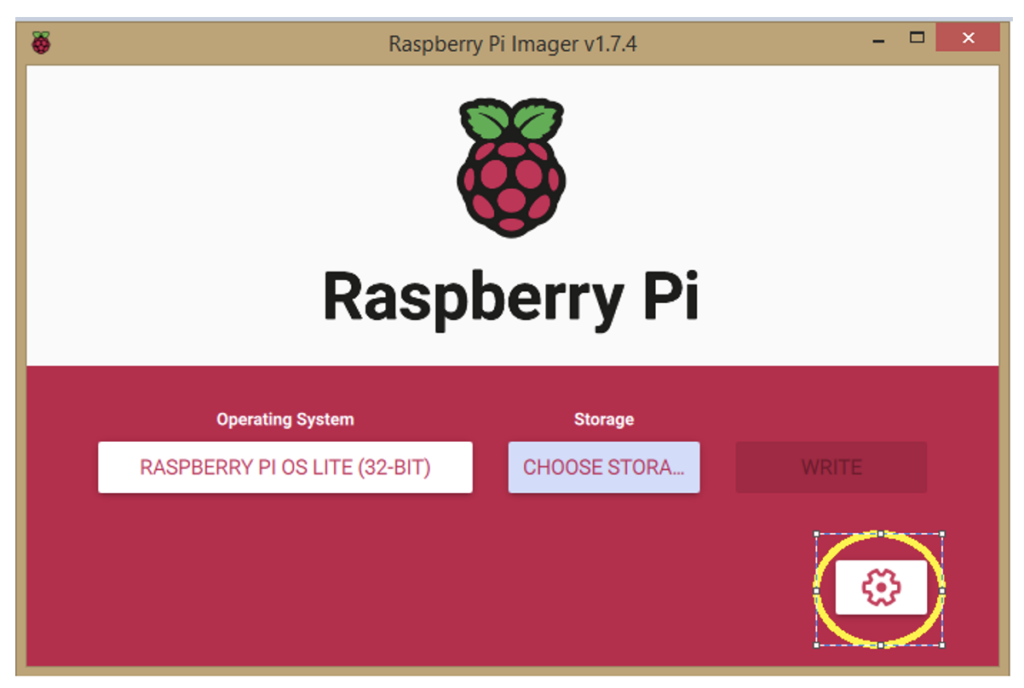
Figure 5. Use the gear button to change the Wi-Fi setting and other options. Then, click on the ‘Write’ image.

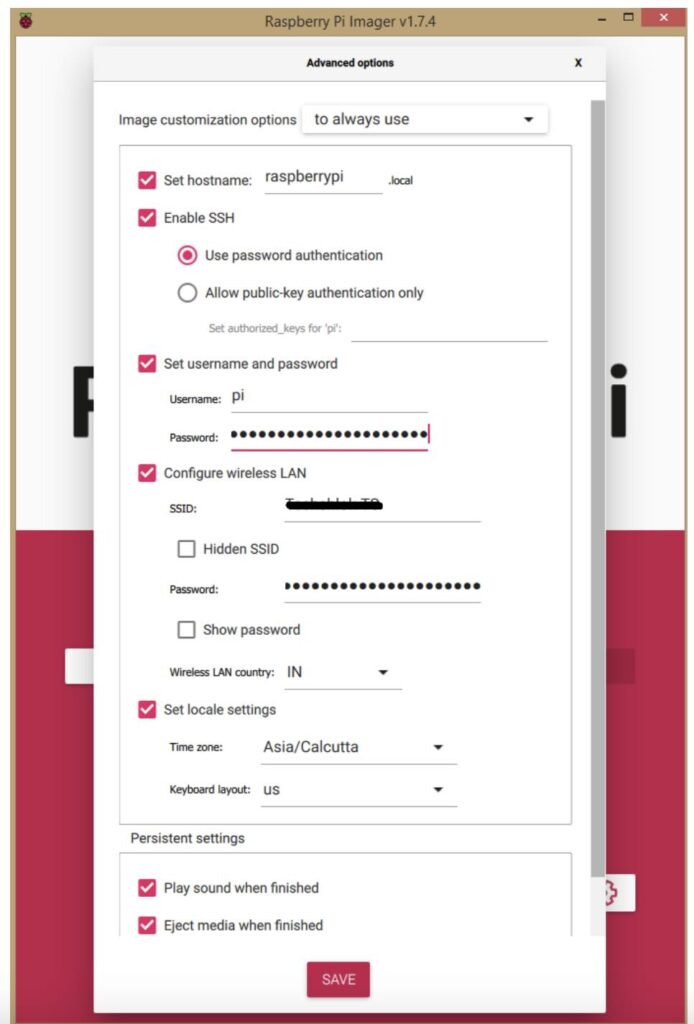
Now, change the settings to Wi-Fi and other options. Then, click on ‘Enable SSH’ and set your username and password. Click on the ‘Configure wireless LAN,’ and enter your Wi-Fi’s SSID and password. This allows RPi to boot without connecting it to a desktop screen.

Figure 6. Add your Wi-Fi’s SSID and password.

Click on the ‘Save’ and then the ‘Write’ buttons. Wait for the process to complete, and once finished, remove the SD card from your current device and insert it into Raspberry Pi.

Step 4. Connect Raspberry Pi using SSH
After assembling and inserting the SD card, power on the Raspberry Pi. Follow the following instructions to establish an SSH connection.

Figure 7. The power is on after connecting RPi using SSH.

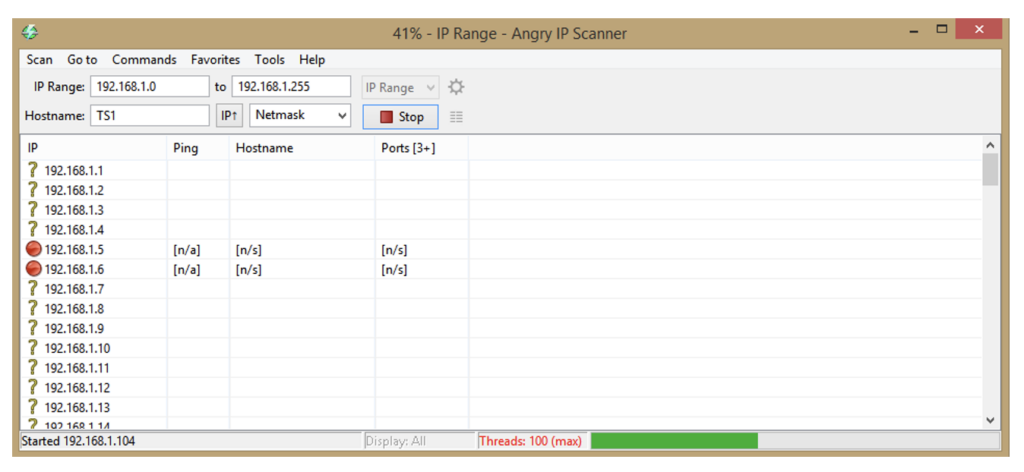
Determining the IP address of the RPi is necessary for establishing a connection. To do so, download the Angry IP Scanner: link

Figure 8. The Angry IP software.

After clicking on ‘Start,’ the below screen will appear. Once the process is complete, locate the IP address with the host name “Raspberry pi.” You can also find the proper information in the DHCP section of your router’s configuration page.

Figure 9. The IP scanning process.

In our case, the IP address is 192.168.1.4. However, in your case, it will be different. Next, download the software bitvise ssh: link

Launch the software and login to the IP address using the username and password set during the SD card flashing process.

Figure 10. The process of moving SSH into RPi.

Click on the ‘New Terminal Console.’

Figure 11. Click on the ‘New Terminal Console.’

Afterward, you’ll be presented with the follow screen.

Figure 12. The ‘Terminal’ screen after logging in.

We’ve successfully established an SSH connection with Raspberry Pi.

Step 5. Configure RPi
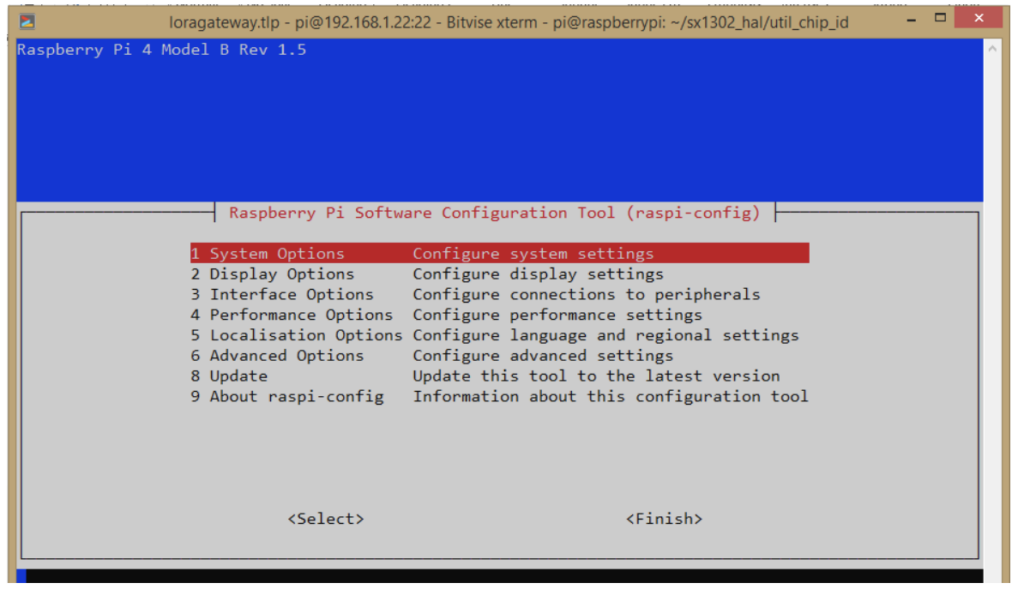
Enable the SPI, Serial, and I2C using this command: “Raspi-config”

Figure 13. The ‘System Options’ window for configuring RPi.

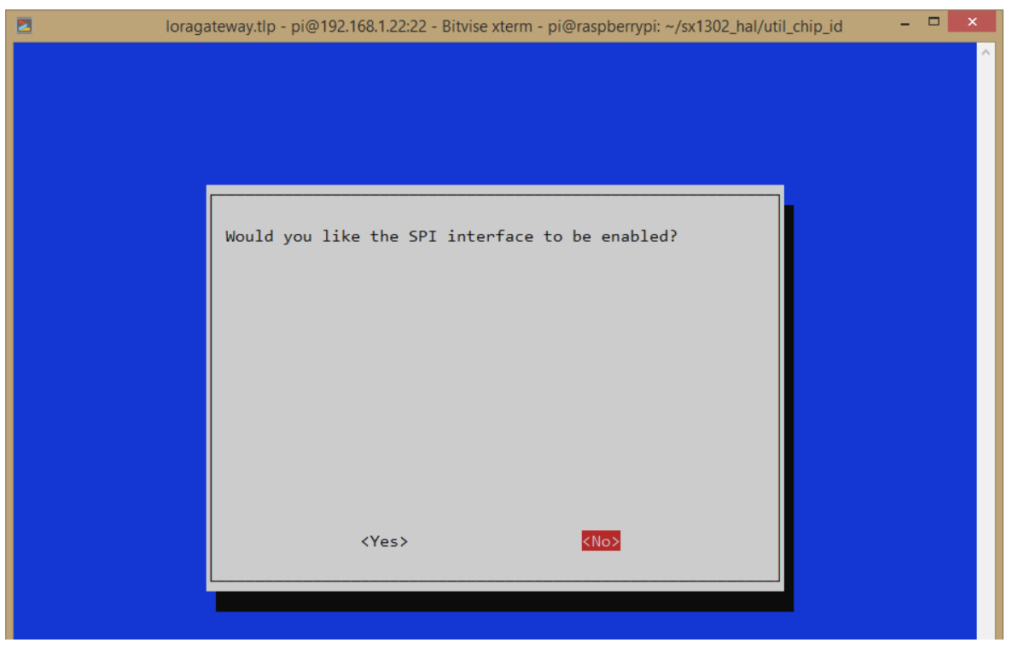
Go to the ‘System Options’ and enable the SPI, Serial, and I2C.

Figure 14. Configure RPi by enabling SPI, I2C, and Serial on the interface window.

Click ‘Yes.’

Figure 15. Click ‘Yes’ for all three options.

It will then ask to reboot.

Step 6. Connecting SX1302
Install the SX1302 binaries for the gateway by following these steps:

  • sudo apt update
  • sudo apt install git
  • cd
  • git clone https://github.com/Lora-net/sx1302_hal.git
  • cd sx1302_hal
  • make clean all
  • make all
  • cp tools/reset_lgw.sh util_chip_id/
  • cp tools/reset_lgw.sh packet_forwarder/

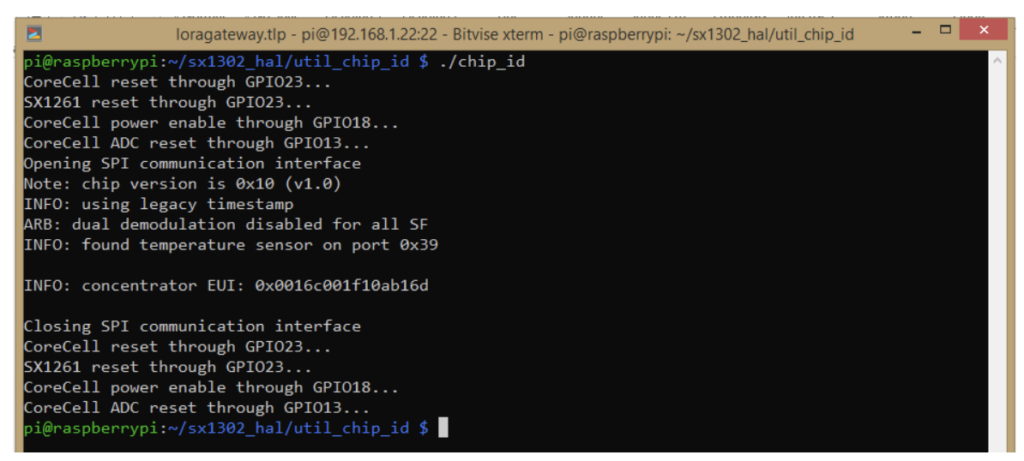
Next, it’s necessary to verify if the hardware is properly connected.

  • Cd sx1302_hal/util_chip_id/-   ./chip_id

Once there’s an established connection with the hardware, you’ll observe output similar to this…

Figure 16. The ‘Get Chip ID’ command.

Your EUI ID is the gateway’s MAC address, so be sure to make a note of it. Initiate the LoRa concentrator shield using this command, providing any configuration file from the folder.

  • cd sx1302_hal/packet_forwarder/-
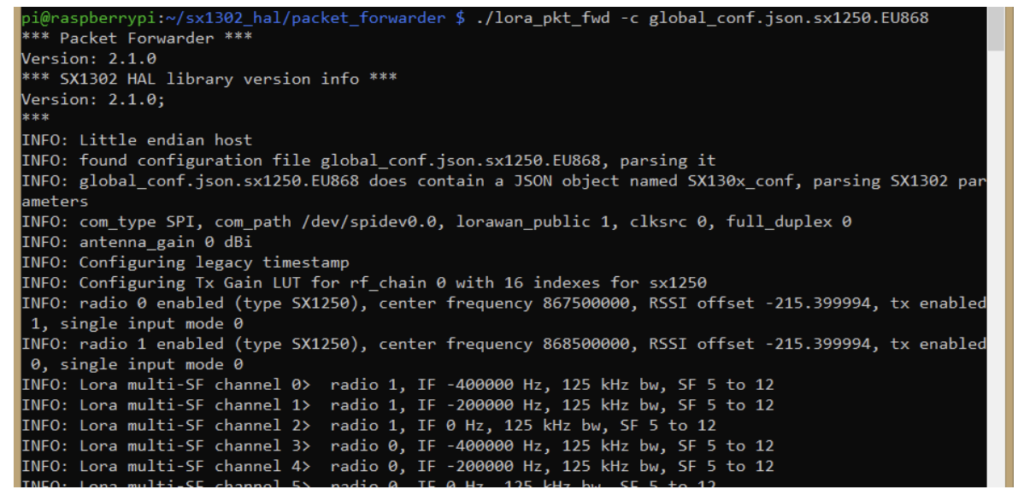
  • ./lora_pkt_fwd -c global_conf.json.sx1250.EU868

A successful connection to the LoRa concentrator will look similar to this:

Figure 17. The gateway is UP and a connection is successfully established to the LoRa concentrator

At this point, any data sent over the EU868 profile will be received by this screen.

Conclusion
Sending data through this gateway will enable data reception. The next step involves connecting to, configuring, and managing the gateway using Chirpstack.


You may also like:


  • Understanding LoRa architecture: nodes, gateways, and servers

  • What is Chirpstack?

  • How communication works between two LoRa end-node devices

  • How to integrate modules and smart meters with LoRa node-to-gateway…

  • How LoRa enables long-range communication

  • What is LoRa and LoRaWAN?

  • What are LoRa gateways and what types are available?

  • How does LoRa modulation enable long-range communication?

Filed Under: Tutorials
Tagged With: antenna, chirpstack, concentrator, gateway, lora, lorawan, nodes, raspberrypi, raspberrypi4, rpi, sx130x
 

Next Article

← Previous Article
Next Article →

Questions related to this article?
👉Ask and discuss on Electro-Tech-Online.com and EDAboard.com forums.


Tell Us What You Think!! Cancel reply

You must be logged in to post a comment.

EE TECH TOOLBOX

“ee
Tech Toolbox: Internet of Things
Explore practical strategies for minimizing attack surfaces, managing memory efficiently, and securing firmware. Download now to ensure your IoT implementations remain secure, efficient, and future-ready.

EE Learning Center

EE Learning Center
“engineers
EXPAND YOUR KNOWLEDGE AND STAY CONNECTED
Get the latest info on technologies, tools and strategies for EE professionals.

HAVE A QUESTION?

Have a technical question about an article or other engineering questions? Check out our engineering forums EDABoard.com and Electro-Tech-Online.com where you can get those questions asked and answered by your peers!


RSS EDABOARD.com Discussions

  • Does mobility carrier ratio changes with Wn? (0.18um) inverter design
  • schematic of the Current 4~20mA to Voltage 3.3/5/10VDC Converter HW-685
  • Gate Driver Suggestions for Two-Switch Non-Inverting Buck-Boost Converter
  • De-embedding using Y, Z parameter
  • How to get started with RTL design?

RSS Electro-Tech-Online.com Discussions

  • JBL charge 4 dead motherboard?
  • Back to the old BASIC days
  • Reclaiming missing motherboard header
  • Need help in repairing a dead motherboard
  • parallel-to-serial problem

Featured -USB Series

  • Controller Chip Selection for Developing USB Enabled Device (Part 6/6)
  • Signal and Encoding of USB System (Part 5/6)
  • USB Requests and Stages of Control Transfer (Part 4/6)
  • USB Descriptors and their Types (Part 3/6)
  • USB Protocol: Types of USB Packets and USB Transfers (Part 2/6)
  • Introduction to USB: Advantages, Disadvantages and Architecture (Part 1/6)

Recent Articles

  • Littelfuse driver achieves less than 1 µA standby current for energy-efficient designs
  • Microchip optimizes power consumption in transceiver-less FPGA design for automotive applications
  • What is an IoT platform and when is one useful?
  • Silanna launches laser driver IC with sub-2 ns FWHM pulse for LiDAR application
  • LEM introduces current sensors with bandwidth up to 2.5 MHz for precision applications

EE ENGINEERING TRAINING DAYS

engineering

Submit a Guest Post

submit a guest post
Engineers Garage
  • Analog IC TIps
  • Connector Tips
  • Battery Power Tips
  • DesignFast
  • EDABoard Forums
  • EE World Online
  • Electro-Tech-Online Forums
  • EV Engineering
  • Microcontroller Tips
  • Power Electronic Tips
  • Sensor Tips
  • Test and Measurement Tips
  • 5G Technology World
  • Subscribe to our newsletter
  • About Us
  • Contact Us
  • Advertise

Copyright © 2025 WTWH Media LLC. All Rights Reserved. The material on this site may not be reproduced, distributed, transmitted, cached or otherwise used, except with the prior written permission of WTWH Media
Privacy Policy

Search Engineers Garage

  • Electronics Projects and Tutorials
    • Electronic Projects
      • Arduino Projects
      • AVR
      • Raspberry pi
      • ESP8266
      • BeagleBone
      • 8051 Microcontroller
      • ARM
      • PIC Microcontroller
      • STM32
    • Tutorials
      • Audio Electronics
      • Battery Management
      • Brainwave
      • Electric Vehicles
      • EMI/EMC/RFI
      • Hardware Filters
      • IoT tutorials
      • Power Tutorials
      • Python
      • Sensors
      • USB
      • VHDL
    • Circuit Design
    • Project Videos
    • Components
  • Articles
    • Tech Articles
    • Insight
    • Invention Stories
    • How to
    • What Is
  • News
    • Electronic Product News
    • Business News
    • Company/Start-up News
    • DIY Reviews
    • Guest Post
  • Forums
    • EDABoard.com
    • Electro-Tech-Online
    • EG Forum Archive
  • DigiKey Store
    • Cables, Wires
    • Connectors, Interconnect
    • Discrete
    • Electromechanical
    • Embedded Computers
    • Enclosures, Hardware, Office
    • Integrated Circuits (ICs)
    • Isolators
    • LED/Optoelectronics
    • Passive
    • Power, Circuit Protection
    • Programmers
    • RF, Wireless
    • Semiconductors
    • Sensors, Transducers
    • Test Products
    • Tools
  • Learn
    • eBooks/Tech Tips
    • Design Guides
    • Learning Center
    • Tech Toolboxes
    • Webinars & Digital Events
  • Resources
    • Digital Issues
    • EE Training Days
    • LEAP Awards
    • Podcasts
    • Webinars / Digital Events
    • White Papers
    • Engineering Diversity & Inclusion
    • DesignFast
  • Guest Post Guidelines
  • Advertise
  • Subscribe