 BMP180 is a digital pressure sensor designed for low-power, low-voltage operation in mobile phones, navigation devices, and personal digital assistants. The sensor has an I2C interface to communicate sensor data. It can operate on 2.5~3.6V and consumes only 12 uA even in the ultra-high-resolution mode. The sensor can be used for several applications, including measuring altitude from sea level, measurement of altitude from ground, measuring vertical velocity, and detecting weather conditions.
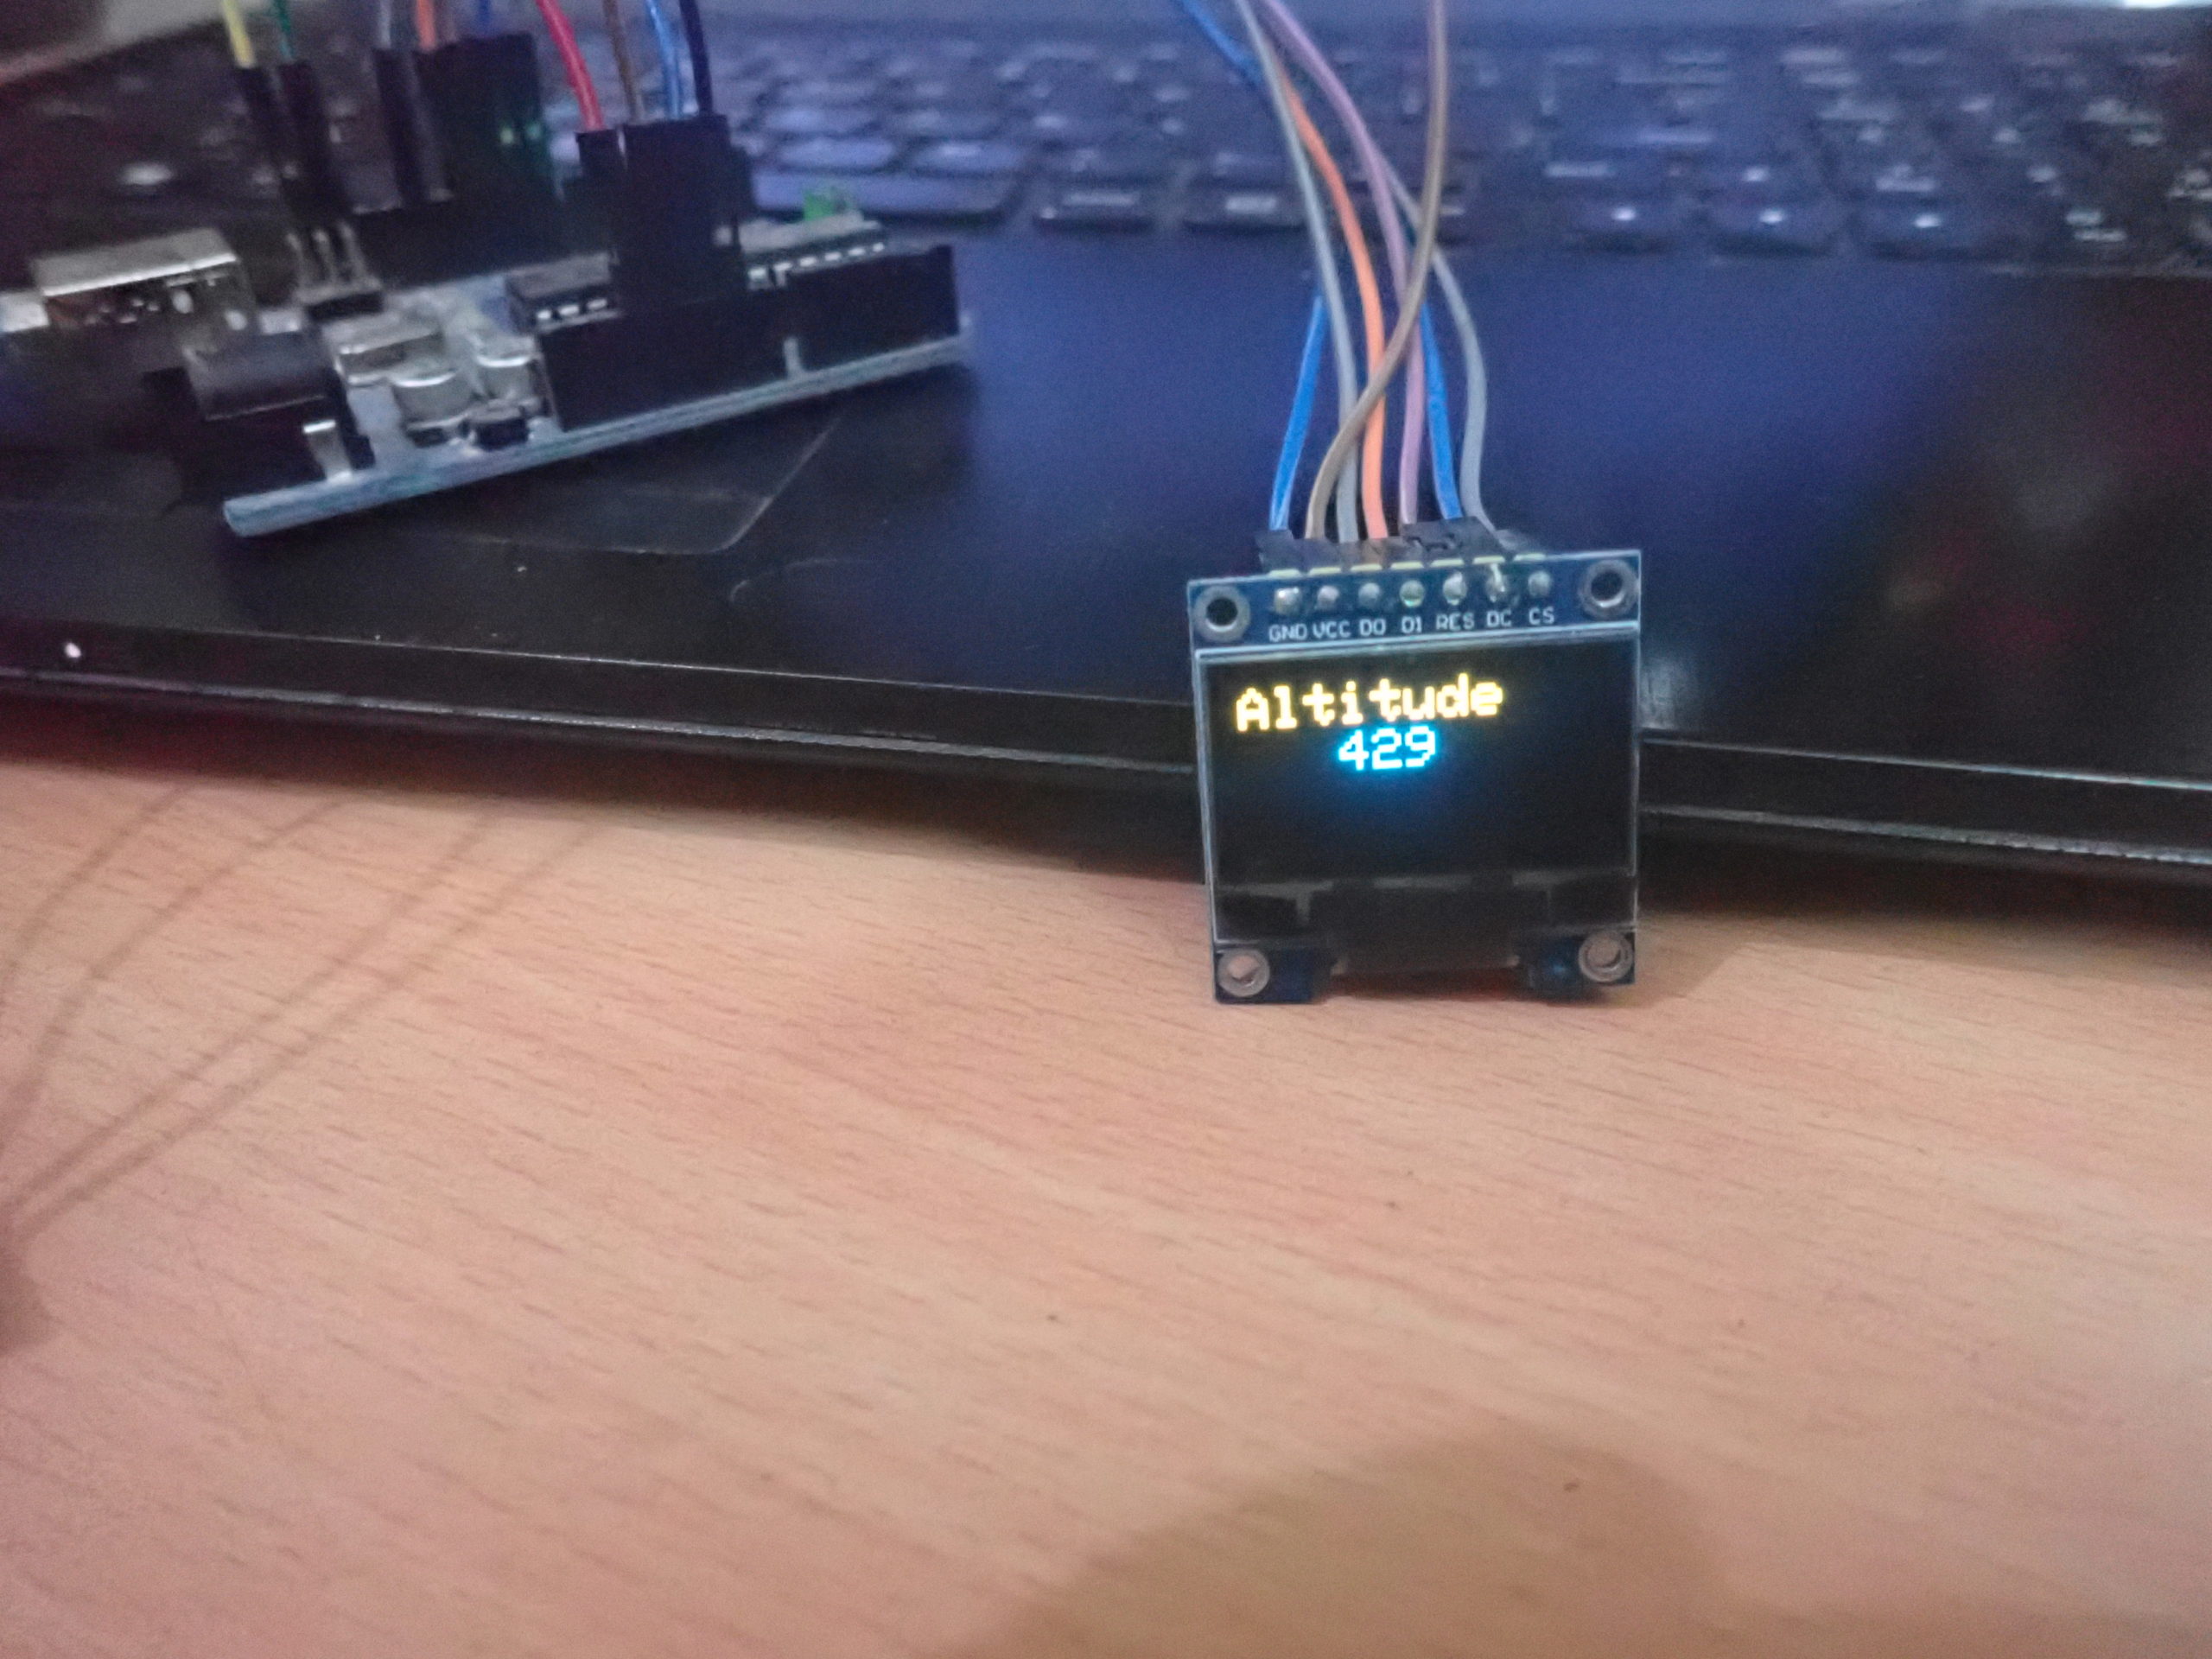
In this project, we have developed an altitude meter using the BMP180 sensor and our favorite microcontroller board – Arduino. This altitude meter displays real-time altitude from sea level on a small OLED display. The OLED display used to current altitude is SSD1306.
Components required
- Arduino UNO/any Arduino board x1
- BMP180 pressure sensor x1
- SSD1306 OLED x1
- Connecting wires/jumper wires
Circuit connections
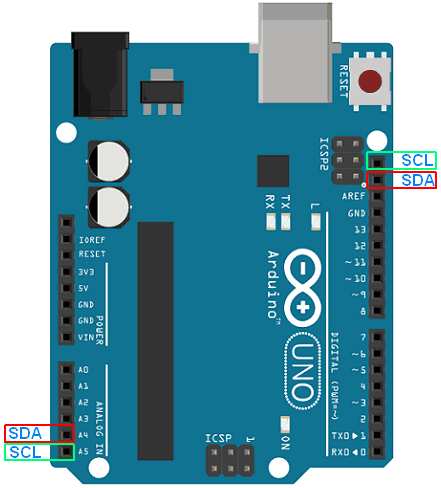
The altitude meter is designed by interfacing the SSD1306 OLED and BMP180 pressure sensor with the Arduino UNO. BMP180 sensor has four terminals – Vin, Gnd, SCL, and SDA. The Vin and Gnd pins of the sensor are connected to 3.3V out and a ground pin of Arduino UNO. The SCL and SDA pins of the sensor can be connected to any of the I2C ports on the Arduino board. The I2C ports on Arduino UNO are shown in the image below.
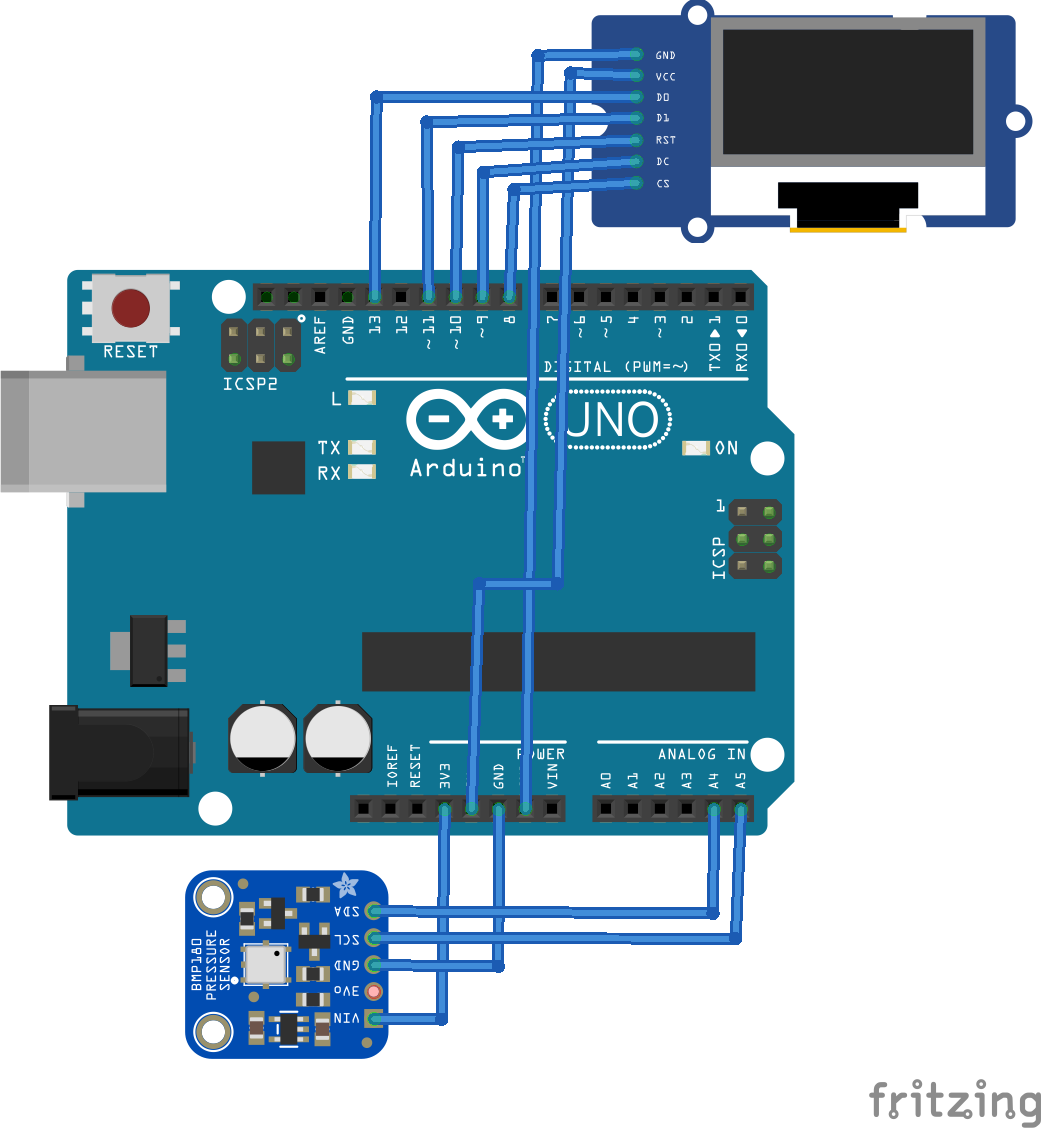
The SSD1306 OLED is connected to Arduino using a physical SPI port. For interfacing SSD1306 OLED via physical SPI port, connect the D0/SCK and D1/MOSI pins of SSD1306 OLED to pins D13 and D11 of Arduino, respectively. Connect pins DC, RESET, and CS of SSD1306 to pins D9, D10, and D8 of Arduino, respectively. The final circuit looks as follows.
Arduino sketch
How the circuit works
BMP180 is a piezoresistive sensor that is used to detect atmospheric pressure. The sensor measures both temperature and pressure as both of these factors affect air density. The temperature is measured to compensate for pressure readings according to the changes in air density. The sensor outputs the atmospheric pressure in Pascals over its I2C interface.
There are Arduino libraries available for BMP180 sensors from Adafruit and Sparkfun. In this project, we are using the library from Sparkfun, and this library converts the sensor output in Pascals to hectoPascals.
The sensor first reads uncompensated temperature reading, then uncompensated pressure reading. Finally, it does some complex calculations with both these readings involving a number of coefficients stored in its EEPROM to give accurate barometric pressure and temperature. The barometric pressure varies with the altitude, and the atmospheric pressure decreases with the increase in altitude and vice-versa. A change of 1 Hectopascal corresponds to around 8 meters in altitude. The BMP180 is a very sensitive sensor and responds to even minute changes in true atmospheric pressure. The following equation gives the altitude for sea level.
altitude = 44330 * (1 – (Pcurrent/Psealevel)^(1/5.255))
The sensor itself takes care to perform all these complex calculations and straightforwardly outputs the current true barometric pressure.
Arduino listens to the barometric pressure from the BMP180 sensor over its I2C interface. The Sparkfun library provides reading temperature, pressure, and altitude functions, and Arduino reads the altitude reading and displays the reading over SSD1306 OLED.
The OLED display is connected to the physical SPI port of the Arduino. So, the OLED communicates with the controller over the SPI interface while the BMP180 sensor relays the pressure readings over the I2C interface. Arduino reads altitude from BMP180 via I2c and displays it on the OLED display via SPI. The displayed output reading is in meters.
The code
First of all, the SPI and Wire libraries are imported for data communication over SPI and I2C interfaces. The Adafruit_GFX and Adafruit_SSD1306 libraries are imported to work with the SSD1306 OLED display. The Sparkfun BMP180 library is imported to work with the BMP180 sensor. Constants and pin assignments for the OLED display are defined. An object ‘display’ of class ‘Adafruit_SSD1306’ is instantiated to deal with the OLED display, and an object ‘pressure’ of class ‘ SFE_BMP180’ is instantiated to deal with the BMP180 sensor. A variable ‘baseline’ is defined to store the reference atmospheric pressure at sea level. Next, a bitmap array is defined to store EEWORLDONLINE logo.
In the setup() function, the baud rate for data communication is set to 9600 bps. The display is initialized using display.begin() method. If the pressure detects the BMP180 sensor.begin() method, the logo is flashed to the OLED display. Otherwise, the “Device not working” message flashes to the OLED.
In the loop() function, variables to store pressure and altitude readings are declared. The pressure is read by calling the user-defined function getPressure(). The baseline atmospheric pressure for the current location is defined. This is set to 1013 as the altitude is read with respect to sea level here. The altitude is measured by calling the altitude() method overpressure object with the given baseline. The OLED display is cleared using display.clearDisplay() method. The cursor is set to start the screen using display. setCursor() method. The text size is set to 2 using display. setTextSize() method. The text color is set to white using setTextColor() method. The read altitude is printed to OLED using display.print() and display.println() methods. The readings flash on OLED when the display.display(0 method is called. A delay of 1500 ms is provided by calling delay() function before the next iteration of the loop() function.
The getPressure() function reads the barometric pressure from BMP180 sensor. It uses the Sparkfun library’s startTemperature(), getTemperature() and startPressure() methods.
Result
You may also like:


Filed Under: Arduino., Electronic Projects, Sensors, Tutorials, Video

Questions related to this article?
👉Ask and discuss on Electro-Tech-Online.com and EDAboard.com forums.
Tell Us What You Think!!
You must be logged in to post a comment.