Including an audio option with an electronic or Internet-of-Things (IoT) project is often an ideal addition. However, microcontrollers cannot process MP3 files, which is the most common audio file format. Fortunately, there is a solution.
It is possible to play MP3 audio files on Arduino using dedicated MP3 decoders like the DFPlayer Mini or MP3-TF-16P.
DFPlayer Mini is a popular original MP3 decoder for Arduino. But if you ordered the DFPlayer Mini module online, you may have received the MP3-TF-16P instead of the original DFPlayer. Both modules look identical and have the same pin configuration but use different chipsets.
The issue is if you try to run audio files using the MP3-TF-16P module and Arduino’s libraries for the DFPlayer Mini. The MP3-TF-16P uses a different chipset despite having the same chipset as the DFPlayer Mini. The popular libraries for the DFPlayer Mini fail to run on MP3-TF-16P because of the different chipset features.
In this project, we’ll explain how to play MP3 files on Arduino using the MP3-TF-16P module. The code provided here also works on the original DFPlayer Mini, as both chipsets have the same instruction set.
Components required
- Arduino Mega/UNO x1
- DFPlayer Mini/MP3-TF-16P x1
- TDA2030 Audio Power Amplifier module x1
- 4Ω/8Ω Speaker x1
- 10K Resistors x2
- Connecting/Dupont wires
Circuit connections
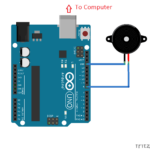
We’ll need to interface the DFPlayer Mini or the MP3-TF-16P with Arduino to play MP3 audio files on Arduino. Both modules have the same pinout which is shown in the below image.
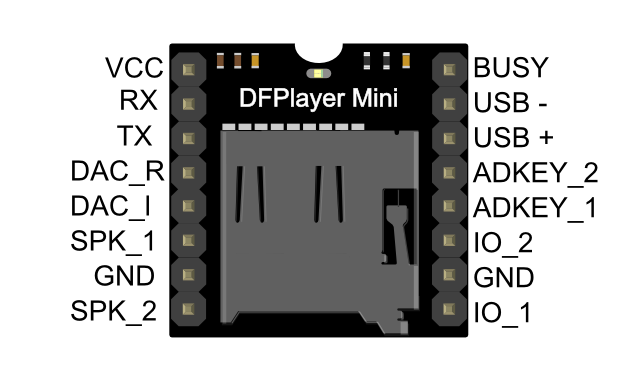
To interface the DFPlayer Mini or MP3-TF-16P with Arduino:
- Connect both grounds of the DFPlayer Mini/MP3-TF-16P with the ground of Arduino.
- Connect the MP3’s VCC pin with Arduino’s 5V.
- Connect the DFPlayer Mini/MP3-TF-16P’s RX and TX pins with Arduino’s TX and RX pins.
- For Arduino Mega, connect the DFPlayer Mini/MP3-TF-16P’s RX and TX pins with Arduino Mega’s TX3 and RX3 pins, respectively.
To eliminate noise, it’s important to connect the DFPlayer Mini/MP3-TF-16P’s TX and RX pins with Arduino’s RX and TX pins via 10K resistors.
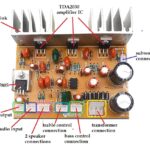
Note: if you connect a speaker directly to the DFPlayer Mini/MP3-TF-16P’s SPK_1 and SPK_2 pins, the audio output might not be as audible. Instead, consider connecting speakers to the DFPlayer Mini/MP3-TF-16P through an audio power amplifier, such as the TDA2030.
The pin diagram of a TDA2030 audio power amplifier module is below.

Next:
- Connect the DFPlayer Mini/MP3-TF-16P module’s SPK_1 and SPK_2 with the Audio In + and Audio in – terminals of the amplifier module.
- Connect the amplifier module’s VCC and GND pins with Arduino’s 5V out and ground, respectively.
- Connect a 4Ω/8Ω speaker with the amplifier’s speaker output connector.
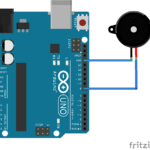
The image below illustrates the complete circuit connections required to play MP3 files on Arduino using the DFPlayer Mini/MP3-TF-16P.

Arduino sketch
After making the proper circuit connections, format a TF card using an SD card formatter like one provided on the SD Association website. Add some of your favorite MP3 songs to the TF card and insert it in DFPlayer Mini/MP3-TF-16P module. Then, upload the following sketch to Arduino.
How it works
The DFPlayer Mini/MP3-TF-16P modules can play MP3 audio files and have pins to control their playback. Using Arduino, the MP3 audio files can be precisely controlled and integrated into a larger application if desired.
The audio playback is controlled by interfacing pushbuttons with the module’s control pins (such as IO_1, IO_2, ADKEY_1, ADKEY_2, and BUSY). The module also provides a UART port for serial communication with Arduino.
The default baud rate of the module(s) is 9600 bps. On the serial port, 10-byte commands can be sent to the DFPlayer Mini/MP3-TF-16P to control the playback. These commands have the following format.
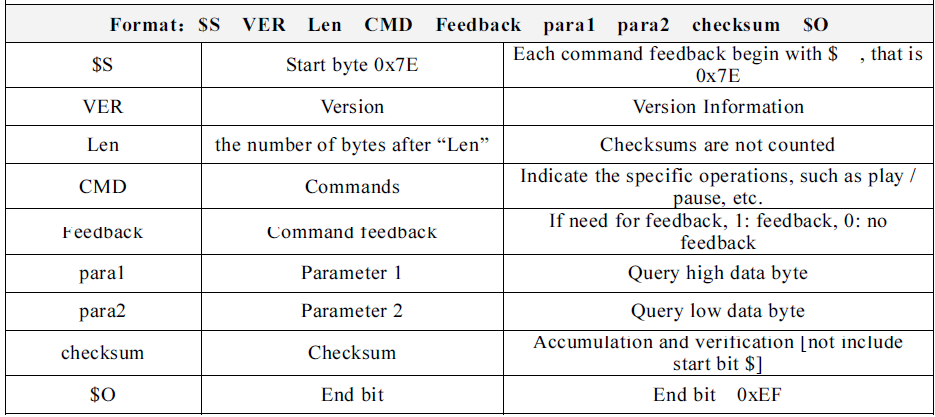
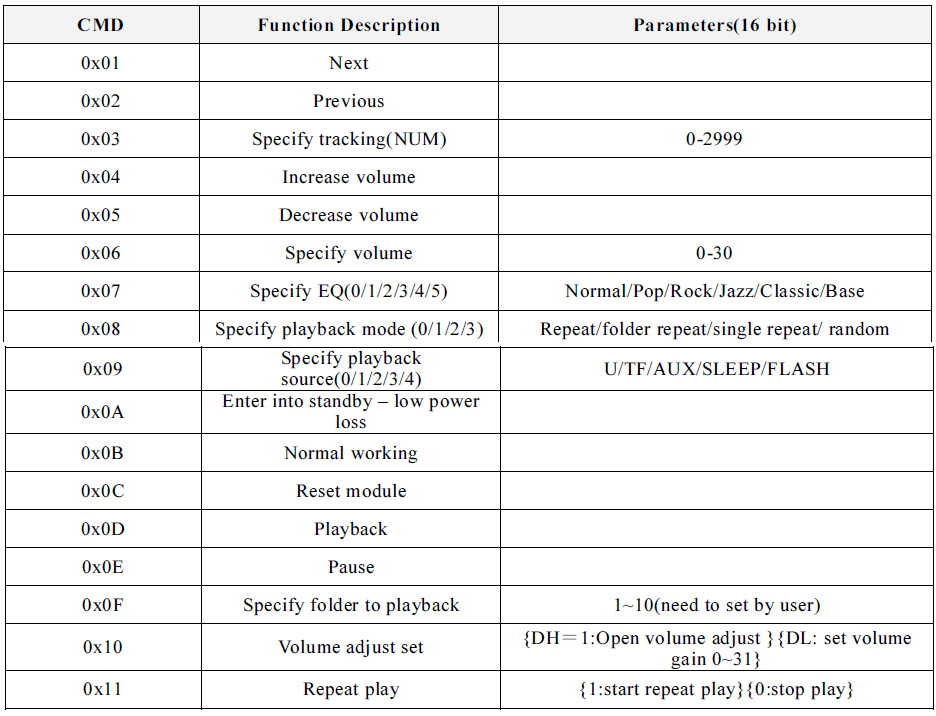
The implementable command in the 10-byte packet is the 4th byte. The command may require additional parameters, which are sent via the 6th and 7th bytes in the packet. The commands that can be directly forwarded to the DFPlayer module are listed below.
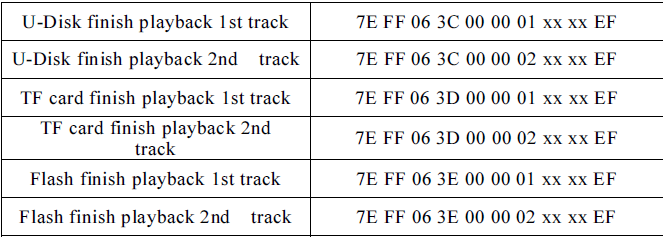
For some query commands or events, the DFPlayer Mini provides a response. The response is also a 10-byte packet. For example, the following responses occur upon finishing the audio files’ playback.
When we tested to receive the responses from the MP3-TF-16P module, the serial transmission from the module was inconsistent. However, the execution of the direct commands was successful. The responses from the original DFPlayer Mini were consistent.
In this project, we sent various direct commands from Arduino to the DFPlayer Mini/MP3-TF-16P module, controlling the playback of the audio files that were stored on a TF card.
The code
The sketch begins by defining the user-defined function sendDFCommand(). This function sends the command packet from Arduino to the DFPlayer Mini/MP3-TF-16P module.
- The user-defined function playTrack() is defined to play a specific track number from the TF card.
- The user-defined function playNext() is defined to play next MP3 file.
- The user-defined function playPrevious() is defined to play the previous track. The user-defined function volumeUp() is defined to increase the volume by ‘1.’ The maximum volume is ‘30.’
- The user-defined function volumeDown() is defined to reduce the volume by ‘1’.
- The user-defined function changeVolume() is defined to change the volume to a specific level.
- The user-defined function changeEQ() is defined to change the equalizer settings.
- The user-defined function setRepeat() is defined to set the repeat options.
- The user-defined function pausePlay() is defined to pause or playback audio.
- The user-defined function RepeatPlay() is defined to turn on and off the repeat play option.
In the setup() function, the baud rate for the serial debug and communication with the DFPlayer Mini/Mp3-TF-16P is set to 9600 bps. The volume is set to a maximum level. The first track is played, and “repeat all” is implemented. In the loop() function, the user-defined functions to control the playback are executed at intervals of ten seconds to investigate their execution via the DFPlayer Mini/MP3-TF-16P.
Results
You may also like:


Filed Under: Arduino Projects, Electronic Projects, Video
Log in to leave a comment:
Lost your password?
Don't have an account? Register here