In this project, we’ll build a paint application on Arduino UNO/Arduino Mega that runs on a 3.5-inch TFT touchscreen display based on the ILI9486 driver. The ILI9486 touchscreen has a display resolution of 320×480 pixels. Using a stylus, you can draw, paint, and write on it (even in your own handwriting ).
Required components
- Arduino UNO/Arduino Mega x1
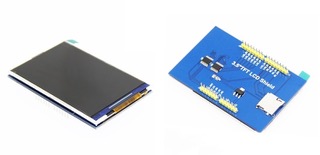
- S 3.5-inch TFT touchscreen display (ILI9486 driver-based) x1
Circuit connections
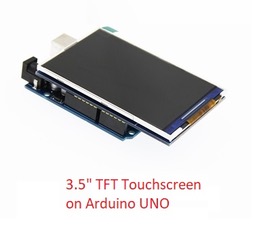
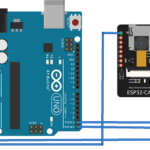
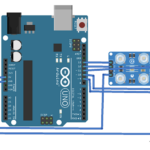
There are no circuit connections required to build this project. Simply fit the TFT touchscreen shield on Arduino UNO or Arduino Mega, powering the board via a USB or power adapter. You’ll also need to connect Arduino to your computer using a USB cable to upload the sketch.

The Arduino sketch
After placing the 3.5-inch TFT touchscreen module on Arduino, upload the following sketch.
How it works
The paint application is coded in Arduino’s firmware and is designed for the screen resolution of the 3.5-inch TFT touchscreen module (i.e., 320×480 pixel resolution). The application has a color palette on one side, with the rest of the screen free for painting, drawing, coloring, or writing with the stylus. This space is white, with seven colors available in the palette: black, red, green, blue, cyan, magenta, and yellow.
It’s possible to choose additional colors by defining constants with their respective color codes in the Arduino sketch.
When the user touches the stylus on the screen, the application “reads” the contacted pixels. If the pixels correspond to one of the color boxes from the palette, that color is selected for use. If the pixels correspond to the touchscreen’s drawing space, the pixels on the screen are filled in with the color chosen.
The brush radius for the seven colors is set to ‘3’ pixels. You can change this in the sketch to any value, such as ‘1’ or ‘5’ pixels. The brush radius for white is set to ‘10’ pixels and is used as an eraser in the drawing space.
Results
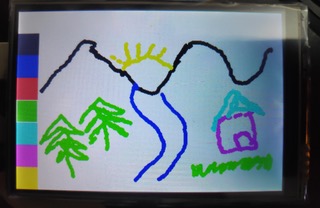
The paint application lets users choose a color from the palette with the stylus and draw within the white drawing space, as demonstrated in the following video.
You can make colorful drawings on this Arduino-hosted paint application like those below.
You can sketch.
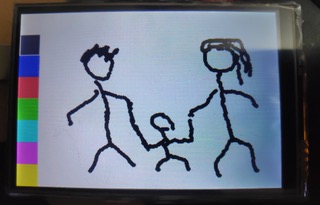
Or you can write in your own handwriting.

The code
The sketch is the basis of this Arduino project and transforms a basic touchscreen interfaced with Arduino into a creative paint or drawing application.
The sketch begins by importing the Adafruit_GFX.h, MCUFRIEND_kbv.h, and TouchScreen.h libraries. The Adafruit_GFX.h and MCUFRIEND_kbv.h libraries enable the TFT display module to work. The Touchscreen.h library is necessary for the “touch” functions to work on the screen via the stylus. This is followed by declaring the color constants and instantiating a TFT display object.
Next, the variables are declared for the touch function configuration, and an object of the touchscreen class is instantiated. The variable ‘BOXSIZE’ is defined to set the size of color boxes in the palette. The variables are declared for the pen radius (the brush size), the previous color, and the current color.
In the setup() function, the touchscreen is initialized, reset, and filled with a white background.
The following lines of code define and display the color palette on the touchscreen.
tft.fillRect(0, 0, BOXSIZE, BOXSIZE, YELLOW);
tft.fillRect(BOXSIZE, 0, BOXSIZE, BOXSIZE, MAGENTA);
tft.fillRect(BOXSIZE * 2, 0, BOXSIZE, BOXSIZE, CYAN);
tft.fillRect(BOXSIZE * 3, 0, BOXSIZE, BOXSIZE, GREEN);
tft.fillRect(BOXSIZE * 4, 0, BOXSIZE, BOXSIZE, RED);
tft.fillRect(BOXSIZE * 5, 0, BOXSIZE, BOXSIZE, BLUE);
tft.fillRect(BOXSIZE * 6, 0, BOXSIZE, BOXSIZE, BLACK);
tft.fillRect(BOXSIZE * 7, 0, BOXSIZE, BOXSIZE, WHITE);
tft.drawRect(BOXSIZE * 7, 0, BOXSIZE, BOXSIZE, BLACK);
The current color is set to ‘Yellow’ and the GPIO13 connects with the touchscreen’s SCK pin and is set as a digital output. Next, the constants are declared for the minimum and maximum stylus pressure.
The current color is set to ‘Yellow’ and the GPIO13 connects with the touchscreen’s SCK pin and is set as a digital output. Next, the constants are declared for the minimum and maximum stylus pressure.
In the loop() function, the below code is used to “sense” the screen pixels that the stylus touches.
digitalWrite(13, HIGH);
TSPoint p = ts.getPoint();
digitalWrite(13, LOW);
pinMode(XM, OUTPUT);
pinMode(YP, OUTPUT);
if (p.z > MINPRESSURE && p.z < MAXPRESSURE) {
if (p.y < (TS_MINY – 5)) {
Serial.println(“erase”);
tft.fillRect(0, BOXSIZE, tft.width(), tft.height() – BOXSIZE, WHITE);
}
p.x = map(p.x, TS_MINX, TS_MAXX, tft.width(), 0);
p.y = map(p.y, TS_MINY, TS_MAXY, tft.height(), 0);
If a touched point on the screen correspond to a box from the color palette, that respective color is selected.
if (p.y < 0) {
oldcolor = currentcolor;
if (p.x < BOXSIZE) {
currentcolor = YELLOW;
tft.drawRect(0, 0, BOXSIZE, BOXSIZE, WHITE);
} else if (p.x < BOXSIZE * 2) {
currentcolor = MAGENTA;
tft.drawRect(BOXSIZE, 0, BOXSIZE, BOXSIZE, WHITE);
} else if (p.x < BOXSIZE * 3) {
currentcolor = CYAN;
tft.drawRect(BOXSIZE * 2, 0, BOXSIZE, BOXSIZE, WHITE);
} else if (p.x < BOXSIZE * 4) {
currentcolor = GREEN;
tft.drawRect(BOXSIZE * 3, 0, BOXSIZE, BOXSIZE, WHITE);
} else if (p.x < BOXSIZE * 5) {
currentcolor = RED;
tft.drawRect(BOXSIZE * 4, 0, BOXSIZE, BOXSIZE, WHITE);
} else if (p.x < BOXSIZE * 6) {
currentcolor = BLUE;
tft.drawRect(BOXSIZE * 5, 0, BOXSIZE, BOXSIZE, WHITE);
}else if (p.x < BOXSIZE * 7) {
currentcolor = BLACK;
tft.drawRect(BOXSIZE * 6, 0, BOXSIZE, BOXSIZE, WHITE);
}else if (p.x < BOXSIZE * 8) {
currentcolor = WHITE;
tft.drawRect(BOXSIZE * 7, 0, BOXSIZE, BOXSIZE, BLACK);
}
Whenever a user selects a different color, the white border around the previous color in the color palette is removed.
if (oldcolor != currentcolor) {
if (oldcolor == YELLOW) tft.fillRect(0, 0, BOXSIZE, BOXSIZE, YELLOW);
if (oldcolor == MAGENTA) tft.fillRect(BOXSIZE, 0, BOXSIZE, BOXSIZE, MAGENTA);
if (oldcolor == CYAN) tft.fillRect(BOXSIZE * 2, 0, BOXSIZE, BOXSIZE, CYAN);
if (oldcolor == GREEN) tft.fillRect(BOXSIZE * 3, 0, BOXSIZE, BOXSIZE, GREEN);
if (oldcolor == RED) tft.fillRect(BOXSIZE * 4, 0, BOXSIZE, BOXSIZE, RED);
if (oldcolor == BLUE) tft.fillRect(BOXSIZE * 5, 0, BOXSIZE, BOXSIZE, BLUE);
if (oldcolor == BLACK) tft.fillRect(BOXSIZE * 6, 0, BOXSIZE, BOXSIZE, BLACK);
if (oldcolor == WHITE) tft.fillRect(BOXSIZE * 7, 0, BOXSIZE, BOXSIZE, WHITE);
}
If a color other than white is selected and the stylus touches the drawing space, the pixel that was tapped changes to that same color. The brush radius for colors stays at ‘3’ pixels.
However, it can be set to any value — like ‘1’ or ‘5’ pixels as desired. The lower the pixel size of the brush, the more detailed the painting or drawing will be in the drawing space.
if ((p.y > 5) && (p.y < tft.height()) && currentcolor != WHITE) {
PENRADIUS = 3;
tft.fillCircle((p.x-PENRADIUS), (p.y+BOXSIZE) , PENRADIUS, currentcolor);
}
If white is the chosen color, the brush radius is set to ’10’ pixels, and white is used to erase the current painting or drawing on the screen.
if ((p.y > 5) && (p.y < tft.height()) && currentcolor == WHITE) {
PENRADIUS = 10;
tft.fillCircle((p.x-PENRADIUS), (p.y+BOXSIZE) , PENRADIUS, currentcolor);
}
For this Arduino-based application, you can use a stylus to paint, draw, sketch, and create with your own handwriting.
Wathc the demonstration video here: https://www.youtube.com/watch?v=mJPjSqNTFdI
You may also like:


Filed Under: Electronic Projects, Video

Questions related to this article?
👉Ask and discuss on Electro-Tech-Online.com and EDAboard.com forums.
Tell Us What You Think!!
You must be logged in to post a comment.