Engineers Garage

  • Electronic Projects & Tutorials
    • Electronic Projects
      • Arduino Projects
      • AVR
      • Raspberry pi
      • ESP8266
      • BeagleBone
      • 8051 Microcontroller
      • ARM
      • PIC Microcontroller
      • STM32
    • Tutorials
      • Sensor Series
      • Engineering Deep Dives
      • AI
      • ARDUINO Compatible Coding
      • Audio Electronics
      • Battery Management
      • Beginners Electronics Series
      • Brainwave
      • Digital electronics (DE)
      • Electric Vehicles
      • EMI/EMC/RFI
      • EVs
      • Hardware Filters
      • IoT tutorials
      • LoRa/LoRaWAN
      • Power Tutorials
      • Protocol
      • Python
      • RPI Python Programming
      • Sensors
      • USB
      • Thermal management
      • Verilog
      • VHDL
    • Circuit Design
    • Project Videos
    • Components
  • Articles
    • Tech Articles
    • Insight
    • Invention Stories
    • How to
    • What Is
  • News
    • Electronic Product News
    • Business News
    • Company/Start-up News
    • DIY Reviews
    • Guest Post
  • Forums
    • EDABoard.com
    • Electro-Tech-Online
    • EG Forum Archive
  • DigiKey Store
    • Cables, Wires
    • Connectors, Interconnect
    • Discrete
    • Electromechanical
    • Embedded Computers
    • Enclosures, Hardware, Office
    • Integrated Circuits (ICs)
    • Isolators
    • LED/Optoelectronics
    • Passive
    • Power, Circuit Protection
    • Programmers
    • RF, Wireless
    • Semiconductors
    • Sensors, Transducers
    • Test Products
    • Tools
  • Learn
    • eBooks/Tech Tips
    • Design Guides
    • Learning Center
    • Tech Toolboxes
    • Webinars & Digital Events
  • Resources
    • Digital Issues
    • EE Training Days
    • LEAP Awards
    • Podcasts
    • Webinars / Digital Events
    • White Papers
    • Engineering Diversity & Inclusion
  • Guest Post Guidelines
  • Advertise
  • Subscribe

How to interface keypad with 8051 microcontroller (AT89C51)- (Part 13/45)

By Himanshu Choudhary August 3, 2010

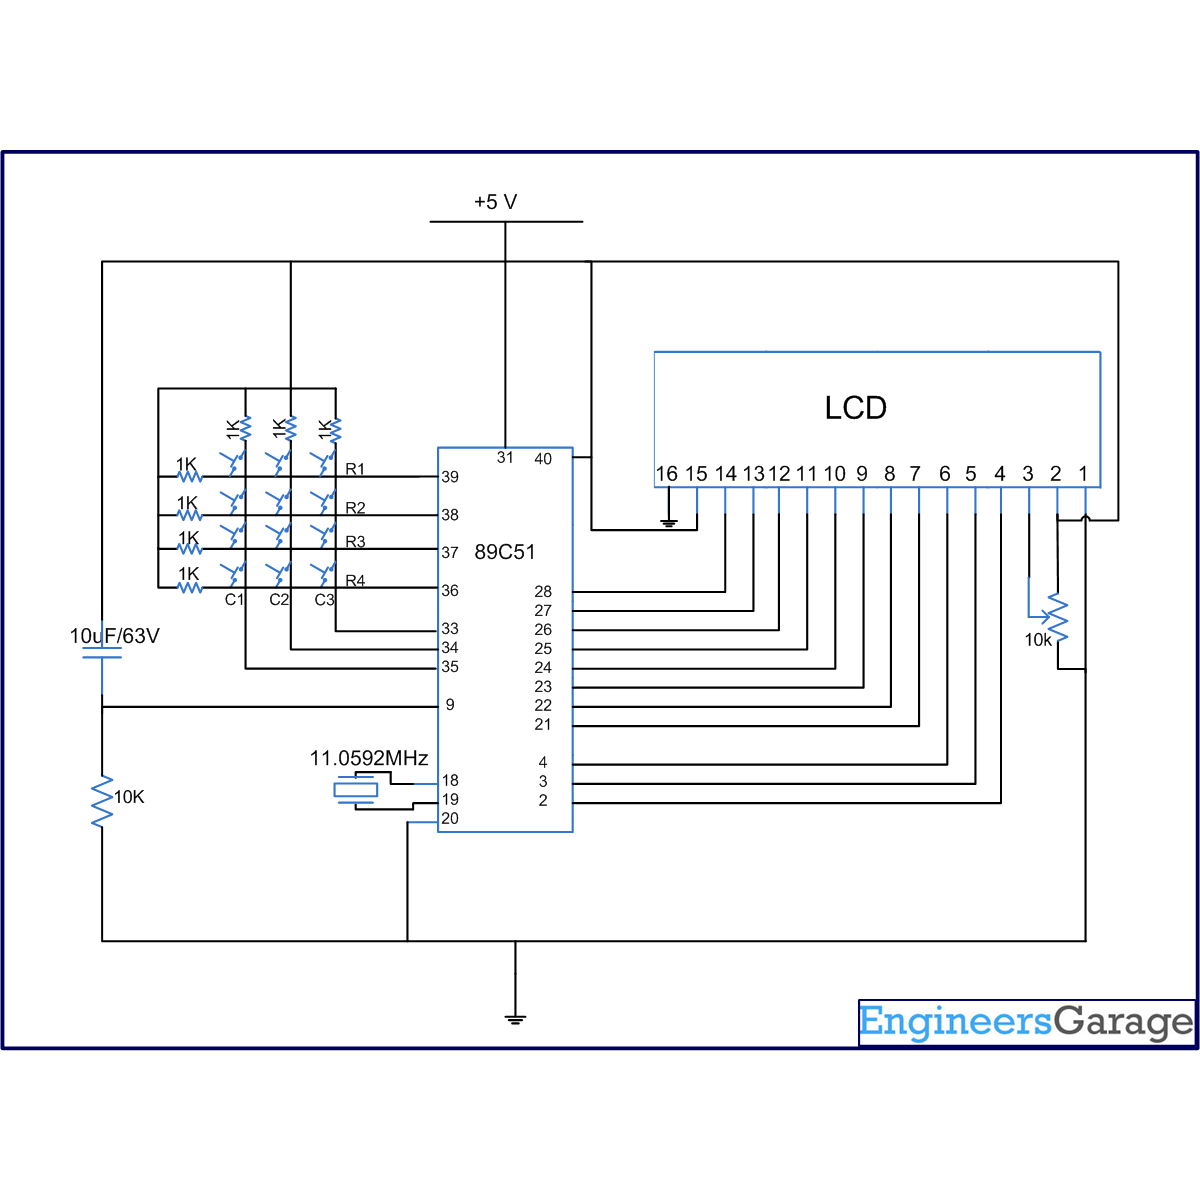
Keypad is a widely used input device with lots of application in our everyday life. From a simple telephone to keyboard of a computer, ATM, electronic lock, etc., keypad is used to take input from the user for further processing. In this article we are interfacing keypad with the MCU AT89C51 and displaying the corresponding number on LCD.  This module can be further used in a number of systems to interfaced keypad with microcontroller and other processors to get desired output. The program to interface keypad with controller is written in C language which is very easy to understand.


Keypad is organized as a matrix of switches in rows and column. The article uses a 4X3 matrix keypad and a 16×2 LCD for displaying the output of keypad.

The circuit diagram shows the connection of keypad with the controller. Port P2 of the microcontroller is used to send the data for displaying on the LCD. P1^1, P1^2, P1^3 pins of microcontroller is connected to RS, RW, EN pins of LCD respectively. Port P0 is used to scan input from the keypad (refer circuit diagram for connection).
 
The concept of interfacing keypad with the MCU is simple. Every number is assigned two unique parameters, i.e., row and column number (n(R, C) for example 6 (2, 3)). Hence every time a key is pressed the number is identified by detecting the row and column number of the key pressed.
 
Initially all the rows are set to zero by the controller and the columns are scanned to check if any key is pressed. In case no key is pressed the output of all the columns will be high.
 
4X4 Keypad Matrix
Fig. 2: 4X4 Keypad Matrix
 
Whenever a key is pressed the row and column corresponding to the key will get short, resulting in the output of the corresponding column goes to go low (since we have made all the rows zero). This gives the column number of the pressed key.
 
Locating column number of pressed key
Fig 3: Locating column number of pressed key
Once the column number is detected, the controller set’s all the rows to high. Now one by one each row is set to zero by controller and the earlier detected column is checked if it becomes zero. The row corresponding to which the column gets zero is the row number of the digit.
 
Locating row number of pressed digit
Fig. 4: Locating row number of pressed digit
 
Displaying row and column on LCD
Fig. 5: Displaying row and column on LCD
 
The above process is very fast and even if the switch is pressed for a very small duration of time the controller can detect the key which is pressed. The controller displays the number corresponding to the row and column on the LCD.


Project Source Code

###

// Program to interface controller with controller

#include<reg51.h>
#define port P1
#define dataport P2  // Dataport for lcd
#define key P0  // Port for keypad
#define sec 100
sbit rs = port^1;
sbit rw = port^2;
sbit en = port^3;

sbit col1=key^4;
sbit col2=key^5;
sbit col3=key^6;
sbit row1=key^0;
sbit row2=key^1;
sbit row3=key^2;
sbit row4=key^3;

void delay(unsigned int msec) //Time delay function
{
int i,j ;
for(i=0;i<msec;i++)
  for(j=0;j<1275;j++);
}

void lcd_cmd(unsigned char item) //Function to send command to LCD
{
dataport = item;
rs= 0;
rw=0;
en=1;
delay(1);
en=0;
return;
}

void lcd_data(unsigned char item) //Funtion to send data on LCD
{
dataport = item;
rs= 1;
rw=0;
en=1;
delay(1);
en=0;
return;
}

void lcd_data_string(unsigned char *str) // Function to send string on LCD
{
int i=0;
while(str[i]!='')
{
  lcd_data(str[i]);
  i++;
  delay(10);
}
return;
}

void lcd(unsigned char str[10])  // Funtion to Initialize LCD
{
lcd_cmd(0x38);
lcd_cmd(0x0e);
//delay(sec);
lcd_cmd(0x01);
//delay(sec);
lcd_cmd(0x82);
//delay(sec);
lcd_data_string(str);
}

void display(int a) //Display functon for LCD

{
switch(a)
{
  case 1:lcd("one 1");
    break;
  case 2:lcd("two 2");
    break;
  case 3:lcd("three 3");
    break;
  case 4:lcd("four 4");
    break;
  case 5:lcd("five 5");
    break;
  case 6:lcd("six 6");
    break;
  case 7:lcd("seven 7");
    break;
  case 8:lcd("EIGHT 8");
    break;
  case 9:lcd("NINE 9");
    break;
  case 0:lcd("ZERO 0");
    break;
  case 11:lcd("*");
    break;
  case 12:lcd("#");
    break;
}
}

void check_col1() //Function for checking column one
{
row1=row2=row3=row4=1;
row1=0;
if(col1==0)
display(1);
row1=1;
row2=0;
if(col1==0)
display(4);
row2=1;
row3=0;
if(col1==0)
display(7);
row3=1;
row4=0;
if(col1==0)
display(11); 
row4=1;
}

void check_col2() //Function for checking column two
{
row1=row2=row3=row4=1;
row1=0;
if(col2==0)
display(2);
row1=1;
row2=0;
if(col2==0)
display(5);
row2=1;
row3=0;
if(col2==0)
display(8);
row3=1;
row4=0;
if(col2==0)
display(0);
row4=1;
}

void check_col3() //Function for checking column three
{
row1=row2=row3=row4=1;
row1=0;
if(col3==0)
display(3);
row1=1;
row2=0;
if(col3==0)
display(6);
row2=1;
row3=0;
if(col3==0)
display(9);
row3=1;
row4=0;
if(col3==0)
display(12);  //For #
row4=1;
}

void main()
{
col1=col2=col3=1;  //Input Port
while(1)
{
  row1=row2=row3=row4=0;
  if(col1==0)
  check_col1();
  else
   if(col2==0)
   check_col2();
   else
    if(col3==0)
    check_col3();
}
}

###


Circuit Diagrams

Circuit-Diagram-of-How-to-interface-keypad-with-8051-microcontroller-AT89C51

Project Components

  • AT89C51 Microcontroller
  • LCD
  • Preset

Project Video


Filed Under: 8051 Microcontroller
Tagged With: 8051, keypad, microcontroller
 

Next Article

← Previous Article
Next Article →

Questions related to this article?
👉Ask and discuss on Electro-Tech-Online.com and EDAboard.com forums.


Tell Us What You Think!! Cancel reply

Log in to leave a comment:

Lost your password?

Don't have an account? Register here

Submit a Guest Post

submit a guest post

EE TECH TOOLBOX

“ee
Tech Toolbox: Sensors
In this Tech Toolbox, we cover some of those technologies driving the next generation of connected systems, including ultra-low-power sensing strategies that extend node battery life, and 60 GHz CMOS radar for contactless health and presence detection.

EE Learning Center

EE Learning Center
“engineers
EXPAND YOUR KNOWLEDGE AND STAY CONNECTED
Get the latest info on technologies, tools and strategies for EE professionals.

HAVE A QUESTION?

Have a technical question about an article or other engineering questions? Check out our engineering forums EDABoard.com and Electro-Tech-Online.com where you can get those questions asked and answered by your peers!


RSS EDABOARD.com Discussions.

RSS Electro-Tech-Online.com Discussions

Featured Tutorials

Learn - VHDL Tutorials (22 Part)

  • VHDL Tutorial – 11: Designing half and full-subtractor circuits
    VHDL Tutorial – 11: Designing half and full-subtractor circuits
  • VHDL Tutorial – 12: Design a 8-bit parity generator and circuit checker
    VHDL Tutorial – 12: Design a 8-bit parity generator and circuit checker
  • VHDL tutorial 13: Design 3×8 decoder and 8×3 encoder using VHDL
    VHDL tutorial 13: Design 3×8 decoder and 8×3 encoder using VHDL
  • VHDL Tutorial 14: Design 1×8  demultiplexer and 8×1 multiplexer using VHDL
    VHDL Tutorial 14: Design 1×8  demultiplexer and 8×1 multiplexer using VHDL
  • VHDL Tutorial 17: Design a JK flip-flop (with preset and clear) using VHDL
    VHDL Tutorial 17: Design a JK flip-flop (with preset and clear) using VHDL
  • VHDL Tutorial 18: Design a T flip-flop (with enable and an active high reset input) using VHDL
    VHDL Tutorial 18: Design a T flip-flop (with enable and an active high reset input) using VHDL
More Tutorials >

Recent Articles

  • Amphenol RF launches 40 GHz solderless connectors
  • STMicroelectronics adds 200g vibration sensor for factories
  • Smarter HVAC Climate Solutions by TE
  • Amphenol RF adds NEX10 jack for 1.37 mm cable
  • Samtec headers support 2 to 50 pins

EE ENGINEERING TRAINING DAYS

engineering
Engineers Garage
  • Analog IC TIps
  • Connector Tips
  • Battery Power Tips
  • EDABoard Forums
  • EE World Online
  • Electro-Tech-Online Forums
  • EV Engineering
  • Microcontroller Tips
  • Power Electronic Tips
  • Sensor Tips
  • Test and Measurement Tips
  • 5G Technology World
  • Subscribe to our newsletter
  • About Us
  • Contact Us
  • Advertise

Copyright © 2026 WTWH Media LLC. All Rights Reserved. The material on this site may not be reproduced, distributed, transmitted, cached or otherwise used, except with the prior written permission of WTWH Media
Privacy Policy

Search Engineers Garage

  • Electronic Projects & Tutorials
    • Electronic Projects
      • Arduino Projects
      • AVR
      • Raspberry pi
      • ESP8266
      • BeagleBone
      • 8051 Microcontroller
      • ARM
      • PIC Microcontroller
      • STM32
    • Tutorials
      • Sensor Series
      • Engineering Deep Dives
      • AI
      • ARDUINO Compatible Coding
      • Audio Electronics
      • Battery Management
      • Beginners Electronics Series
      • Brainwave
      • Digital electronics (DE)
      • Electric Vehicles
      • EMI/EMC/RFI
      • EVs
      • Hardware Filters
      • IoT tutorials
      • LoRa/LoRaWAN
      • Power Tutorials
      • Protocol
      • Python
      • RPI Python Programming
      • Sensors
      • USB
      • Thermal management
      • Verilog
      • VHDL
    • Circuit Design
    • Project Videos
    • Components
  • Articles
    • Tech Articles
    • Insight
    • Invention Stories
    • How to
    • What Is
  • News
    • Electronic Product News
    • Business News
    • Company/Start-up News
    • DIY Reviews
    • Guest Post
  • Forums
    • EDABoard.com
    • Electro-Tech-Online
    • EG Forum Archive
  • DigiKey Store
    • Cables, Wires
    • Connectors, Interconnect
    • Discrete
    • Electromechanical
    • Embedded Computers
    • Enclosures, Hardware, Office
    • Integrated Circuits (ICs)
    • Isolators
    • LED/Optoelectronics
    • Passive
    • Power, Circuit Protection
    • Programmers
    • RF, Wireless
    • Semiconductors
    • Sensors, Transducers
    • Test Products
    • Tools
  • Learn
    • eBooks/Tech Tips
    • Design Guides
    • Learning Center
    • Tech Toolboxes
    • Webinars & Digital Events
  • Resources
    • Digital Issues
    • EE Training Days
    • LEAP Awards
    • Podcasts
    • Webinars / Digital Events
    • White Papers
    • Engineering Diversity & Inclusion
  • Guest Post Guidelines
  • Advertise
  • Subscribe