OpenCV is a popular cross-platform framework for image processing and real-time computer vision. The software framework is useful for efficiently developing real-time computer vision applications that would be extremely time-consuming to create from scratch.
The power of OpenCV’s framework is that it runs seamlessly on embedded platforms like microcomputers. This means developing and running embedded computer vision applications in real-time can be done with little hassle. We covered how to install OpenCV 4.5 and QT5 on Raspberry Pi in this article.
Once you’ve installed OpenCV, it’s time to capture any desired images and/or videos. The system can then process them for useful insights and applications. What’s nice about using Raspberry Pi is the images and videos can be captured by a Raspberry Pi camera — which easily installs on a webcam or CSI port.
In this project, we’ll use a Raspberry Pi camera and record the captured images and videos on a Micro SD card (which hosts Raspberry Pi OS). Let’s get started.
Components required
1. Raspberry Pi 4B/3B x1
2. Raspberry Pi camera x1
3. Power adaptor for Raspberry Pi x1
4. HDMI-To-Micro-HDMI cable x1
5. Display monitor x1
6. Keyboard and mouse x1
7. Raspberry Pi case with camera case x1 (optional)
The camera module
To begin, attach the camera module to Raspberry Pi’s CSI port. Raspberry Pi must be installed with an operating system like Raspbian or Debian Linux — and OpenCV must be installed on the Raspberry Pi OS. Review the installation process of OpenCV 4.5 on Raspbian Bullseye here. For tips on attaching the camera module to RPi’s CSI port, click here.
Once the camera module is set, enable the camera module in Raspberry Pi OS. Open the terminal and execute the following command.
$ sudo raspi-config
In the configuration window, select ‘Interface Options,’ and then ‘Legacy Camera.’ Select ‘yes’ to enable the camera module and reboot the system.

 Test the camera
It’s important to test the camera module to ensure it works before starting the OpenCV code. To do so, open the terminal and execute the below command.
$ raspistill -o test.jpg

You can tell the camera module is working if an image is clicked and saved on Raspbian. If there’s no image, either the camera module is faulty or it’s not installed correctly on the CSI port.
Installing Picamera
Next, install the Picamera library for use with the RPi camera. You’ll install the package in the virtual environment we created when installing OpenCV 4.5 on Raspberry Pi.
Open the terminal and activate the virtual environment by executing this command:
$ workon cv
Note that ‘cv’ is the name of the virtual environment created in the previous tutorial. You can install the Picamera package within the virtual environment with the following:
$ pip install “picamera[array]”

Picamera is necessary to work with the camera module. The OpenCV array sub-module is required for the images. This is because OpenCV represents images as NumPy arrays. The array sub-module lets us obtain the NumPy arrays from the camera module.
The images
There are two ways to record and access images using the RPi camera via OpenCV. One way is to capture an image using the Picamera module and then use OpenCV to read and display the image. The other way is to directly write an image as a Numpy array, and then display it.
First, import the required modules:
from picamera import PiCamera
import time
import cv2
To write an image as an OpenCV array, the ‘picamera.array’ module must be imported in the Python script as follows.
from picamera.array import PiRGBArray
Whether capturing an image using Picamera or the picamera.array, it’s necessary to instantiate a Picamera object.
camera = PiCamera()
To capture an image using the Picamera module, use this code:
time.sleep(0.1)
camera.capture(‘test.jpg’)
A delay of 100 milliseconds is provided, allowing the camera module to warm up. The camera.capture() method takes a shot and saves it on a MicroSD card by a filename that’s specified as a parameter.
To capture an image using the picamera.array module, use this code:
rawImage = PiRGBArray(camera)
time.sleep(0.1)
camera.capture(rawImage, format = “rgb”)
image = rawImage.array
An object of the PiRGBArray class is instantiated to store an image array. The time delay is provided for the camera module to warm up. The image is captured as a NumPy array using the camera.capture() method. The captured image array is stored in a variable ‘image.’
OpenCV’s imread() function is used to read an image. The function has the following prototype.
imread(filename, flags)
The imread() function takes two arguments. The first argument is a fully qualified path to the image file. The second argument is an optional flag specifying how the image is represented. It can take any one of the following values.
- cv2.IMREAD_UNCHANGED or -1: representing an image as it is
- cv2.IMREAD_GRAYSCALE or 0: representing a grayscale image
- cv2.IMREAD_COLOR or 1: representing a color image.
This code reads the test.jpeg as it is.
image = cv2.imread(‘test.jpg’, -1)
To display an image in the OpenCV window, the imshow() function is used, which has this prototype:
imshow(window_name, image)
The function takes two arguments. The first is the name of the OpenCV window that displays the image. The window can be defined and configured before calling in the imshow() function as follows.
cv2.namedWindow(‘Image’, cv2.WINDOW_NORMAL)
cv2.resizeWindow(‘Image’, 640, 480)
The window can be directly instantiated from the imshow() function itself even if it not prior defined. However, the function does not configure the window.
The second argument in the imshow() function is the image object, which is either a captured image file or an image array that’s to be displayed. The code below displays the image object captured through Picamera or the picamera.array in an OpenCV window named ‘image.’
cv2.imshow(‘Image’, image)
cv2.waitKey(0)
The imshow() function is used with the waitKey() and destroyAllWindows() / destroyWindow() functions. The waitKey() function is a keyboard-binding function that takes a single argument, indicating the time image object is displayed in an OpenCV window in milliseconds.
The code continues if the user presses any key before the time specified. If ‘0’ is passed as an argument, the program waits indefinitely for a keystroke.
The waitkey() function can also detect specific keystrokes to manipulate an image or close the OpenCV window. The destroyAllWindows() function closes all open OpenCV windows and releases its resources. The destroyWindow() function only closes the current OpenCV window and releases its resources.
To write an image, use OpenCV’s imwrite() function. The function must be to record an image object if it’s captured through the picamera.array. It has the following prototype.
imwrite(filename, image)
The function takes two arguments. The first is the filename, including its extension (like jpg, jpeg, png, etc.), that saves the image object. The second argument is the image object to be saved. The following code saves an image object ‘image’ as ‘test.jpeg’. The image object is captured through the picamera.array.
cv2.imwrite(“test.jpeg”, image)
The Python scripts
The following Python script captures an image using Picamera. The image is instantly saved as a ‘test.jpeg’ when captured using this module. The OpenCV functions are then used to read and display the stored image in an OpenCV window.
The following Python script captures an image using the picamera.array. The script first captures a still image as an image array object. The captured image is displayed in an OpenCV window. Then, it’s saved on MicroSD card as a ‘test.jpeg’ using the imwrite() function in OpenCV.
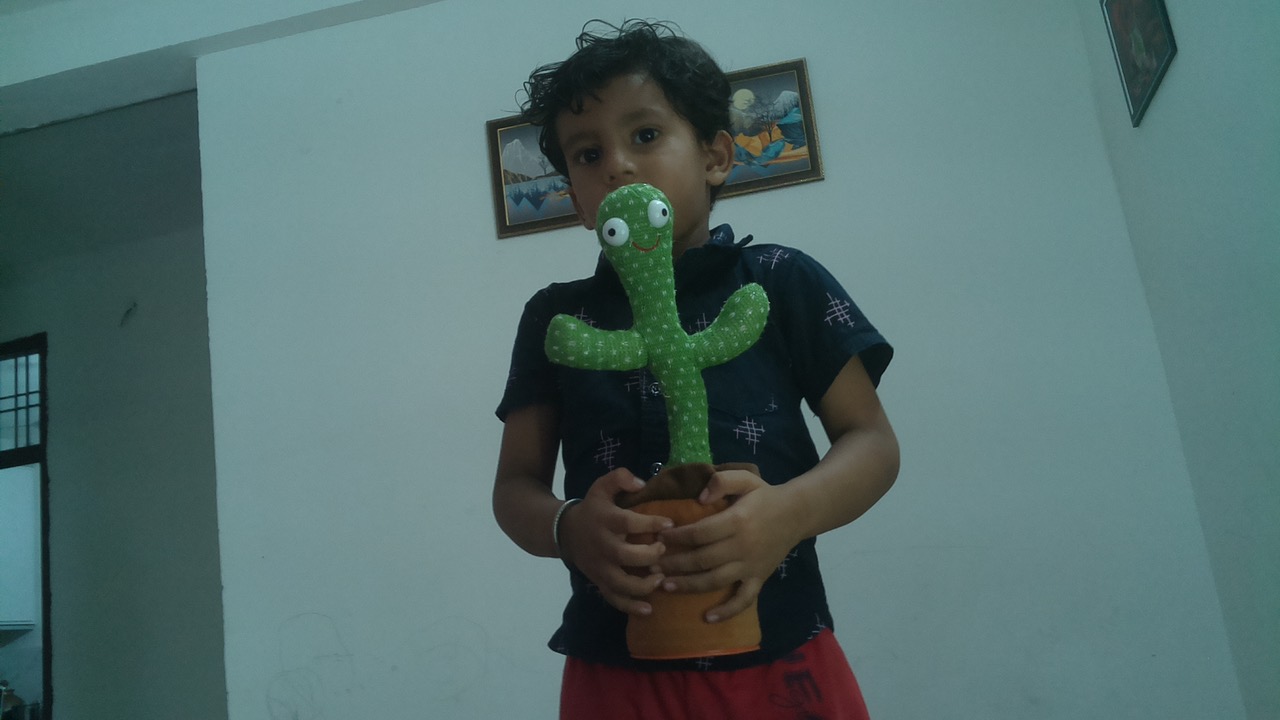
An image the author’s son captured using OpenCV on the Raspberry Pi camera module.
Accessing videos
Typically, the cv.VideoCapture() function is used in OpenCV to capture a video. This function creates a video capture object that can be displayed or streamed as video. When using Raspberry Pi’s camera module, it’s more effective to capture a continuous image sequence as image array objects to access a video.
Each captured image serves as a frame of the video. The number of frames captured in a second depends upon the frame rate set for the Picamera object. The frames are displayed in an OpenCV window in real time. Continuously and consecutively playing the captured frames simulates an actual video. The same frames can also be stored as a video file.
To capture image arrays as frames of a video, use the picamera.capture_continuous() function. The Python script that follows captures the images and displays them in an OpenCV window as a video. The images are taken using the picamera.array module.
Recording videos
To record a video using the RPi camera module, use the cv.VideoWriter() function. It saves the output video to a specified directory. The function has the following prototype:
VideoWriter(filename, apiPreference, fourcc, fps, frameSize[, isColor])
This function has these arguments:
- filename: pathname for the output video file
- apiPreference: API backends identifier
- fourcc: a 4-character code of codec used to compress the frames (fourcc)
- fps: frame rate of the created video stream
- frame_size: Ssize of the video frames
- isColor: if not zero, the encoder will expect and encode the color frames; otherwise, it will work with grayscale frames. This flag is currently supported on Windows only.
To save the output video in the AVI format, use the following code.
cv2.VideoWriter_fourcc(‘M’,’J’,’P’,’G’)
To save the output video in MP4 format, use the following code.
cv2.VideoWriter_fourcc(*’XVID’)
After the video is recorded, the cv.VideoWriter object must be released by calling the video_writer.release() function. The Python script that follows records a video by capturing continuous images as image array objects that are accessed in an OpenCV window.
This is a video of my son recorded using OpenCV with the Raspberry Pi camera module.
[Link to dCV02-DVemonstration video CV02-DV]
Conclusion
OpenCV is an excellent framework for editing and processing images and videos for real-time computer vision applications. The framework supports embedded vision projects as it runs seamlessly over various microcomputers, including Raspberry Pi.
After installing OpenCV, it’s easy to access images and videos through the available peripherals. Images and videos can be captured and recorded using a Raspberry Pi camera module attached to CSI port or a USB webcam. In this project, we used the RPi camera module to access and record images and videos.
You may also like:


Filed Under: Raspberry pi
Log in to leave a comment:
Lost your password?
Don't have an account? Register here