In this article, we will be creating a pet feeding system that can be controlled by WhatsApp.
Components required
 Tools required/ libraries required
Linux based machine
Python-based WhatsApp API
MQTT based
Python IDE
Arduino IDE
Technical insights
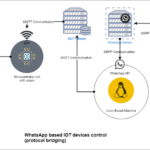
The complete project has three types of communication and devices. XMPP (WhatsApp, MQTT, and Arduino Serial) can also be categorized as M2M communication (machine to machine communication).
Technical challenges were to make a device that can be controlled with an interface that is readily available to everyone. So, we will be using WhatsApp with MQTT to control the pet feeder.
Block diagram
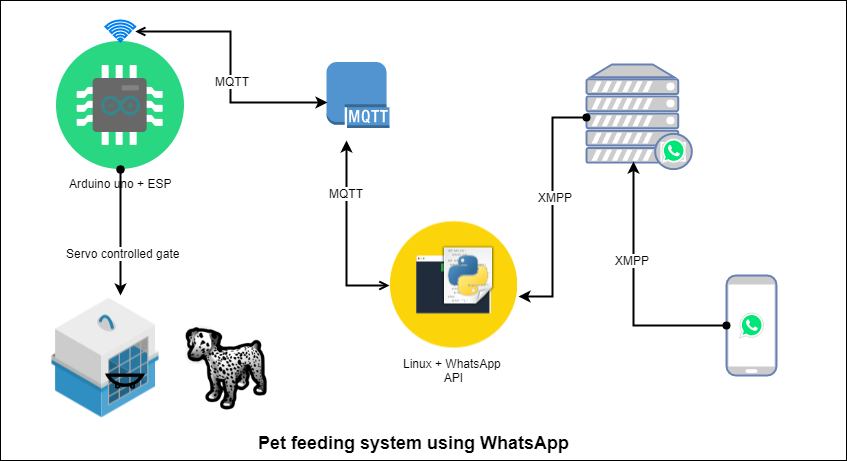
Figure 1 Pet feeding system using WhatsApp
The pet feeding box is controlled with a door controlled using Atmega328 (Arduino UNO) and ESP. Arduino is receiving commands over MQTT using ESP. There is a Linux-based machine that is running WhatsApp API to read messages from WhatsApp and send them to the MQTT broker. The ESP receives commands from the broker to control the servo connected to the feeding system door.
Circuit diagram
 Connection for servo
 How the system works
When a message is sent from the pet owner to the pet feeding system using WhatsApp the message first goes to the Linux machine, where the message is read from WhatsApp using API. The message is scanned if any command is available to control the system. The command is extracted and sent to the system using MQTT. The message is received by ESP and sent to Arduino over Serial, and if the message says to open the door of the feeding system, then the servo moves, and the door is opened.
Understanding the source code
As the project has two parts
- Read messages over WhatsApp and send them to MQTT: It includes code for Linux machines and installing WhatsApp API and MQTT implementation.
- Read Messages over MQTT and control the servo motor: Arduino code to control the servo and ESP for communication over MQTT.
Let’s first understand the communication with WhatsApp and MQTT.
Code for Python script
The python script is installed with “Yowsup” WhatsApp API to read and send messages from WhatsApp.
There are two files in this script run.py and layer.py.
Understanding File Run.py
We will call our libraries at the top of the file
from yowsup.stacks import YowStackBuilder
from yowsup.layers.auth import AuthError
from yowsup.layers import YowLayerEvent
from yowsup.layers.network import YowNetworkLayer
from yowsup.env import YowsupEnv
- We will also attach the layer file on the top because the main class “Echolayer” exists inside that file.
From the layer import EchoLayer
- We can name the layer file anything, but we must put the same name here.
- Inside the py, we will declare our main variable for password and events we want to occur.
credentials = (“91xxxxxxxxxx”, “HkhWVW5/Wnr493HXK8NKl/htpno=”)
- Now we pass them to the layer and build the stack. Also, the loop which will keep the connection live is called.
stack.setCredentials(credentials)
stack.broadcastEvent(YowLayerEvent(YowNetworkLayer.EVENT_STATE_CO
NNECT)) #sending the connect signal
stack.loop() #this is the program mainloop
Understanding File layer.py
This file contains the Protocol library for MQTT and can receive messages from WhatsApp.
Understating how messages are received from WhatsApp
This file contains the class which will receive any messages incoming to this number, and that will be a callback entity so any other loop can be run inside the file.
@ProtocolEntityCallback(“message”)
def onMessage(self, messageProtocolEntity):
if True:
Message data and the number from which the message came can be obtained below.
incomming_message_data = messageProtocolEntity.getBody()
This will get the message body which is the real message. It will store in a string variable “incomming_message_data”
incomming_message_sender = messageProtocolEntity.getFrom()
This line will store the incoming message contact number in the string variable “incomming_message_sender”
Understanding the MQTT layers for sending and receiving
First of all, we will import libraries that are necessary for MQTT.
import paho.mqtt.client as mqtt
import paho.mqtt.publish as publish
now we will declare a variable named client with mqtt client.
client = mqtt.Client()
Now we will make two function callbacks 1. For receiving messages, 2. Doing something on connection successful.
client.on_connect = on_connect
client.on_message = on_message
Finally, we will connect to MQTT broker on a port, and start the client inside a nonblocking loop
client.connect(“broker.hivemq.com”, 1883, 60)
client.loop_start()
After the connection is successful, we can send messages using this
publish.single(topic, message_data, hostname=”broker.hivemq.com”)
So, now when any message is received on WhatsApp, it is stored in a string, and then that string is scanned for some keywords that define that message as a command to turn servo ON/OFF.
elif(“lights on” in incomming_msg):
#Do something on match
Now if the condition is matched we send the control command to the MQTT broker.
publish.single(“ts/dog”, “feed”, hostname=”broker.hivemq.com”)
When any unrecognized message is received the message on WhatsApp is replied that this is invalid.
Code for Arduino
Arduino is installed with a code that receives data on serial and controls the servo according.
We first add a ” Servo ” library to control the servo easily
#include <Servo.
Then we attach the servo according the circuit diagram, and we can control the servo by sending the angle to the servo object.
myservo.attach(5); // attaches the servo on pin 9 to the servo object
myservo.write(0);
Also, when a specific string is received like “feed” it will turn the Servo where the door will be open and on receiving “ok” it will close the door.
if (rec == “feed”) {
myservo.write(180);
}
if (rec == “ok”) {
myservo.write(0);
}
Code for ESP
ESP is connected with Arduino on serial port and subscribed on a MQTT topic to receive d it. It sends the data which is received on the MQTT topic to the serial port and data from the serial to the MQTT topic.
To learn more about ESP and MQTT, refer to our previous articles.
You may also like:


Filed Under: Electronic Projects

Questions related to this article?
👉Ask and discuss on EDAboard.com and Electro-Tech-Online.com forums.
Tell Us What You Think!!
You must be logged in to post a comment.