This article is to make the process of transferring files from a Windows PC to Raspberry Pi easier. The Raspberry Pi is connected to a Windows PC through Ethernet cable and the GUI is obtained using a VNC server. Sharing files between Raspberry Pi and Windows is often very useful for Raspberry Pi users. Whether we need to transfer media files to the Raspberry Pi or want to share some software packages. This article discusses how to enable file sharing for a folder on the Raspberry Pi running the Raspbian OS.
Microsoft developed the protocol called Common Internet File System (CIFS) for transfer of files between windows machines. The most popular implementation of CIFS in LINUX system is known as Samba and it allows Raspberry Pi to act as a CIFS file server, which allows a Windows PC to mount a folder on a Raspberry Pi and then allowing to modify(copy, delete, read and write) the files on it.
In this project the Raspberrypi board is booted with the Ubuntu OS and is connected to the Ethernet port of a Windows7 PC. The board is connected to the internet connection as explained in the project Connecting the Raspberrypi to the internet. The IP address of the Raspberrypi board has been obtained to remote login in the TUI using the PUTTY and is remotely accessed using VNC.
First step in this process is to install the samba software which is capable of providing support for the Windows naming service (WINS), and support for linking Raspberry Pi to Windows by adding it to the Workgroup. A Workgroup is a cluster of computers on a local network that can access each other’s folders. Installing this software is very simple and is discussed in the following.
Open the command terminal and type the following command:
apt-get install samba samba-common-bin
If not logged as the root user, add the sudo before the command like:
sudo apt-get install samba samba-common-bin
Once the Linux finds the files to be downloaded it will prompt for permission to proceed. Around 35 Mb is required to download all the required files and so make sure that the SDcard has enough available free space.
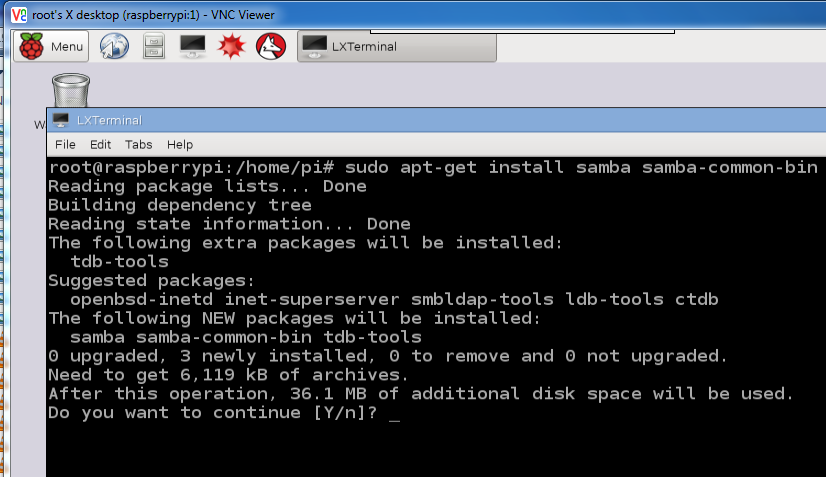
Fig. 1: Installing Samba Software For Support WINS And Raspberry Pi
Type ‘y’ and press Enter to proceed.
That will install the software in the local disk which is SD card here.
After installation, configure the software by opening the file /etc/samba/smb.conf using the command:
sudo nano /etc/samba/smb.conf
Set up the entries for workgroup and wins support as follows:
workgroup = your_workgroup_name
wins support = yes
Workgroup name can be anything, and it should matches the name of the Workgroup that you want to join.
Scroll down config file until you see a section called Share Definitions, and place this code there. The path should point to the drive or folder that you want to share. Setting guest to no will prompt for a password to access the shared folder.
[pihome]
comment= Pi Home
path=/home/pi
browseable=Yes
writeable=Yes
only guest=no
create mask=0777
directory mask=0777
public=no
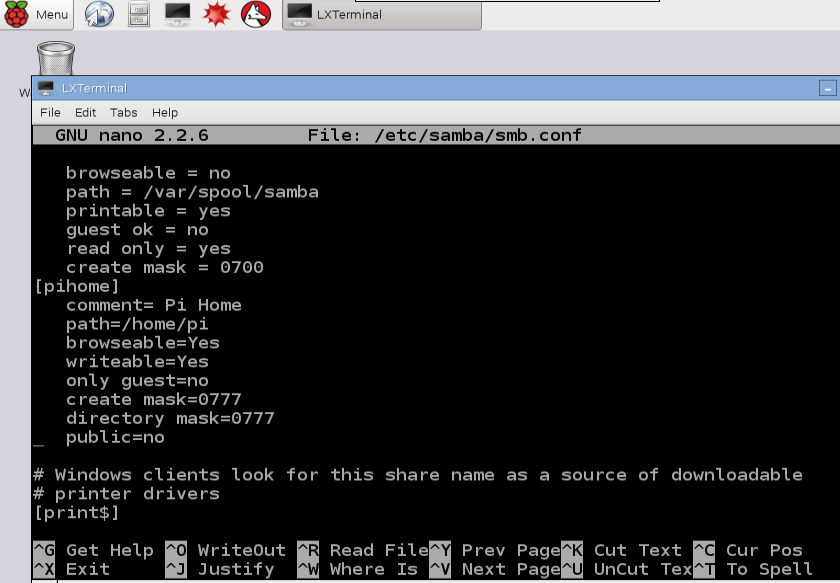
Fig. 2: Configuring Samba Software for Raspberry Pi
Press “Ctrl + X” to leave the nano editor and type “Y” to confirm saving the file. Press ENTER to keep the filename unchanged(i.e. /etc/samba/smb.conf).
Now, we should restart the software so that samba reads the configuration file and acts as we mentioned. To restart type the below command:
sudo service samba restart
There is one last step before you can access the shared folders. A password needs to be defined since CIFS is used to access files on the Raspberry Pi. To set the password for the default pi user, type:
sudo smbpasswd –a pi
The above command will add the user pi to the Samba users and ask for a password. You need to repeat this step for any other users you want to add.
Connect from Windows:
In windows machine, Go to the My computer > Network’s > network. The window where all the network available devices are displayed will be opened up which includes RASPBERRYPI in it.
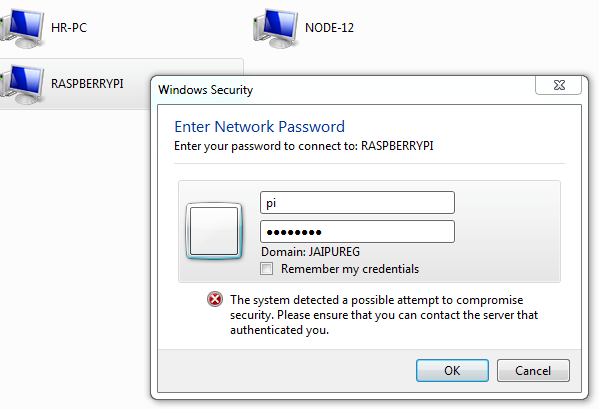
Fig. 3: Connecting RaspberryPi To Window
Double click on it > it will prompt for login > Use pi as user name and password which we set in the previous step. Now you can see folders which are shared from raspberry Pi.
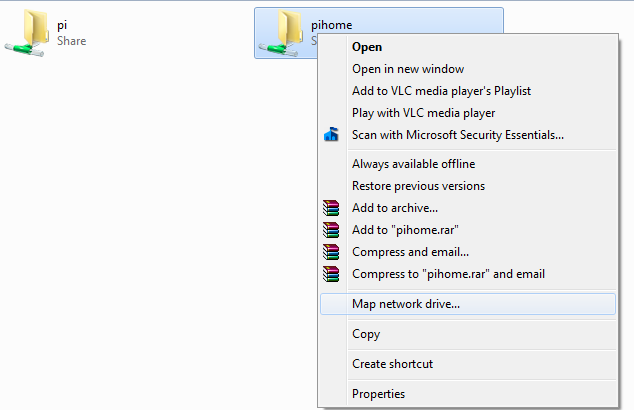
Fig. 4: Mapping Drive For Windows & Raspberry Pi Connection
Right click on the folder and select ‘Map network drive’.
Click on finish in the window.
Now do the same steps with the other folders. Once all the steps are completed, you can see the folders in your computer.
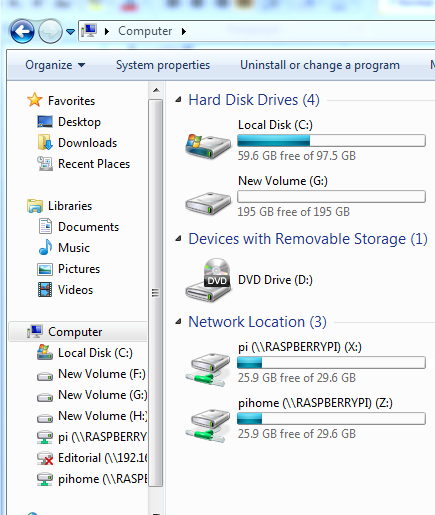
Fig. 5: Shared Folders In Windows & Raspberry Pi Interface
Note: Each time you restart your PC it will prompt you for logging in. If you do not want to deal with logging in you can also make the share publicly available by changing the config file to say:
public=yes
Please note that this is not recommended, since anyone can access, modify and delete your files.
You may also like:
Filed Under: Raspberry pi, Tutorials



Questions related to this article?
👉Ask and discuss on EDAboard.com and Electro-Tech-Online.com forums.
Tell Us What You Think!!
You must be logged in to post a comment.