PROJECT OVERVIEW
This project uses cheap Hitachi HD44780 based 16×2 LCD to display regional Indian language. These displays are designed for English text only, but they have provisions to display custom characters. On the LCD, each character is 8 pixels high by 5 pixels wide. Using a custom character designer from here-http://www.quinapalus.com/hd44780udg.html the regional fonts were converted to hex codes, later to be used in the project. In order to understand the theory behind custom character generation we have to take a look at the memory mapping of HD44780.
It consists of:-
1) DD RAM
2) CG ROM
3) CG RAM
1) DD RAM (Display Data RAM): This partof the memory holds the characters which are to be displayed on LCD screen. It has a capacity of 80 characters and it stores display data represented in 8-bit character codes.
2) CG ROM(Character Generator ROM): This part of the memory holds the font bitmap for predefined characters that LCD can display.It can generate 5 x 8 dot character patterns from 8-bit character codes that are stored in the LCD controller. User defined character patterns are also available by mask-programmed ROM.
3) CG RAM(Character Generator RAM): CGRAM area is used to store our custom characters in LCD. The stored characters can now be sent to DD RAM for displaying. A maximum of eight character patterns can be written for 5×8 dots. However 8 characters have very limited use in displaying a full set of regional character set. So this part of memory is refreshed continuously to generate new character sets and provide a scrolling display.
In order to make it more flexible the project is designed as an Arduino library. User can add his/her regional language by creating the custom characters and mapping them to a keyboard layout. Presently only Bengali and Hindi are supported.
Design and mapping of characters

In order for the project to work each and every character needs to be transformed into a hex array of size n*8, where ‘n’ is the number of characters in a given language set. Using this online tool you can generate custom fonts to be displayed on a 16×2 LCD. Byclicking on desired green matrix to set /clear pixels you can get your desired font along with its hex representation. In order to add a new language set, one .h header file and one .cpp file has to be created. The .cpp file contains the hex array of custom characters generated by the above tool along with an int type array which maps each custom character with normal US-EN keyboard. Info about size and type of array used is stored in .h header file.
Keyboard Layout
To display user information on regional language the characters need to be mapped onto a standard keyboard. In this case, the custom characters are mapped to a standard US-EN keyboard. When defining new character set, ASCII values of keys are assigned uniquely to each new custom character in ascending order [order is important as binary search is employed!]. For example, to display a vacant position spacebar key with ASCII value 32 is assigned to hex array {0x00,0x00,0x00,0x00,0x00,0x00,0x00,0x00}.
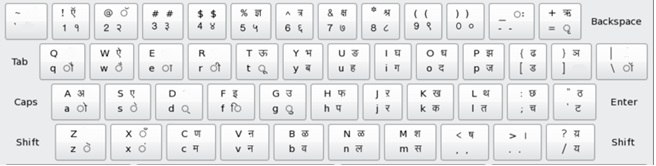
Bengali Keyboard layout:-

Hindi Keyboard layout:-
Sample Programs and Circuit
Usage
Three sample programs are included namely- “SerialDisplay” , “PrintAllChar” , “Bengali/Hindi Text”. The functioning of each sample programs is described below:-
#################
# SerialDisplay
#################
The SerialDisplay function requires the use of “Serial Monitor” in the Arduino IDE for input. After uploading the program the user needs to open the serial monitor from where the input can be given. For proper input please refer to the keyboard layout pictures.
#################
# PrintAllChar
#################
PrintAllChar function basically displays all the stored fonts in the library. It does not involve any user interaction. This can be used to test whether all the designed fonts are working as required.
#######################
# Bengali/Hindi Text
#######################
This function prints the regional fonts by taking the input from user in the form of function parameter. Usage involves sending the input in the form of String.
void loop()
{
Bengali_Text(lcd,”r|H,l kr”);//printing my name[use the keyboard layout file for guidance]
delay(300);
Bengali_Text(lcd,”b|Vl|”);//printing the word “Bangla” [use the keyboard layout file for guidance]
delay(300);
}
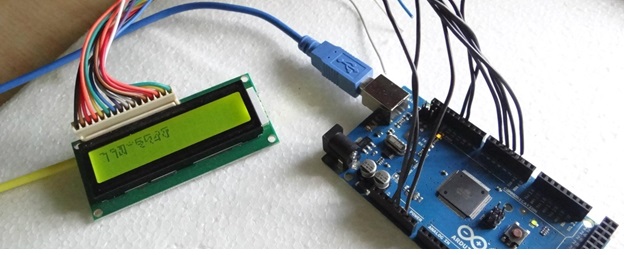
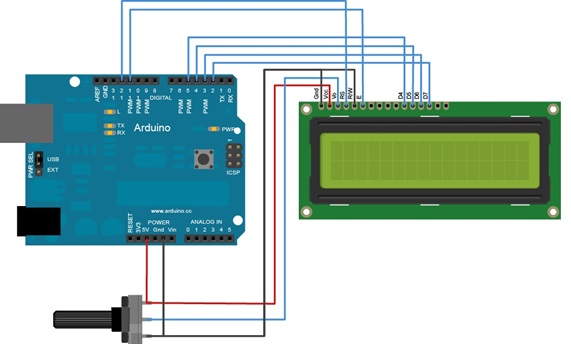
Circuit
HD44780 controllers use two types of addressing modes: 4 bit & 8 bit mode. This project uses 4 bit addressing mode which requires only 6 digital I/O Arduino pins to interface with 16×2 LCD. (Check here Arduino Tutorials) Following connections are made between Arduino and 16×2 LCD module:-
LCD Pin Arduino Pin
1 (VSS) Arduino GND pin
2 (VDD) + 5V Arduino pin
3 (contrast) Resistor or potentiometer to ArduinoGND pin
4 RS Arduino pin 12
5 R/W ArduinoGND pin
6 Enable Arduino pin 11
7 NC
8 NC
9 NC
10 NC
11 (Data 4) Arduino pin 5
12 (Data 5) Arduino pin 4
13 (Data 6) Arduino pin 3
14 (Data 7) Arduino pin 2
15 + 5V Arduino pin
16 470Ohm resistor to GND Arduino
Circuit Images and Code
Images


Code:-
Place the Hindi/Bengali libraries inside Arduino/libraries/ folder. Code files are attached with the document.
Videos
Videos:-
Circuit Diagrams
Filed Under: Electronic Projects
Log in to leave a comment:
Lost your password?
Don't have an account? Register here