Engineers Garage

  • Electronic Projects & Tutorials
    • Electronic Projects
      • Arduino Projects
      • AVR
      • Raspberry pi
      • ESP8266
      • BeagleBone
      • 8051 Microcontroller
      • ARM
      • PIC Microcontroller
      • STM32
    • Tutorials
      • Audio Electronics
      • Battery Management
      • Brainwave
      • Electric Vehicles
      • EMI/EMC/RFI
      • Hardware Filters
      • IoT tutorials
      • Power Tutorials
      • Python
      • Sensors
      • USB
      • VHDL
    • Circuit Design
    • Project Videos
    • Components
  • Articles
    • Tech Articles
    • Insight
    • Invention Stories
    • How to
    • What Is
  • News
    • Electronic Product News
    • Business News
    • Company/Start-up News
    • DIY Reviews
    • Guest Post
  • Forums
    • EDABoard.com
    • Electro-Tech-Online
    • EG Forum Archive
  • DigiKey Store
    • Cables, Wires
    • Connectors, Interconnect
    • Discrete
    • Electromechanical
    • Embedded Computers
    • Enclosures, Hardware, Office
    • Integrated Circuits (ICs)
    • Isolators
    • LED/Optoelectronics
    • Passive
    • Power, Circuit Protection
    • Programmers
    • RF, Wireless
    • Semiconductors
    • Sensors, Transducers
    • Test Products
    • Tools
  • Learn
    • eBooks/Tech Tips
    • Design Guides
    • Learning Center
    • Tech Toolboxes
    • Webinars & Digital Events
  • Resources
    • Digital Issues
    • EE Training Days
    • LEAP Awards
    • Podcasts
    • Webinars / Digital Events
    • White Papers
    • Engineering Diversity & Inclusion
    • DesignFast
  • Guest Post Guidelines
  • Advertise
  • Subscribe

How to Access Raspberry Pi Directly through the Ethernet Port of PC – (Part 03/38)

By Ajish Alfred August 10, 2020

The Raspberry pi is a single board minicomputer which has only the essential hardware included so as to meet the goal of low cost. The board is Raspberry pi board runs on ARM11 processor but is available at extremely cheap price. The board is designed with an intention of providing computer education to the remote schools where the PCs are not very commonly used. The idea behind the design is to use the TV screen as the display unit for the Raspberry pi board and hence converting the normal TV into a computer. The board is hence provided with a RCA connector which can be used to connect it directly to a TV screen which is based on PAL and NTSC standard. The board also has a HDMI connector output which can be used to connect the board to a HD TV, but there is no VGA connector assuming that there is no PC or PC monitor in the place where the Raspberry pi is used.

There are situations in which the person using the Raspberry pi has a PC screen but not a HD display device. In such situations one can use remote login to access the Raspberry pi and view the TUI (Text User Interface) on the PC screen. Using a PC to do remote login has other advantages as there is no power adaptor required as  one can power up the Raspberry pi using the USB port of the PC itself and can use the keyboard of the PC to access the TUI. This article discusses how to do remote login in the case where windows is running on the PC and the Ubuntu is installed on Raspberry pi board.


The only additional hardware required to do the remote login is a “cross-over LAN cable” which comes with connectors at both the end and an internal crossover connection between connectors at both the end. 


The remote login can be easily done when there is a router available and the user can access the details of the devices connected to the router. All that required is to connect the one end of the LAN cable to the Ethernet port of the Raspberry pi and the other end to the connector slot of the router. Access the router and find out the IP of the connected devices. The Raspberry pi board will appear in the list with a name of “raspberrypi”. Note the IP and try to login using any remote login software for windows.

In most of the cases there won’t be any router available especially in outdoor conditions with a laptop. In such conditions one has to make a direct connection with the PC and the Raspberry pi. But inside the Ubuntu running in the Raspberry pi board the internet settings are not configured to enable a direct connection with the PC using LAN cable. One has to download server software which will provide an IP to the Raspberry pi board and help the PC to establish a connection with the raspberry pi board. The step-by-step connection process is explained in the following section.

Step: 1 Provide an IP to the windows

The software that can be used with windows7 is DHCP server software which can act as a server for the incoming connections. Before using this software there are few settings to be done in the windows to enable the connection. Go to the control panel > network and internet > network and sharing center > change adapter settings. Right click on the ‘Local Area connection’ and select ‘properties’.

Ethernet Access from Raspberry Pi

Fig. 3: Changing Network Adapters Setting In Windows

Select the Internet protocol version 4 (IPV4) and click on the ‘properties’ button.

LAN Connection Properties

Fig. 4: Select Internet Protocol IPV4 And Click On ‘properties’ 

Now provide an IP and subnet mask for the windows. The IP used in this project is “192.168.0.30” and the subnet mask as “255.255.255.0”.

TCP/IP v4

Fig. 5: Allocate IP And Subnet Mask For The Windows

Now click OK and it is always better to reboot the system.

Step: 2 Connect the Raspberry pi

Once the booting process of the windows is completed, connect the Raspberry pi board to the Ethernet port of the PC. Connect a USB data cable to the Raspberry pi’s power port and the other end to the USB port of the PC. Wait for a while and an “Unidentified network” will appear in the “currently connected to” list usually present in the task bar.

Connect the Raspberry Pi

Fig. 6: Unidentified Network On Connecting To Raspberry Pi

Step: 3 Run the DHCP server software

Unzip the downloaded zip file of the DHCP server software into a folder. Find the executable file “dhcpwiz.exe” inside the folder and run it. Select the network adaptor as the ‘Local Area Connection’ as shown in the following snapshot.

Network Interface

Fig. 7: Running DHCP Server With Local Area Network Connection

Now click on the ‘Next’ button for this window and for every window that opens up, make sure that the default values are not changed. When the window with a title “writing the INI file” opens up, tick on the “Overwrite existing file” and click the button “Write INI file”.

Writing INI File

Fig. 8: Overwrite Write INI File

Click on the ‘Next’ button again. In the following window that opens up, tick on the “Run DHCP server immediately”.

DHCP Configuration

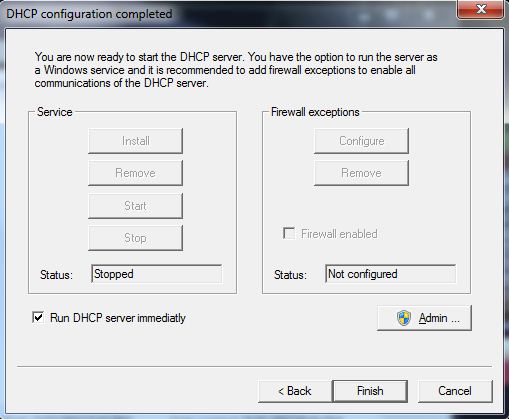
Fig. 9: Running DHCP Configuration Window For Raspberry Pi

Click the ‘Finish’ button now and the following window appears.

DHCP Server

Fig. 10: DHCP Server Window 

Click on the “Continue as tray app.” Button now and click “Yes” on the confirmation window which follows it. Now the DHCP server is running in the windows system and the icon can be found in the task bar normally.

Step: 4 Reconnect the Raspberry pi board

Once the above steps are completed, power off the Raspberry pi board by removing the USB data cable from the PC. Now power on the board again and after the booting process of the Raspberry pi seems to be completed a notification appears from the DHCP server software as shown in the following snap shot.

Assigning IP to Raspberry Pi

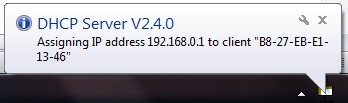
Fig. 11: IP Address To Run Raspberry Pi Board

Note the IP address as it is required to login to the Raspberry pi board using the software which helps in remote login.

Step: 5 Remote login using PUTTY

PuTTY is an SSH and telnet client software which is commonly used with the Windows platform. Download the latest version of the PuTTY and open the .exe file.

PuTTY Configuration

Fig. 12: Remote Login Using Putty To Raspberry Pi Board

As shown in the above snapshot, enter the previously noted IP and keep the default port number. Select SSH mode by clicking on the radio button “SSH”. Now click on the button “Open” and click “Yes” to the confirmation window follows and the PuTTY will display the TUI of the Raspberry pi board.

Logging into PuTTY

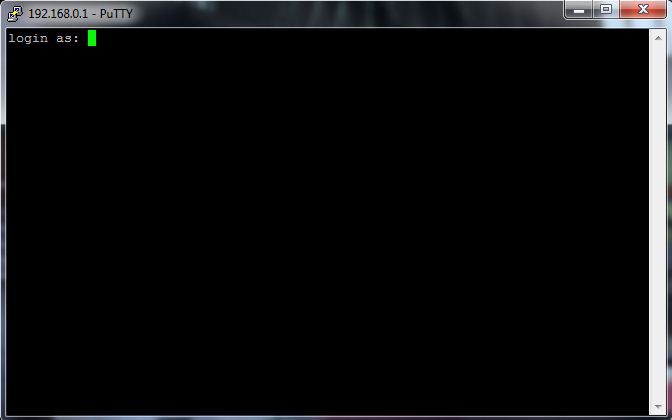
Fig. 13: TUI Of Raspberry Pi

Type the default login and password and start exploring the Raspberry pi.

The default login and password are:

login as : pi

password : raspberry

You may also like:


  • What are the top development boards for AI and ML?

  • What are LoRa gateways and what types are available?

  • What is the Modbus protocol and how does it work?

  • What is an Actuator Sensor Interface (AS-i)?

  • What is the LoRaWAN network and how does it work?

  • What are different types of IoT networks?

Filed Under: Electronic Projects, Raspberry pi
Tagged With: ethernet port, PC, Raspberry Pi
 

Next Article

← Previous Article
Next Article →

Questions related to this article?
👉Ask and discuss on Electro-Tech-Online.com and EDAboard.com forums.


Tell Us What You Think!! Cancel reply

You must be logged in to post a comment.

EE TECH TOOLBOX

“ee
Tech Toolbox: 5G Technology
This Tech Toolbox covers the basics of 5G technology plus a story about how engineers designed and built a prototype DSL router mostly from old cellphone parts. Download this first 5G/wired/wireless communications Tech Toolbox to learn more!

EE Learning Center

EE Learning Center
“engineers
EXPAND YOUR KNOWLEDGE AND STAY CONNECTED
Get the latest info on technologies, tools and strategies for EE professionals.

HAVE A QUESTION?

Have a technical question about an article or other engineering questions? Check out our engineering forums EDABoard.com and Electro-Tech-Online.com where you can get those questions asked and answered by your peers!


RSS EDABOARD.com Discussions

  • No Output Voltage from Voltage Doubler Circuit in Ansys Nexxim (Harmonic Balance Simulation)
  • Discrete IrDA receiver circuit
  • How do loop recording and G-sensors work on front and rear dash cams?
  • Getting different output for op amp circuit
  • Resistor Selection for Amplifier Layout

RSS Electro-Tech-Online.com Discussions

  • PIC KIT 3 not able to program dsPIC
  • Wideband matching an electrically short bowtie antenna; 50 ohm, 434 MHz
  • using a RTC in SF basic
  • Relay buzzing after transformer change?
  • Back to the old BASIC days

Featured – RPi Python Programming (27 Part)

  • RPi Python Programming 21: The SIM900A AT commands
  • RPi Python Programming 22: Calls & SMS using a SIM900A GSM-GPRS modem
  • RPi Python Programming 23: Interfacing a NEO-6MV2 GPS module with Raspberry Pi
  • RPi Python Programming 24: I2C explained
  • RPi Python Programming 25 – Synchronous serial communication in Raspberry Pi using I2C protocol
  • RPi Python Programming 26 – Interfacing ADXL345 accelerometer sensor with Raspberry Pi

Recent Articles

  • GigaDevice launches GD32C231 MCU series with 48MHz Cortex-M23 core and 64KB Flash
  • Advanced Energy releases 425 W CF-rated medical power supply in 3.5 x 6 x 1.5-inch format”
  • LEM combines shunt and Hall effect sensing in 2000 A current measurement unit
  • What is AWS IoT Core and when should you use it?
  • AC-DC power supply extends voltage range to 800 V DC

EE ENGINEERING TRAINING DAYS

engineering

Submit a Guest Post

submit a guest post
Engineers Garage
  • Analog IC TIps
  • Connector Tips
  • Battery Power Tips
  • DesignFast
  • EDABoard Forums
  • EE World Online
  • Electro-Tech-Online Forums
  • EV Engineering
  • Microcontroller Tips
  • Power Electronic Tips
  • Sensor Tips
  • Test and Measurement Tips
  • 5G Technology World
  • Subscribe to our newsletter
  • About Us
  • Contact Us
  • Advertise

Copyright © 2025 WTWH Media LLC. All Rights Reserved. The material on this site may not be reproduced, distributed, transmitted, cached or otherwise used, except with the prior written permission of WTWH Media
Privacy Policy

Search Engineers Garage

  • Electronic Projects & Tutorials
    • Electronic Projects
      • Arduino Projects
      • AVR
      • Raspberry pi
      • ESP8266
      • BeagleBone
      • 8051 Microcontroller
      • ARM
      • PIC Microcontroller
      • STM32
    • Tutorials
      • Audio Electronics
      • Battery Management
      • Brainwave
      • Electric Vehicles
      • EMI/EMC/RFI
      • Hardware Filters
      • IoT tutorials
      • Power Tutorials
      • Python
      • Sensors
      • USB
      • VHDL
    • Circuit Design
    • Project Videos
    • Components
  • Articles
    • Tech Articles
    • Insight
    • Invention Stories
    • How to
    • What Is
  • News
    • Electronic Product News
    • Business News
    • Company/Start-up News
    • DIY Reviews
    • Guest Post
  • Forums
    • EDABoard.com
    • Electro-Tech-Online
    • EG Forum Archive
  • DigiKey Store
    • Cables, Wires
    • Connectors, Interconnect
    • Discrete
    • Electromechanical
    • Embedded Computers
    • Enclosures, Hardware, Office
    • Integrated Circuits (ICs)
    • Isolators
    • LED/Optoelectronics
    • Passive
    • Power, Circuit Protection
    • Programmers
    • RF, Wireless
    • Semiconductors
    • Sensors, Transducers
    • Test Products
    • Tools
  • Learn
    • eBooks/Tech Tips
    • Design Guides
    • Learning Center
    • Tech Toolboxes
    • Webinars & Digital Events
  • Resources
    • Digital Issues
    • EE Training Days
    • LEAP Awards
    • Podcasts
    • Webinars / Digital Events
    • White Papers
    • Engineering Diversity & Inclusion
    • DesignFast
  • Guest Post Guidelines
  • Advertise
  • Subscribe