Engineers Garage

  • Electronic Projects & Tutorials
    • Electronic Projects
      • Arduino Projects
      • AVR
      • Raspberry pi
      • ESP8266
      • BeagleBone
      • 8051 Microcontroller
      • ARM
      • PIC Microcontroller
      • STM32
    • Tutorials
      • Audio Electronics
      • Battery Management
      • Brainwave
      • Electric Vehicles
      • EMI/EMC/RFI
      • Hardware Filters
      • IoT tutorials
      • Power Tutorials
      • Python
      • Sensors
      • USB
      • VHDL
    • Circuit Design
    • Project Videos
    • Components
  • Articles
    • Tech Articles
    • Insight
    • Invention Stories
    • How to
    • What Is
  • News
    • Electronic Product News
    • Business News
    • Company/Start-up News
    • DIY Reviews
    • Guest Post
  • Forums
    • EDABoard.com
    • Electro-Tech-Online
    • EG Forum Archive
  • DigiKey Store
    • Cables, Wires
    • Connectors, Interconnect
    • Discrete
    • Electromechanical
    • Embedded Computers
    • Enclosures, Hardware, Office
    • Integrated Circuits (ICs)
    • Isolators
    • LED/Optoelectronics
    • Passive
    • Power, Circuit Protection
    • Programmers
    • RF, Wireless
    • Semiconductors
    • Sensors, Transducers
    • Test Products
    • Tools
  • Learn
    • eBooks/Tech Tips
    • Design Guides
    • Learning Center
    • Tech Toolboxes
    • Webinars & Digital Events
  • Resources
    • Digital Issues
    • EE Training Days
    • LEAP Awards
    • Podcasts
    • Webinars / Digital Events
    • White Papers
    • Engineering Diversity & Inclusion
    • DesignFast
  • Guest Post Guidelines
  • Advertise
  • Subscribe

How to Connect Raspberry Pi to WiFi- (Part 3/12)

By Prabakaran P.M May 23, 2021

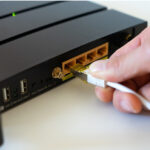
This article is to make the procedure of setting up the WiFi. The Raspberry Pi is connected to Windows PC through Ethernet cable and the GUI is obtained using a VNC server. Although Raspberry Pi Model B comes with 100Mbps wired Ethernet, it is also essential to connect WiFi. The best arrangement is to purchase a cheap USB WiFi connector and utilize one of the USB ports to get to our WiFi home router. Setting up a Raspberry Pi utilizes the Raspbian OS to get to your remote system is simple – This article will guide you through the procedure.


Prerequisites & Equipment:

You will need the following:

  1. A Raspberry Pi Model B or greater.

  2. A USB WiFi Adapter (Edimax – Wireless 802.11b/g/n nano USB adapter is used here – it’s small and cheap!)

  3. An SD Card flashed with the Raspbian OS (Here is a guide if you need)

  4. Access to the Raspberry either via a keyboard and a monitor or remotely.

Before we continue I need to call attention to the significance of purchasing the compatible USB WiFi Adapter. Since not all the wifi dongles are plug and play to the Raspberry Pi. Some of the time you will need to download a driver to make them work. While drivers are typically accessible for Windows PCs – it is an alternate world for Linux and Raspberry Pi’s. This is the reason it is critical to purchase a WiFi Adapter that says “Linux” in the package. I utilize the Edimax – Wireless 802.11b/g/n nano USB adapter because I have found it to be cheap and very easy to work with. http://elinux.org/RPi_USB_Wi-Fi_Adapters — This link gives the list of plug and play compatible USB WiFi dongles for Raspberry Pi.

Adding WiFi adapter to the Raspberry Pi:

In this tutorial the Raspberrypi board is booted with the Ubuntu OS and is connected to the Ethernet port of a Windows7 PC. The board is connected to the internet connection as explained in the article Connecting the Raspberry pi to the internet. The IP address of the Raspberrypi board has been obtained to remote login in the TUI using the PUTTY and is remotely accessed using VNC.

After booting and logging-in you want to make sure that the new wireless adapter is found by Raspberry Pi. To look at which peripherals the operating system found when booting run the following command:

lsusb

This will give the list of USB devices connected to the Raspberry Pi.

Detecting USB devices connected to Raspberry Pi

Fig. 2: Detecting USB Devices Connected To Raspberry Pi

Your device should be in the list. Followed by this command will ensure that WiFi dongle is Recognized.

dmesg | more

You can use the space-bar to scroll down a page at a time – towards the end you will see something similar to the following lines:

Raspberry pi Recognizing the USB Device

Fig. 3: Raspberry Pi Recognizing The USB Device

This means that the operating system recognized the USB WiFi Adapter using one of the built-in drivers (you can return to the terminal by pressing “q”). All that is left is to configure your WiFi connection.

Adding the network details to the Raspberry Pi:

Open a Terminal session enter the following command into it:

sudo nano /etc/network/interfaces

This will open the file in nano editor. After opening the file in nano, you will see a screen like this:

Adding network details to Raspberry Pi

Fig. 4: Adding Network Details To Raspberry Pi

To configure your wireless network you want to modify the file such that it looks like the following:

auto lo

iface lo inet loopback

auto eth0

allow-hotplug eth0

iface eth0 inet manual

auto wlan0

allow-hotplug wlan0

iface wlan0 inet manual

wpa-conf /etc/wpa_supplicant/wpa_supplicant.conf

After editing the file you should see something like the following:

Editing a File in Raspberry Pi to configure Wireless Network

Fig. 5: Editing A File In Raspberry Pi To Configure Wireless Network

To save the file, press Ctrl+O this will write the file to the disk – afterwards you can exit nano by pressing Ctrl+X. If nano asks if you want to Save modified buffer? Press “Y” followed by hitting enter to confirm the filename.

Now open the wpa-supplicant configuration file in nano by entering this command:

sudo nano /etc/wpa_supplicant/wpa_supplicant.conf

Go to the bottom of the file and add the following:

network={

ssid=”Your_SSID_name”

psk=”Your_wifi_password”

}

Now save the file by pressing ctrl+x then y, then finally press enter.

At this point, wpa-supplicant will normally notice a change has occurred within a few seconds, and it will try and connect to the network. If it does not, either manually restart the interface with sudo ifdown wlan0 and sudo ifup wlan0, or reboot your Raspberry Pi with sudo reboot.

Testing Raspberry Pi connected to Wifi

Fig. 6: Testing Raspberry Pi Connected To Wifi

You can verify if it has successfully connected using ifconfig. If the inet addr field has an address beside it, the Pi has connected to the network. If not, check your SSID and password are correct.

You may also like:


  • What is the LoRaWAN network and how does it work?

  • What are the top 4G modems available in India?

  • What are the top development boards for AI and ML?

  • What are LoRa gateways and what types are available?

  • What is IP geofencing?

  • What are the top open-source software systems for home automation?

Filed Under: PIC Microcontroller, Raspberry pi, Tutorials


Next Article

← Previous Article
Next Article →

Questions related to this article?
👉Ask and discuss on Electro-Tech-Online.com and EDAboard.com forums.


Tell Us What You Think!! Cancel reply

You must be logged in to post a comment.

EE TECH TOOLBOX

“ee
Tech Toolbox: 5G Technology
This Tech Toolbox covers the basics of 5G technology plus a story about how engineers designed and built a prototype DSL router mostly from old cellphone parts. Download this first 5G/wired/wireless communications Tech Toolbox to learn more!

EE Learning Center

EE Learning Center
“engineers
EXPAND YOUR KNOWLEDGE AND STAY CONNECTED
Get the latest info on technologies, tools and strategies for EE professionals.

HAVE A QUESTION?

Have a technical question about an article or other engineering questions? Check out our engineering forums EDABoard.com and Electro-Tech-Online.com where you can get those questions asked and answered by your peers!


RSS EDABOARD.com Discussions

  • Finding past posts on edaboard?
  • Industrial Relay Board Design for Motorcycle Use
  • I think i have devised a new type of "super_transformer" for the Electricity grid?
  • What is the purpose of this relay?
  • mosfet driver problem in regeneration mode

RSS Electro-Tech-Online.com Discussions

  • Pic18f25q10 osccon1 settings swordfish basic
  • Sump pit water alarm - Kicad 9
  • Anyone jumped from Easyeda std to Easyeda pro?
  • turbo jet fan - feedback appreciated.
  • More fun with ws2812 this time XC8 and CLC

Featured – LoRa/LoRaWan Series

  • What is the LoRaWAN network and how does it work?
  • Understanding LoRa architecture: nodes, gateways, and servers
  • Revolutionizing RF: LoRa applications and advantages
  • How to build a LoRa gateway using Raspberry Pi
  • How LoRa enables long-range communication
  • How communication works between two LoRa end-node devices

Recent Articles

  • How IoT network topologies work
  • The top five AI startups to watch in 2025
  • STMicroelectronics unveils SoC based on secure MCU
  • Nexperia’s 48 V ESD diodes support higher data rates with ultra-low capacitance design
  • Taoglas releases Patriot antenna with 18 integrated elements covering 600 to 6000 MHz

EE ENGINEERING TRAINING DAYS

engineering

Submit a Guest Post

submit a guest post
Engineers Garage
  • Analog IC TIps
  • Connector Tips
  • Battery Power Tips
  • DesignFast
  • EDABoard Forums
  • EE World Online
  • Electro-Tech-Online Forums
  • EV Engineering
  • Microcontroller Tips
  • Power Electronic Tips
  • Sensor Tips
  • Test and Measurement Tips
  • 5G Technology World
  • Subscribe to our newsletter
  • About Us
  • Contact Us
  • Advertise

Copyright © 2025 WTWH Media LLC. All Rights Reserved. The material on this site may not be reproduced, distributed, transmitted, cached or otherwise used, except with the prior written permission of WTWH Media
Privacy Policy

Search Engineers Garage

  • Electronic Projects & Tutorials
    • Electronic Projects
      • Arduino Projects
      • AVR
      • Raspberry pi
      • ESP8266
      • BeagleBone
      • 8051 Microcontroller
      • ARM
      • PIC Microcontroller
      • STM32
    • Tutorials
      • Audio Electronics
      • Battery Management
      • Brainwave
      • Electric Vehicles
      • EMI/EMC/RFI
      • Hardware Filters
      • IoT tutorials
      • Power Tutorials
      • Python
      • Sensors
      • USB
      • VHDL
    • Circuit Design
    • Project Videos
    • Components
  • Articles
    • Tech Articles
    • Insight
    • Invention Stories
    • How to
    • What Is
  • News
    • Electronic Product News
    • Business News
    • Company/Start-up News
    • DIY Reviews
    • Guest Post
  • Forums
    • EDABoard.com
    • Electro-Tech-Online
    • EG Forum Archive
  • DigiKey Store
    • Cables, Wires
    • Connectors, Interconnect
    • Discrete
    • Electromechanical
    • Embedded Computers
    • Enclosures, Hardware, Office
    • Integrated Circuits (ICs)
    • Isolators
    • LED/Optoelectronics
    • Passive
    • Power, Circuit Protection
    • Programmers
    • RF, Wireless
    • Semiconductors
    • Sensors, Transducers
    • Test Products
    • Tools
  • Learn
    • eBooks/Tech Tips
    • Design Guides
    • Learning Center
    • Tech Toolboxes
    • Webinars & Digital Events
  • Resources
    • Digital Issues
    • EE Training Days
    • LEAP Awards
    • Podcasts
    • Webinars / Digital Events
    • White Papers
    • Engineering Diversity & Inclusion
    • DesignFast
  • Guest Post Guidelines
  • Advertise
  • Subscribe