Stepper motor is one of the commonly used motors for precise angular movement. The advantage of using a stepper motor is that the angular position of the motor shaft can be controlled without any feedback mechanism. Stepper motors are widely used in industrial and commercial applications. They are also commonly used as in drive systems of autonomous robots.
This article explains the unipolar stepper motor interfacing with AT89C51 microcontroller. The microcontroller is programmed to rotate the stepper in wave drive and half drive stepping modes. For basic concepts and working of a stepper motor, refer the article on Stepper Motors.
A Unipolar Stepper Motor is rotated by energizing the stator coils in a sequence. In unipolar stepper, the direction of current in stator coils is not required to be controlled by the driving circuit. Just applying the voltage signals across the motor coils or motor leads in a sequence is sufficient to drive the motor.
A two phase unipolar stepper motor has a total of six wires/leads of which four are end wires (connected to coils) and two are common wires. The color of common wires in the stepper motor used here is Green. Each common wire is connected to two end leads thus forming two phases. The end leads corresponding to each phase have to be identified.

Fig. 2: A typical Stepper Motor
In some cases, when the leads cannot be directly identified in the motor, the identification of endpoints and common points can be done by measuring the resistance between the leads. The leads of different phase will show open circuited condition with respect to each other. This way the leads corresponding to different phase can be separated. The resistance between any two end points of same phase will be twice the resistance between a common point and an end point. This way the common and end points of both the phases can be identified.

Fig. 3: Diagram Of 6-Lead Unipolor Stepper Motor
To work with the unipolar stepper motor, the common points are connected to either Ground or Vcc and the end points of both the phases are usually connected through the port pins of a microcontroller. In present case the common (Green) wires are connected to Vcc. The end points receive the control signals as per the controller’s output in a particular sequence to drive the motor.
Since the coils related to each phase are arranged in alternate manner, the end points of two phases are energized in alternate fashion to rotate the motor. This means that the voltage signal should be applied to first end point of Phase1 and then to the first end point of the Phase2 and so on.
1. Wave Drive Stepping Mode
The above mentioned sequence is repeated to rotate the motor in Wave Drive Stepping Mode. (For more details on different Stepping Modes, refer to the article on Stepper Motors) The direction of rotation can be clockwise or anti clockwise depending upon the selection of end points.
|
Signal sequence for Wave Drive Stepping Mode
|
||||
|
Step
|
Yellow lead
(End point 1 of Phase1)
|
Blue lead
(End point 2 of Phase1)
|
Red lead
(End point 1 of Phase2)
|
White lead
(End point 2 of Phase2)
|
|
1
|
1
|
0
|
0
|
0
|
|
2
|
0
|
0
|
1
|
0
|
|
3
|
0
|
1
|
0
|
0
|
|
4
|
0
|
0
|
0
|
1
|
Fig. 4: Signal sequence for Wave Drive Stepping Mode in Stepper Motor

Fig. 5: Diagrams Of Wave Drive Stepping Mode
2. Full Drive Stepping Mode
The Full Drive Stepping can be achieved by energizing two endpoints of different phases simultaneously.
|
Signal sequence for Full Drive Stepping Mode
|
||||
|
Step
|
Yellow lead
(End point 1 of Phase1)
|
Blue lead
(End point 2 of Phase1)
|
Red lead
(End point 1 of Phase2)
|
White lead
(End point 2 of Phase2)
|
|
1
|
1
|
0
|
1
|
0
|
|
2
|
0
|
1
|
1
|
0
|
|
3
|
0
|
1
|
0
|
1
|
|
4
|
1
|
0
|
0
|
1
|
Fig. 6: Signal sequence for Full Drive Stepping Mode

Fig. 7: Diagrams Of Full Drive Stepping Mode
3. Half Drive Stepping Mode
The Half Drive Stepping is achieved by combining the steps of Wave and Full Drive Stepping Modes. This divides the stepping angle by half.
|
Signal sequence for Half Drive Stepping Mode
|
||||
|
Step
|
Yellow lead
(End point 1 of Phase1)
|
Blue lead
(End point 2 of Phase1)
|
Red lead
(End point 1 of Phase2)
|
White lead
(End point 2 of Phase2)
|
|
1
|
1
|
0
|
0
|
0
|
|
2
|
1
|
0
|
1
|
0
|
|
3
|
0
|
0
|
1
|
0
|
|
4
|
0
|
1
|
1
|
0
|
|
5
|
0
|
1
|
0
|
0
|
|
6
|
0
|
1
|
0
|
1
|
|
7
|
0
|
0
|
0
|
1
|
|
8
|
1
|
0
|
0
|
1
|
Fig. 8: Signal sequence for Half Drive Stepping Mode

Fig. 9: Diagram of Half Drive Stepping Mode
Note:
The stepping angle depends upon the resolution of the stepper motor. The direction of rotation and size of steps is directly related to the order and number of input sequence. The shaft rotation speed depends on the frequency of the input sequence. The torque is proportional to the number of magnets magnetized at a time.
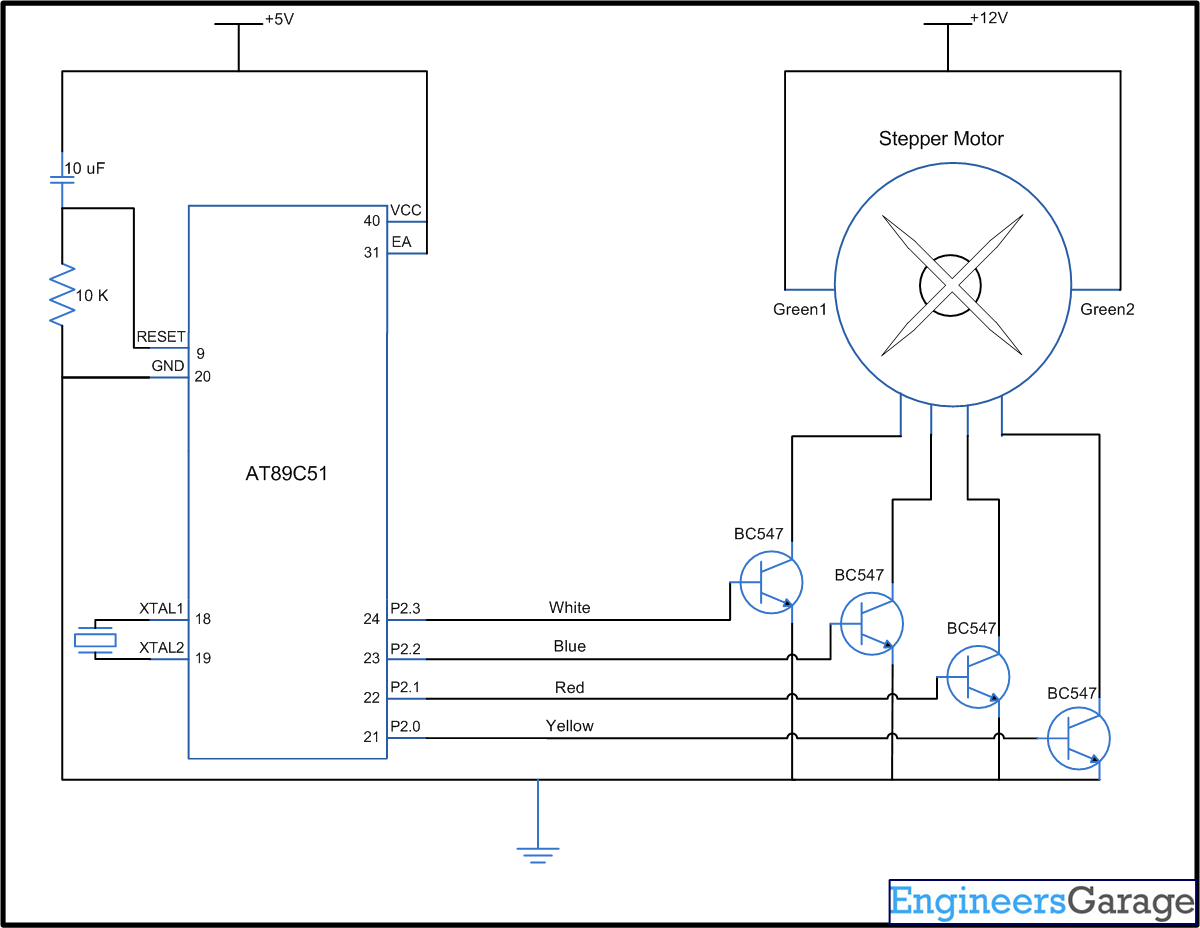
Circuit Description:
In the circuit, Port P2 is defined as output port to provide the input sequence for the stepper motor. Four transistors are used as switches to drive the motor. The motor leads are not directly interfaced with the microcontroller pins because stepper motor requires 60mA current while AT89C51 has the maximum current rating of 50mA. So the transistors switches are used to transfer signals from the microcontroller to the stepper wires.
The sequence of signals mentioned in the tables above rotates the motor in clockwise direction. Reversing these input sequences would rotate the motor in counter clockwise direction.
The four transistors used in this circuit could be replaced altogether by ULN2003 as has been explained in the next article.
Project Source Code
###


// Program to interface Stepper Motor with 8051 Microcontroller (AT89C51)
/**** Wave Drive Stepping ****/
#include<reg51.h>
sfr stepper=0xA0;

void delay(unsigned int count)
{
int i;
for(i=0;i<count;i++);
}

void main()
{
while(1)
{
stepper=0x01;
delay(350);
stepper=0x02;
delay(350);
stepper=0x04;
delay(350);
stepper=0x08;
delay(350);
}
}
/*****************************/

/**** Half Drive Stepping ****/
#include<reg51.h>
sfr stepper=0xA0;

void delay(unsigned int count)
{
int i;
for(i=0;i<count;i++);
}

void main()
{
while(1)
{
stepper=0x01;
delay(300);
stepper=0x03;
delay(300);
stepper=0x02;
delay(300);
stepper=0x06;
delay(300);
stepper=0x04;
delay(300);
stepper=0x0C;
delay(300);
stepper=0x08;
delay(300);
stepper=0x09;
delay(300);
}
}
/*****************************/###
Circuit Diagrams
Project Components
Project Video
Filed Under: 8051 Microcontroller.
Filed Under: 8051 Microcontroller.

Questions related to this article?
👉Ask and discuss on Electro-Tech-Online.com and EDAboard.com forums.
Tell Us What You Think!!
You must be logged in to post a comment.