A Stepper Motor is a brushless, synchronous DC motor which divides a full rotation into a number of steps. For detailed information on working, types and stepping modes, refer the article on Stepper Motors. Here the operation of a unipolar Stepper motor with PIC18F4550 microcontroller has been explained.
As stated earlier, a Stepper motor rotates step by step. Each stepper motor has a defined step angle which is the minimum degree of rotation in a single step. This step angle depends on the internal construction of the motor. If a stepper motor has a step angle of 1.8°, then it would need 200 steps for a complete circular rotation. For control operation, construction and stepping modes, refer the article on Stepper Motors.
The stepper motor consists of a Rotor and four Stators. The stators are rounded with center-taped winding. The center-taped terminals are known Common terminals. Thus a unipolar stepper motor consists of total 6 wire-ends (four wires for coils and two for the common ends).

Fig. 2: Unipolar Stepper Motor with 6 Wire-Ends
The COMs are connected with +12V which is the power supply to drive the stepper motor. To rotate the Rotor, zero voltage is provided at coil-ends one by one in a sequential manner. (Based on this sequence, stepper motors have different stepping modes which are explained in the article on Stepper Motor)
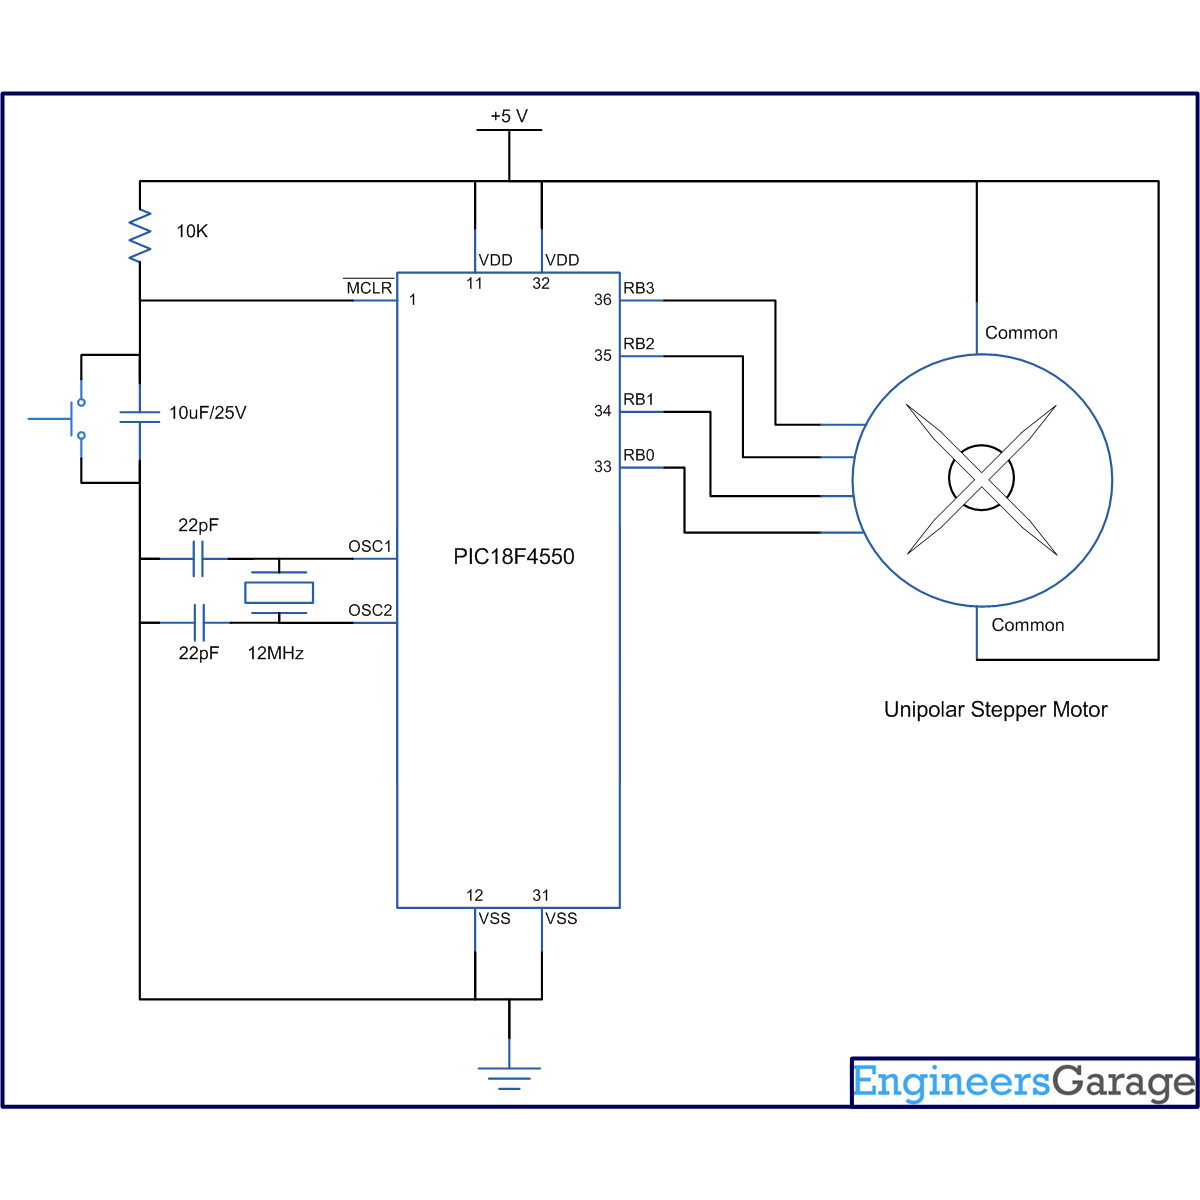
The sequential voltage signals are provided by the PIC microcontroller. A repetitive sequence of 1110, 1101, 1011 and 0111 is sent by PIC18F4550 to its PortB pins to rotate the Stepper motor.
Although this PIC microcontroller can provide enough output current to drive the stepper motor, but its becomes more efficient by employing a current driver between the controller and motor. For this purpose, sometimes ULN2003 is used to drive the stepper motor. Check interfacing Stepper motor with 8051 using ULN2003 for reference.
Project Source Code
###
// Program to Interface Stepper Motor with PIC18F4550 Microcontroller void main() { unsigned int i=0; TRISB=0; // Set PortB as output port while(1) { LATB=0x07; // To send 1110 at PortB Delay_ms(20); LATB=0x0B; // To send 1101 at PortB Delay_ms(20); LATB=0x0D; // To send 1011 at PortB Delay_ms(20); LATB=0x0E; // To send 0111 at PortB Delay_ms(20); } }###
Circuit Diagrams
Project Components
Project Video
Filed Under: PIC Microcontroller.
Filed Under: PIC Microcontroller.

Questions related to this article?
👉Ask and discuss on EDAboard.com and Electro-Tech-Online.com forums.
Tell Us What You Think!!
You must be logged in to post a comment.