There is no other tool available which helps in easy prototyping like the arduino does. Any AVR microcontroller based board which follows the standard arduino schematic and is flashed with the arduino boot-loader can be called an arduino board. The arduino can be used as a stand-alone board of which the output or inputs can be taken from the boards or given to the board using convenient connectors. Both digital and analog inputs and outputs are available in all arduino boards. When it comes to programming the arduino board anyone who have basic knowledge of c programming can quickly get started with the arduino IDE.
Since the arduino board can act as a stand-alone system it should have capabilities to take inputs process the input and then generate a corresponding output. It is through these inputs and outputs that the arduino as a system can communicate with the environment. The arduino boards can communicate with other devices using digital input/output analog input/output standard communication ports like USART, IIC, and USB etc.
It is assumed that the reader has gone through the project Getting started with arduino and done all the things discussed in it.

Fig. 2: Typical Arduino Pro-Mini Board

You may also like:


Project Source Code
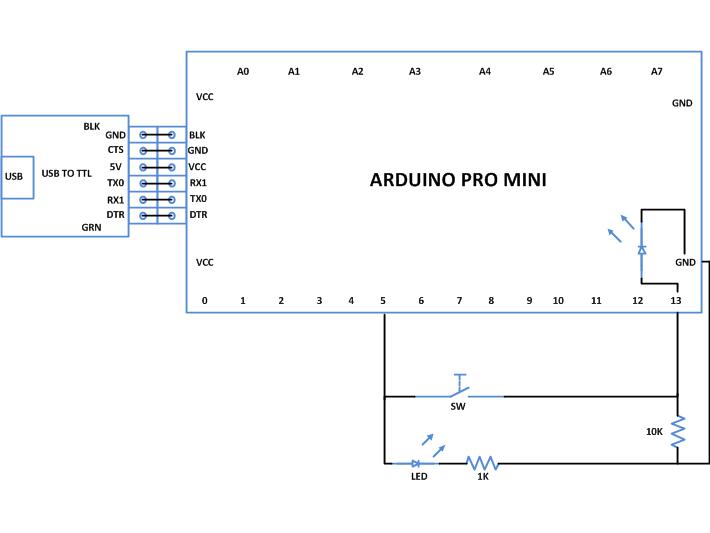
###


/*================================= EG LABS =======================================


 Turns on and off a light emitting diode(LED) connected to digital

 pin 5, when pressing a pushbutton attached to pin 13.


 The circuit:

 * LED attached from pin 5 to ground through a 1K resistor

 * pushbutton attached to pin 13 from +5V

 * 10K resistor attached to pin 13 from ground

//================================= EG LABS =======================================*/


// constants won't change. They're used here to

// set pin numbers:


const int buttonPin = 13;             // the number of the pushbutton pin

const int ledPin =  5;                    // the number of the LED pin


// variables will change:

int buttonState = 0;                      // variable for reading the pushbutton status


void setup()

{

  // initialize the LED pin as an output:

  pinMode(ledPin, OUTPUT);

  // initialize the pushbutton pin as an input:

  pinMode(buttonPin, INPUT);

}


void loop()

{

  // read the state of the pushbutton value:

  buttonState = digitalRead(buttonPin);


  // check if the pushbutton is pressed.

  // if it is, the buttonState is HIGH:

  if (buttonState == HIGH)

  {

    // turn LED on:

    digitalWrite(ledPin, HIGH);

    delay(100);

  }

  else

  {

    // turn LED off:

    digitalWrite(ledPin, LOW);

  }

}

###
Circuit Diagrams
Project Components
Project Video
Filed Under: Arduino, Electronic Projects
Filed Under: Arduino, Electronic Projects

Questions related to this article?
👉Ask and discuss on EDAboard.com and Electro-Tech-Online.com forums.
Tell Us What You Think!!
You must be logged in to post a comment.