Engineers Garage

  • Projects and Tutorials
    • Circuit Design
    • Electronic Projects
      • 8051
      • Arduino
      • ARM
      • AVR
      • PIC
      • Raspberry pi
      • STM32
    • Tutorials
    • Components
  • Articles
    • Tech Articles
    • Insight
    • Invention Stories
    • How to
    • What Is
  • News
    • EE Design News
    • DIY Reviews
    • Guest Post
    • Sponsored Content
  • Forums
    • EDABoard.com
    • Electro-Tech-Online
    • EG Forum Archive
  • Digi-Key Store
    • Cables, Wires
    • Connectors, Interconnect
    • Discrete
    • Electromechanical
    • Embedded Computers
    • Enclosures, Hardware, Office
    • Integrated Circuits (ICs)
    • Isolators
    • LED/Optoelectronics
    • Passive
    • Power, Circuit Protection
    • Programmers
    • RF, Wireless
    • Semiconductors
    • Sensors, Transducers
    • Test Products
    • Tools
  • EE Resources
    • DesignFast
    • LEAP Awards
    • Oscilloscope Product Finder
    • Video
    • White Papers
    • Webinars
  • EE Learning Center
  • Women in Engineering

Dc motor speed and direction control with stm32f103 microcontroller and l293d motor driver

August 22, 2019 By EG Projects

In this tutorial i am going to teach you how to control speed of dc motor using stm32 microcontroller and l293d half h bridge control ic. Dc motors are common motors you see in your houses(DC water pumps, DC fans), toys etc. DC motors rotate at a constant speed but their speed can be varied and controlled by utilizing few techniques. One such technique and the most popular is to supply a variable voltage to it. By variable voltage i mean to supply less amount of voltage(power) than maximum rating of a particular dc motor. Like our roof fans(work on Ac voltage) rotating speed is controlled by varying the potentiometer(variable resistor) connected in the buttons socket. The resistor varies the power when we rotate its knob in either directions.   
Variable resistor is a good choice to control motor speed. But if we want to insert some control logic(e.g changing motor rotation direction) or accurately control the motors rpm (resolutions per minute) then variable resistor technique can not full fill our requirement. To achieve the upper logic pwm(pulse width modulation) technique is best suited. In pulse width modulation input constant voltage to motor is divided in to sub cycles to reduce the amount of input voltage.
In this project our purpose is to control the speed of motor with stm32 microcontroller. Pwm technique is utilized in the project to control the motor speed and direction. St32f103c8t6 micorcontroller pre assembled board is used in the project. Stm32cubemx is used for stm32f103c8t6 microcontrollers gpio, timers configuration. Keil arm mdk 5 is used for writing and compiling the project code. Code is written by utilizing stm32 HAL libraries. If you are new and don’t know about stm32cubemx, keil arm mdk 5 and HAL libraries i advise you to first take the getting started tutorial with stm32cubemx and keil arm and HAL libraries. Just click the below button to take the tutorial.   
   

Getting started stm32cubemx, keil arm and HAL libraries

I am going to control the speed of two dc motors connected to l293d half h bridge ic. What is l293d? Microcontrollers works on 3.3 to 5 volt TTL logic. Where as dc motors work on 5 to +24 volts. Its not possible to run motors directly from the microcontoller output pins. Microcontroller output pins can source only 5 volts and 25 mA of current which is not suitable for dc motors to start rotation. Stm32 microcontrollers works on 3.3 volt TTL logic. For this project i am using 12 volt dc motors which require 200 mA of current for constant rotation. So we need an external circuit to drive motor with it using stm32 microcontroller.     

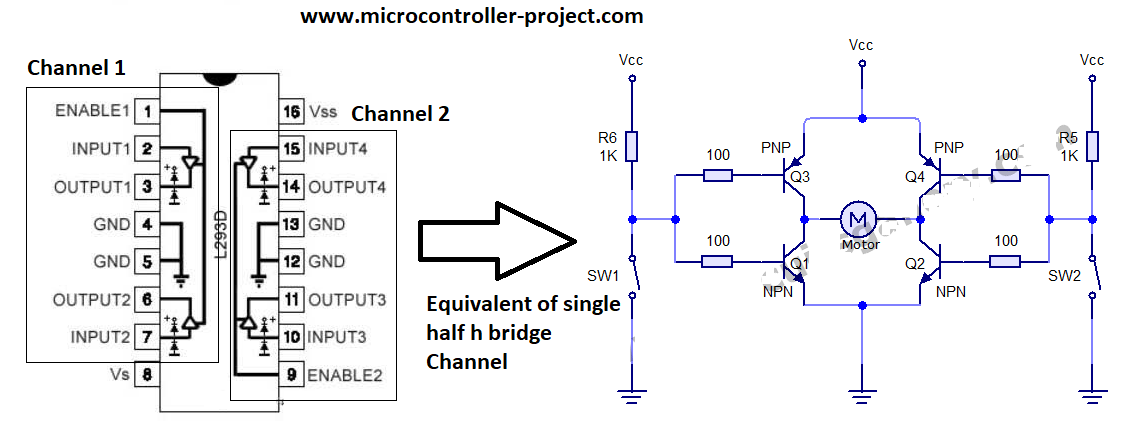
Transistor or Mosfet as external circuit to drive, control the speed and direction of DC motor

An external transistor or mosfet is a best choice to drive a 12 volt motor using stm32 microcontroller. The base of transistor, mosfet is connected to stm32 output pin and motor will be inserted between collector of transistor. A variable pwm signal to the base of transistor from stm32 output pin can easily control the rotation speed of dc motor. But we also require to change the direction of motor which is not possible in this configuration.  

Half h bridge circuit for dc motor direction control

In half h bridge circuit two transistors are used to control the direction of dc motor rotation. Making a half h bridge circuit with requirements of dc motor power is not an easy task. L293d is a pre assembled ic containing two half h bridge configurations in it. We can drive, control direction and speed of two dc motors easily with l293d motor driver ic.  
L293d single half h bridge channel equivalent circuit

L293d single half h bridge channel equivalent circuit

To learn about pin out and purpose of each pin in l293d you have to take an another tutorial. I explained the l293d circuit and its working in the tutorial very deeply. Tutorial will help you in understanding the circuit diagram of the project below. Click the below button to take the tutorial.

L293d pin out and working

Project working

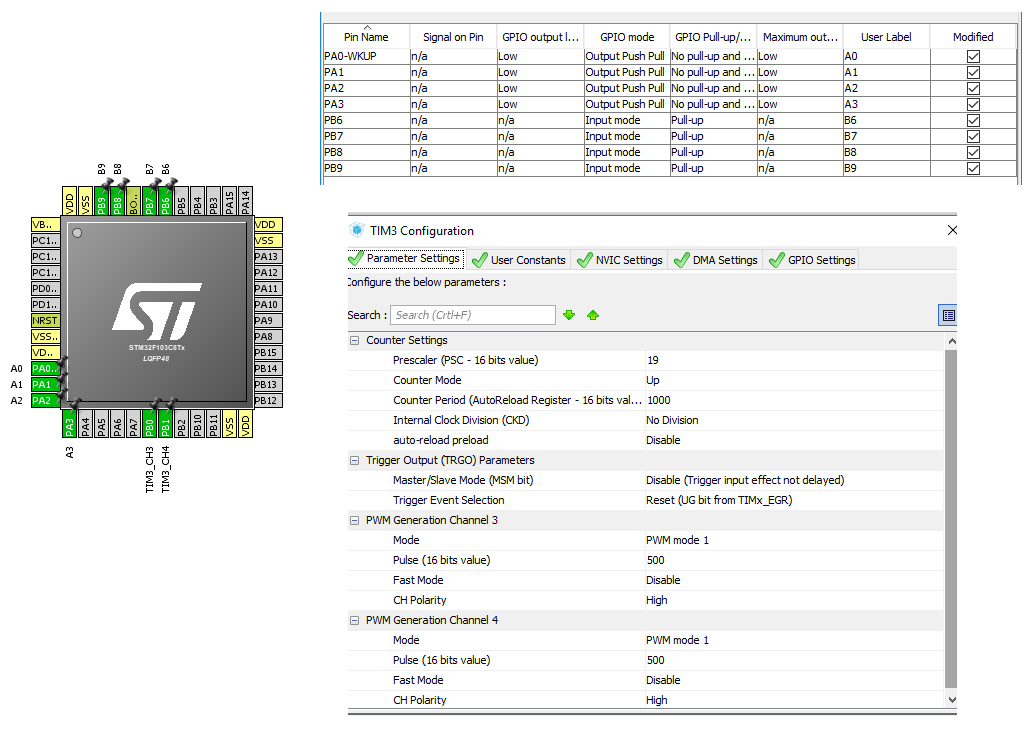
I am going to control the direction of rotation of dc motors and their speed in the project. For this purpose i decided to connect four buttons as input. Buttons will control the direction and speed of the motors. I will discuss purpose of each button later. For four buttons as input i require four gpio’s of stm32 microcontroller declared as input. I declared the Port-B pins 6, 7, 8 and 9 as input. I also activated the pull up resistors associated with these pins. 
To control the direction of two dc motors through half h bridge circuits i need four controls. Basically four pgio pins of microcontroller are required to control the direction of two dc motor rotation. I declared four stm32 microcontroller Port-A pins 0, 1, 2 and 3 as output.      

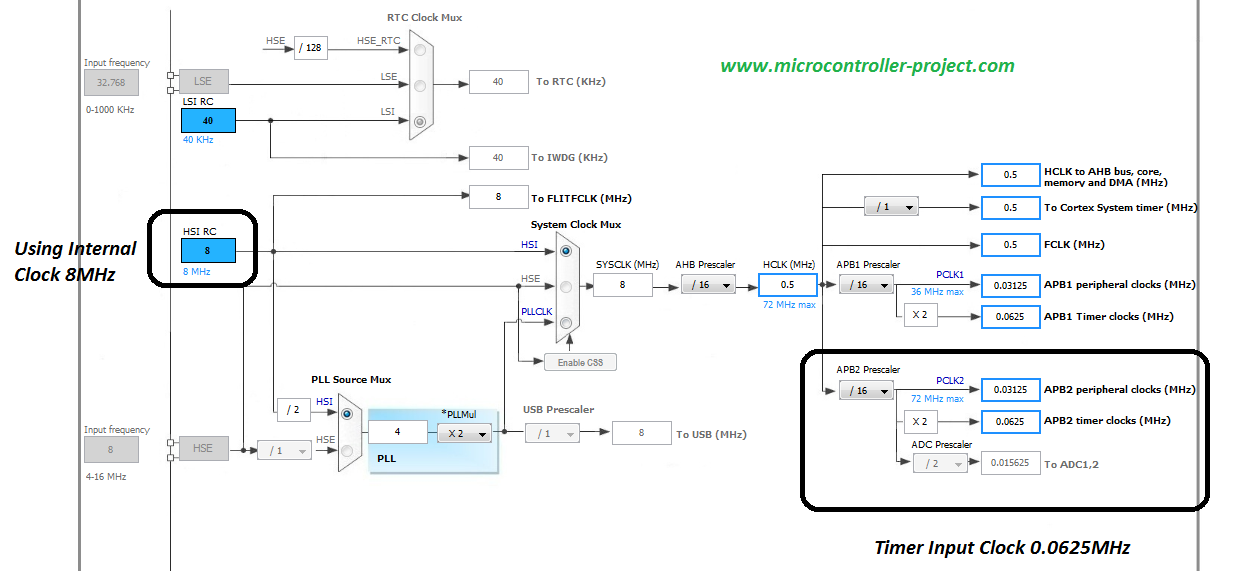
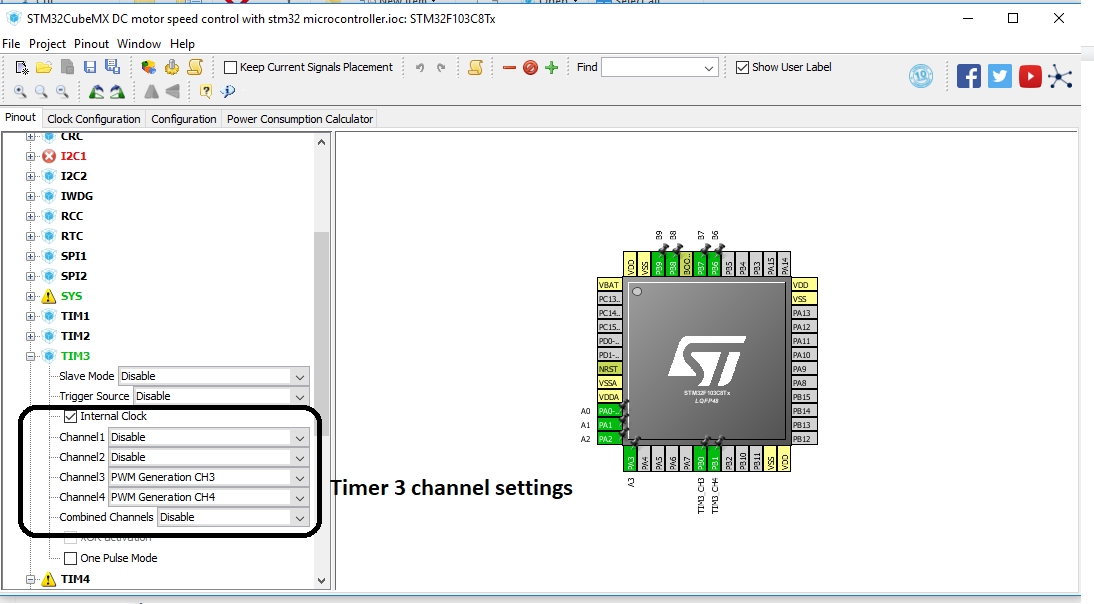
Finally to control the motor speed i need two pwm signals. I am going to use the Port-B pins 0 and 1 as pwm sources. Generating pwm using stm32 is not an easy task. One has to take care of many constraints. I have an another tutorial on how to generate pwm with stm32 microcontroller. I discussed all the constraints frequency, duty cycle and counter etc in that tutorial. Please take that tutorial before moving any further. If you do not take the tutorial you will be unable to understand the code below.   

Stm32 pwm generation formula calculations and constraints

If you have gone through the above tutorial you now probably have know how of how to generate desired pwm with stm32 microcontroller. To control the dc motor speed i have to vary the pwm signal. Varying the pwm signal is not a hard task if you have gone through the above tutorial. Foe varying the pwm signal you need to calculate some more variables. In this project i am generating a variable duty cycle pwm signal on 50 hz frequency. Actually i calculated these values for an another project(Servo motor with stm32 microcontrolelr) and used those values in this project. You can see that project settings if you want. It will help you in stm32cubemx pwm settings.    

Stm32cubemx settings for this project borrowed from another projecct

Stm32cubemx gpio settings and timer pwm settings are given below. You have to take the above tutorials to understand each constraint and how they are calculated and inserted in stm32cubemx.  
Stm32cubemx pwm timer 3 and gpio configurations

Stm32cubemx pwm timer 3 and gpio configurations

I am using internal 8 Mhz oscillator of stm32f103 microcontroller for clock source to gpio pins and for pwm generation. These settings are must to generate the 50 Hz frequency pwm signal as discussed above.
stm32f103 microcontroller pwm clock settings in stm32cubemx

stm32f103 microcontroller pwm clock settings in stm32cubemx

For pwm i am using Port-B pins 0 and 1 of stm32. With both the pins of microcontroller timer-3 is associated. With pin 0 timer 3 channel 3 is linked and with pin 1 timer 3 channel 4 is linked. We have to activate these channels before starting to work with them. How to activate channels? Settings are given below. 
Stm32 timer 3 pwm channel settings in stm32cubemx

Stm32 timer 3 pwm channel settings in stm32cubemx

Project circuit

Port-A pins A0 and A1 are used to control the direction of motor-1. Microcontroller pin A0 is connected to input-1 of l293d and pin A1 is connected to input-2 of l293d. Pwm signal is supplied to enable pin of motor-1 or channel 1 of l293d. Stm32 Port-B pin 1 is connected to enable 1 of l293d. Similarly Port-A pins A2 and A3 of stm32 microcontroller is used to control the speed of motor 2 or channel 2 of l293d. A2 pin of stm32 is connected to input 4 of stm32 microcontroller and A3 pin of stm32 is connected to input 3 pin of l293d channel 2. Enable pin of channel 2 of l293d is connected to pin B0 of stm32 microcontroller. 
Our 12 volt motors are connected with output pins of l293d. Motor 1 is connected against output pins of channel 1 and motor 2 is connected across output pins of channel 2 of l293d motor driver. Ground pins are grounded.
Note: The ground of stm32 microcontroller power and l293d motor power must be commonly grounded for circuit completion and proper working.   
Dc motor speed and direction control with stm32 microcontroller and l293d motor driver

Dc motor speed and direction control with stm32 microcontroller and l293d motor driver

Input buttons functions 

  • B9 – Pressing button B9 will toggle the rotation direction of dc motor. If its moving in forward direction pressing the B9 button will change the direction to back ward. 
  • B8 – Pressing button B8 will set the pwm duty cycle to 75% and it lowers with motor rotation speed.
  • B7 – Pressing button B7 will set the pwm duty cycle to 50%. Dc motor know rotates at half speed than maximum.
  • B6 – Pressing button B6 will set the pwm duty cycle to 25% will further lowers down the rotation speed.

Coming to the code. Main logic of the code is before and between the while 1 loop. If you have gone through the above tutorials on Pwm and stm32cubemx getting started you can easily understand the code statements below. Statements are same as in the previous tutorials only the sequence of statements are changed as desired in the project. 

In the above code first statements before while 1 loop starts both the dc motors and pwm signal is outputted with 100% duty cycle. In while 1 loop each button press is continuously checked. If any button is pressed it corresponding function(direction reversed, speed changed) is executed. I hope the above code is easy for you if you have gone through all the tutorials enlisted in the post. 
Future work:  
With the same code and logic above you can not only drive dc motors but also servo motors. In circuit you have to change some settings like input voltage to l293d for servo motor driving(5 to 12 v). Servo motors work on 50 Hz frequency and duty cycle between 1 milli second to 3 milli second. We generated pwm on 50 Hz frequency. So yon can connect a servo at output and check if the code works(It definitely will). You can also fade an led by connecting it at l293d output with the same code, circuit above. You may need to fix the direction and not change it for led. Since led polarity can’t be changed.
Download the project code. Folder contains stm32cubemx and keil arm ide project files. All project libraries and dependencies are included in the folder. Please provide us your feed back on the project.
Code/files

Related Articles Read More >

How to monitor pH levels in an aquarium using Arduino
TV remote hack using Arduino and IR sensor
Gesture sensor using Arduino
How to build a metal detector using an inductive proximity sensor with Arduino

HAVE A QUESTION?

Have a technical question about an article or other engineering questions? Check out our engineering forums EDABoard.com and Electro-Tech-Online.com where you can get those questions asked and answered by your peers!


Featured Tutorials

  • Getting Started with the ESPlorer IDE
  • SENDING TEXT MESSAGE USING ESP8266
  • CONNECTION BETWEEN TWO ESP8266
  • ESP8266 WIFI HOTSPOT
  • HOME AUTOMATION USING ESP8266
  • Open WiFi Scanner using Esp8266

Stay Up To Date

Newsletter Signup

EE Training Center Classrooms

“ee

“ee

“ee

“ee

“ee

Recent Articles

  • How to monitor pH levels in an aquarium using Arduino
  • What are the different types of fingerprint scanners?
  • TV remote hack using Arduino and IR sensor
  • Gesture sensor using Arduino
  • Diodes adds to its family of voltage-level shifters

RSS EDABOARD.com Discussions

  • Self resonant frequency of MLCC capacitor
  • Force sensing resistor (FSR) nonlinearity?
  • Vivado simulation variables
  • Connecting RF Tx/Rx Modules to SMA via PCB and header pin
  • Help to identify circuit took from a mixer

RSS Electro-Tech-Online.com Discussions

  • Help with circuit design
  • How are you managing with the Covid-19 pandemic?
  • Does anyone have a paper tape punch for sale, to suit 1" tape?
  • Would someone be interested in a raspberry pi?
  • Need to add a question to a thread.
Engineers Garage
  • Analog IC TIps
  • Connector Tips
  • DesignFast
  • EDABoard Forums
  • EE World Online
  • Electro-Tech-Online Forums
  • Microcontroller Tips
  • Power Electronic Tips
  • Sensor Tips
  • Test and Measurement Tips
  • 5G Technology World
  • About Us
  • Contact Us
  • Advertise

Copyright © 2021 WTWH Media LLC. All Rights Reserved. The material on this site may not be reproduced, distributed, transmitted, cached or otherwise used, except with the prior written permission of WTWH Media
Privacy Policy | Advertising | About Us

Search Engineers Garage

  • Projects and Tutorials
    • Circuit Design
    • Electronic Projects
      • 8051
      • Arduino
      • ARM
      • AVR
      • PIC
      • Raspberry pi
      • STM32
    • Tutorials
    • Components
  • Articles
    • Tech Articles
    • Insight
    • Invention Stories
    • How to
    • What Is
  • News
    • EE Design News
    • DIY Reviews
    • Guest Post
    • Sponsored Content
  • Forums
    • EDABoard.com
    • Electro-Tech-Online
    • EG Forum Archive
  • Digi-Key Store
    • Cables, Wires
    • Connectors, Interconnect
    • Discrete
    • Electromechanical
    • Embedded Computers
    • Enclosures, Hardware, Office
    • Integrated Circuits (ICs)
    • Isolators
    • LED/Optoelectronics
    • Passive
    • Power, Circuit Protection
    • Programmers
    • RF, Wireless
    • Semiconductors
    • Sensors, Transducers
    • Test Products
    • Tools
  • EE Resources
    • DesignFast
    • LEAP Awards
    • Oscilloscope Product Finder
    • Video
    • White Papers
    • Webinars
  • EE Learning Center
  • Women in Engineering