In this project the Raspberrypi board is loaded with Ubuntu and is remotely accessed using VNC. The Raspberrypi board is also connected to the internet. There are 26 connectors which can be taken out from the connector port of the Raspberrypi board. All the connector pins are taken out using 13*2 pin female connectors and at the other end of their wire 26 pin Burg stick male connectors are attached.The Burg stick male connectors allow each pin out from the Raspberrypi board to be plugged into the holes of a breadboard. To access the pins that coming out of the Broadcom controller of the Raspberrypi board using C language, a C library is available called “bcm2835” which has been downloaded and installed.
How to Run a Code Automatically On Boot-(Part 08/38)
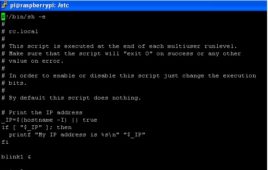
The embedded system devices are meant to start its predefined function as soon as it is powered up. When the OS runs on the Desktop most of the applications are executed by the user after the OS boots. In case of OS running on embedded applications like in Raspberrypi board the preffered applications must be made executable immediately after OS booting process finishes. This article discusses how to execute a code automatically after the Ubuntu OS boots in a Raspberrypi board. In this project the Raspberrypi board is loaded with Ubuntu and is remotely accessed using VNC. The Raspberrypi board is also connected to the internet. There are 26 connectors which can be taken out from the connector port of the Raspberrypi board. All the connector pins are taken out using 13*2 pin female connectors and at the other end of their wire 26 pin Burg stick male connectors are attached.
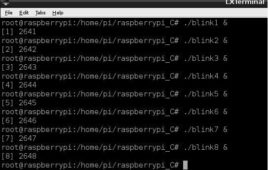
How to Blink LED using Raspberry Pi -(Part 07/38)

The Intel and ARM are the two popular processor families widely used in computational device. The Intel processors are mostly used in the Personal Computers whereas the ARM processors are optimized for the embedded system applications. The high end ARM processors can provide embedded system devices with that much computational power as most of the PCs have. The Raspberrypi is a low cost minicomputer board designed to be used as a PC for providing computer education for remote schools, where costly desktops are not available. The embedded system people are interested in it since it is using ARM11 processor based microcontroller and unlike the motherboard of the PC, the Raspberry pi board provides lot of pin outs like GPIO pins, serial communication pins etc. which enable them to be used in embedded system applications.
How to Connect Raspberry Pi to Wi-Fi Connection of a PC – (Part 05/38)
In this project the Raspberrypi board is booted with the Ubuntu OS and is connected to the Ethernet port of a Windows7 PC. One end of the peer-to-peer LAN cable is connected to the Ethernet port of the Raspberrypi and the other end to the Ethernet port of the PC. It is assumed that the user has Wi-Fi connectivity to the PC where the Raspberrypi board is connected. In windows the Raspberrypi connected to the Ethernet port of the PC can be provided with the internet access by creating a bridge network adaptor between the Wi-Fi adaptor and the LAN adaptor. The idea is to connect the Raspberrypi board to the Wi-Fi router rather than simply sharing the network connectivity with the board. The advantage is that the Raspberrypi board will be having its own IP and can be connected with all other computers which are connected to that particular Wi-Fi network.
Getting Started with Raspberry Pi: “Hello World” Programming on Raspberry Pi – (Part 06/38)
The Raspberrypi is a microcontroller board which runs on a SoC chip from the Broadcom with ARM11 processor at the core. The Board is a mini computer itself without any input or output devices but ports provided to connect them. The board is designed with an intention of providing computer education to the remote schools where the PCs are not very commonly used. The board can be connected to a normal TV set using a RCA connector. It can be connected to an HD TV screen using the HDMI port provided in the board. The board can be connected with an Ethernet cable and access them remotely in TUI or GUI mode. The operating systems like Archlinux ARM, OpenELEC, Pidora, Raspbmc, RISC OS and the Raspbian and also Ubuntu versions are available for the Raspberrypi board. This article discusses how to start with the C programming in the Raspberrypi.
How to Configure Raspberry Pi – (Part 01/38)
The Raspberry pi is a low cost single board minicomputer which can be used for learning the computer basics, programming and easy to interface with the embedded systems. The Raspberry pi is a mini computer which is designed in a single board with all the essential components required for running an operating system. The Raspberry pi board runs on ARM11 processor but is available at extremely cheap price. The board is provided with a RCA connector which can be used to connect it directly to a TV screen which is based on PAL and NTSC standard. The board also has a HDMI connector output which can be used to connect the board to a HD TV. The board can be powered up from the USB port also but it is not recommended. The board has two USB2 ports where the keyboard and mouse can be plugged in.
How to Load Ubuntu on Raspberry Pi – (Part 02/38)

The Raspberry pi is a mini computer which is designed in a single board with all the essential components required for running an operating system. The Raspberry pi is designed to be low cost and easy to use. The board has a micro USB port which can be used to supply 5V DC using an adaptor with rating not less than 1A. The board can be powered up from the USB port also but it is not recommended. The board has a HDMI port which can be used to connect it to the HD TV using an HDMI cable.The Ubuntu image for the Raspberry pi called ‘Soft-float Debian “wheezy”’ can be downloaded from the Raspberry pi website. To use this image file, one has to unzip it and write it to a suitable (2GB or larger) SD card using the UNIX tool dd. Windows users should use Win32DiskImager. Installing the Ubuntu using windows is discussed in the following. The operating system used here is 32 bit windows7.
Interfacing Raspberry Pi With Arduino

We are working on RaspberryPi model B it is a credit-card-sized single-board computer developed in the UK by the RaspberryPi Foundation with the intention of promoting the teaching of basic computer science in schools The RaspberryPi has a Broadcom BCM2835 system on a chip (SoC), which includes an ARM1176JZF-S 700 MHz processor (The firmware includes a number of “Turbo” modes so that the user can attempt overclocking, up-to 1 GHz, without affecting the warranty),VideoCore IV GPU,and originally shipped with 256 megabytes of RAM, later upgraded to 512MB.It does not include a built-in hard disk or solid-state drive, but uses an SD card for booting and long-term storage.In this Project raspberry pi and Arduino UNO are Used. Raspberry Pi is used for sending control signals to Arduino and controlling all the activity of Arduino meanwhile the Ardunio is used for sensing the o/p of LM 35 and all the other sensors which is connected with it.