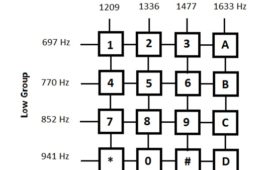
{C}{C}{C}{C}{C}{C}{C}{C}{C}{C}{C}{C}{C}This project based on DTMF(Dual Tone multi frequency) which generates in cellular cell phones. By using this thing of cell phone we control the home appliances from anywhere in the world(In Network Area). Below you can see the diagram of DTMF keypad. When we press any key then it generates a frequency after mixing two frequencies. And then send it to the receiver end over communication channel.User can activate their devices using this DTMF keypad as he/she want to activate. The encoder encodes the user input and sends via a communication channel. The receiver receives the modulated signal and demodulates it and the user input. In this system, we are going to make a DTMF based home/office appliance. How is the PCB Designed? What dimensions of the code are kept in mind? Continue reading to know more.
How to Make a Rain Detector Circuit
Rain circuit is the device which will really work as you wish what you want to do. It is a device which will generate the signal when the rain comes. The frequency will be more when the rain is heavier and the frequency is very less when the rain will be low. It all means that the frequency will depend upon the rain. We always should focus upon the signal making. Don’t focus on the rest of the part which we have to make it. When we get the signal now we can do anything we want to do.We will make a single wire circuit so that the circuit is easy and every reader can read it. Double wired is quiet complicated and the circuit which is made has to be with IC’s.
How to Find Something Secretly using IR Radiation
To find something secretly you have to do something that has to be in a very secret manner. Never use this method to steal anything. If you will caught by this method than you can be jail for whole life time or you could be charged fine in few lakhs. There is only one way to do this. There is a light which cannot be seen by naked eye called IR light. This is not in the range of the visual range. Visual range is the range of light that can be seen by our naked eyes. By this advantage we can now make a machine that can find the item in the dark place. So let’s start this machine working. Infrared (IR) light is electromagnetic radiation with longer wavelengths than those of visible light, extending from the nominal red edge of the visible spectrum at 700 nanometers (nm) to 1 mm.
How to Find Resistance of Anything using Wheatstone Bridge
Finding a resistance is very easy all you have to do is only putting a particular type of resistors into it. What is resistance of the any given material? Resistance is the ability to stop down the flow of current through them. Which Theory used to find the resistance? Wheatstone bridge is used to find the resistance. What is Wheatstone bridge? Wheatstone bridge is an electrical circuit used to measure an unknown electrical resistance by balancing two legs of a bridge circuit, one leg of which includes the unknown component. Its operation is similar to the original potentiometer. It was invented by Samuel Hunter Christie in 1833 and improved and popularized by Sir Charles Wheatstone in 1843. One of the Wheatstone bridge’s initial uses was for the purpose of soils analysis and comparison.
DIY a Shock Alarm
This project details about making an alarm battery which will wake you up at the given time. Materials required for this experiment are: Transformer, NPN transistor, connecting wire, alarm watch, 12v battery. Take Transformer in your hand which converts 220v to 12v or 12v to 220v. Identify the wire by passing the 12V current in the first pair wire if the voltage in the second wire is 0.65v then change the wire then you can find out that it is coming 2230v. Take the watch and de assemble it. You can now be able to see the spring like structure that will be your signal wire.Connect first wire in the positive terminal of the battery and the second wire in the spring. Take the transistor which should be NPN. Connect the transistor and after that, connect the wire to the signal wire.
Boiling Water through Electrolysis
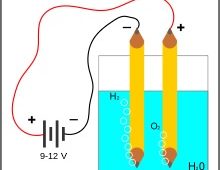
An electrical power source is connected to two electrodes, or two plates (typically made from some inert metal such as platinum, stainless steel or iridium) which are placed in the water. Hydrogen will appear at the cathode (the negatively charged electrode, where electrons enter the water), and oxygen will appear at the anode (the positively charged electrode). Assuming ideal faradaic efficiency, the amount of hydrogen generated is twice the number of moles of oxygen, and both are proportional to the total electrical charge conducted by the solution.However, in many cells competing side reactions dominate, resulting in different products and less than ideal faradaic efficiency. Electrolysis of pure water requires excess energy in the form of over potential to overcome various activation barriers. Without the excess energy the electrolysis of pure water occurs very slowly or not at all. This is in part due to the limited self-ionization of water.
DIY- How To Make a Relay at Home
A relay is an electrically operated switch. Many relays use an electromagnet to operate a switching mechanism mechanically, but other operating principles are also used. Relays are used where it is necessary to control a circuit by a low-power signal (with complete electrical isolation between control and controlled circuits), or where several circuits must be controlled by one signal. The first relays were used in long distance telegraph circuits, repeating the signal coming in from one circuit and re-transmitting it to another. Relays were used extensively in telephone exchanges and early computers to perform logical operations.Relays are used for;Amplifying a digital signal, switching a large amount of power with a small operating power, A telegraph relay, repeating a weak signal received at the end of a long wire, Controlling a high-voltage circuit with a low-voltage signal, as in some types of modems or audio amplifiers etc.
How to Create a Battery using Aluminium Foil
EMF of cell can be defined as the actual potential difference of the cell. The voltage that we are getting from the battery is reduced by the internal resistance of the battery. Circuit diagram shows is internal physical structure of the cell. It contains a resistor and the cells voltage. Resistor that is connected here is not seen as this is not connected in the cell or it is outside the cell. It is the resistor that is of the cell. And emf of the cell is constant means that the emf of the particular cell does not change. Aluminium foil is used in this project. Lots of aluminium foil is wasted in the garbage after using it in the lunch box. This will give you aluminium free. You need not purchase it from shop asks your friend to give his used aluminium foil, It is eco-friendly. This project can be made anywhere. As it does not require any precious metal.
How to Make a TV Remote Control Jammer
This circuit confuses the infra-red receiver in a TV. It produces a constant signal that interferes with the signal from a remote control and prevents the TV detecting a channel-change or any other command. This allows you to watch your own program without anyone changing the channel!! The circuit is adjusted to produce a 38 kHz signal. The IR diode is called an Infra-red transmitting Diode or IR emitter diode to distinguish it from a receiving diode, called an IR receiver or IR receiving diode. (A Photo diode is a receiving diode). There are so many IR emitters that we cannot put a generic number on the circuit to represent the type of diode. Some types include: CY85G, LD271, CQY37N (45¢), INF3850, INF3880, INF3940 (30¢). The current through the IR LED is limited to 100mA by the inclusion of the two 1N4148 diodes, as these forms a constant-current arrangement when combined with the transistor and 5R6 resistor.
How to make a Mobile/Battery charger
In this project a mobile/battery charger is made by using voltage divider rule. Voltage divider is also known as a potential divider. Potentiometer having two resistor in it is the best example of a voltage divider rule. This charger has reference voltage lower than the input voltage. Using voltage divider any voltage can be derived by it by passing high voltage than the voltage we want. This is because output voltage which comes out is always lesser. Voltage dividers are used for adjusting the level of a signal, for bias of active devices in amplifiers and for measurement of voltages. A Wheatstone bridge and a multimeter both include voltage dividers. A potentiometer is used as a variable voltage divider in the volume control of a radio, in finding temprature, in battery charger, in loud speaker etc.
How to Make Waveform of an IC by Only Choosing Resistors and Capacitors
An electronic circuit used to generate a continuous output signal usually in the form of a sinusoid at some predetermined frequency or wavelength set by the resonant components of the circuit.Wave is a signal that cannot be made by any simple device. It requires a capacitor and resistor combination that helps in the charging and discharging of the capacitor and makes that type of wave.There is a device called 8038 which generate any type of the waves.The 8038 waveform generator was an Integrated circuit by Intersil designed to generate accuracy sine, square & triangular waveforms based on bipolar monolithic technology involving Schottky barrier diodes. Triangular waves were produced by charging and discharging a capacitor with constant currents.
GPS Clock Using Arduino
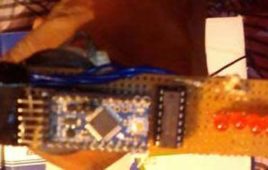
GPS is a common device which is used in many electronics applications like Vehicle Tracking System, Soldier Tracking System, Traffic Navigation and Surveillance System and many other systems. The main aim of the project is to get accurate times while using GPS Clock. GPS clock is a Universal Clock Which is mostly used at Railways Stations, Bus Stands and Airports. It is widely used for Military purposes too. In this project we are using Arduino pro mini for GPS updated clock… Arduino pro mini is an ATmega168 based microcontroller board, which is small in size and can be fitted on bread board easily.
Wireless Electricity Meter Reading using Arduino and GSM
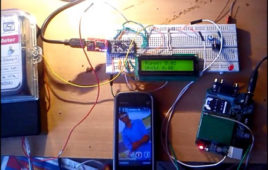
In present time Electricity is the necessary thing in the world for human life. Today every home, offices, companies, industries have electricity connection.So here this project is building only for interfacing electricity energy meter with microcontrollers. Here, Arduino is used for interfacing. And the main aim of this project is to know, how much unit is obtained and the total amount of rupees has to be paid. This will help both the inspector and the owner of the place where the meter is placed, we can simply view the unit and the total money that we have to paid and also send to our cell phone using GSM module.
7 Segment Multiplexing & Distance Measurement Using Arduino
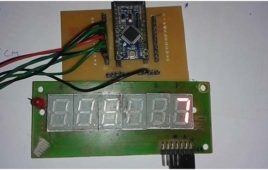
The main aim of this project is to understand that how Seven Segment Interfacing is done using Arduino. The project idea is to make an application based on Seven Segment Display. Here we demonstrate Seven Segment Interfacing and its application in a single project. Applications are Seven Segment Counter and Ultrasonic Sensor & Seven Segment based Distance Measurement project.
Propeller LED Display
[[wysiwyg_imageupload:13465:]]The aim of this project is to display information like Name, Title, Time and any other information on it. It is a very simple and interesting project for hobbyist. By using some LED’s we can display any information on it. Here we have used 5×7 Dot-Matrix codes for displaying information. This circuit is attached to a DC Electric Motor. This project is based on concept of persistence of vision (POV). Means if an object is remaining constant, at a point while it is moving at very fast speed then it looks like a stable image or pattern.
Medicine Reminder using Arduino
Sometimes patients forget to take the medicine at the required time of medicines. And sometimes patient also forgets which medicine He/She have to take at required time. And it is difficult for Doctor/Compounder to monitor patients around the clock. To avoid this problem, we have made this medicine reminder system for patients using Arduino.In this system we have used Arduino for controlling the whole system. Working of this project is very simple. In this system ds1307 real time clock chip is used for running the time accurate and to prevent the time after light failure by using 3 volt li-on battery connected with this real time clock chip
Rain Detector using 8051 Microcontroller
Now we are going to learn how to make a rain detector with only a LCD and a microcontroller will control your hole circuit. This controller will give you the data that what is the speed of the rain. You can also make a circuit from this that to make water flowing from the pipe this will take the detail of the water flowing from the pipe and tell you the speed of the rain. You can fit it at very far places and the places where you go very less.You can place it in the office, in that office form where you cannot see outside you cannot tell or predict the speed of rain like if you are in a hall or in the mall. You can make a automatic system which can help you to work in the further process. So let’s begin.
Arduino Based Wireless Notice Board – Send Notice Using Your Cell Phone
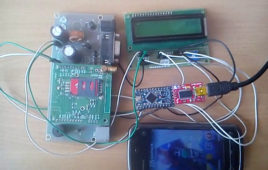
You can see the notice boards being used specially at offices and public places to display important news and notices. To make the notice boards easy to use and more technical advance, I have used this prototype of wireless notice board where we can display the message by simply sending the message through your cell phone. These display systems are very accurate and easy to control and cheaply available and the most important thing is that they can be operated on low Voltage (Up to 12 Voltage).A GSM module is used here for the wireless notice board to send the information or message to display. The main aim of this project is to save time and provide information urgently on display for the customers.

