REQUIREMENTS:
1. Encoder/Decoder (HT12E/HT12D)
2. RX/TX module (433 MHz)
3. SPDT switches (4)
4. Relays (4) {to handle 220 ac voltage}
5. 7805 voltage regulator IC
6. L293d {for operating 12V relays}
Nowadays everyone needs a device which could control appliances wirelessly. This allows us to operate them on our fingertips from particular vicinity with ease.
This time I have created a prototype of a device which controls 4 devices/appliances separately using RF (Radio Frequency) technology. The device comprises two sections: Transmitting (remote) and Receiving part.
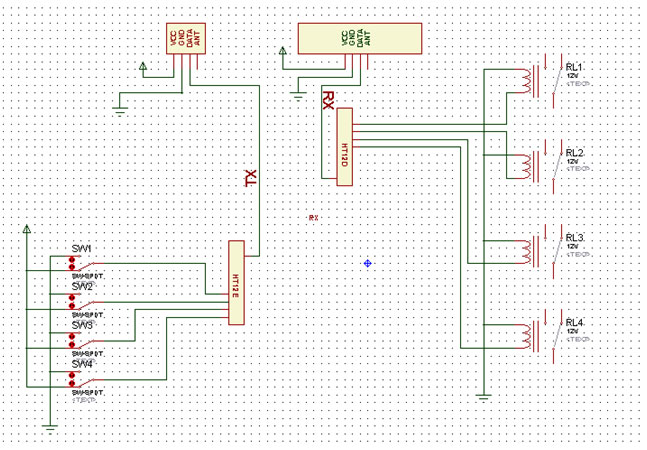
The transmitting part works as a remote device to send the corresponding data to the receiver section. It further consists of 4 SPDT (single pole double throw) switch, one Encoder IC (HT12E) and a TX module (433 MHz). These 4 switches are connected to the 4 data pins of the encoder IC to generate a 4-bit data to be transmitted. The switches provide either high (+5V) or low (0V) signal levels.
At the receiver’s part, this 4-bit data is received wirelessly by the decoder IC via RX module and then corresponding output is given at the data pins of the decoder. The 4 relays are connected to these 4 data outputs which react only to the high state (+5V) i.e. for (+5V) it will remain on and for (0V) it will go off. This technique even helps to operate appliances working on 220 AC voltage.
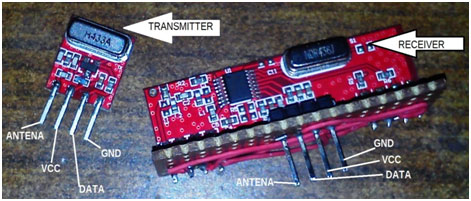
Fig. 1:
Image of 433MHz RF Transmitter and Receiver Modules
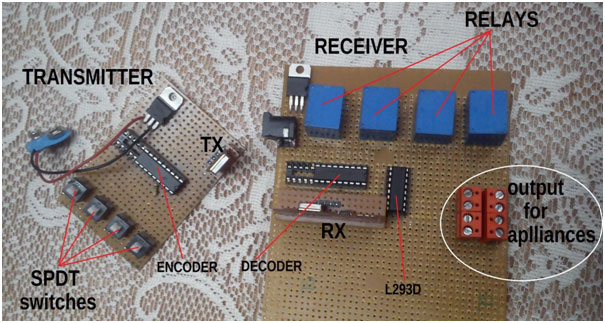
Fig. 2: Prototypes of 433 MHz RF Transmitter and Receiver Modules based on HT12E and HT12D ICs
ABOUT Encoder/Decoder:
Encoders and decoders are used when we need to send our data serially. The encoder decoder pair which I have used is HT12E/HT12D respectively. These are 18 pin ICs.
These encoders/decoders require 12 bits for communication out of which 8 are the address pins and the rest four are the 4-data pins. For a pair of these encoders/decoders to work together their address should match, only then the data will be decoded at the decoder part.
The figure bellow represents how the wave is generated for the communication to take place:
Now here first 8 (1-8) pulses correspond to the address pins and the pulses 9-12 are the data one.
Since there are only 4 bits for data communication therefore this makes them a 4 bit data encoder/decoder IC.
These encoders/decoders also require a clock pulse at pin 15&16 which can be provided by simply connecting these two pins via a specified resistance. I have used 1M Ohm for the encoder part while decoder works with 33K Ohm (these values are specified in their datasheet).
To know more about these ICs do visit the links below:
(ENCODER):http://www.engineersgarage.com/electronic-components/ht12e
(DECODER):http://www.engineersgarage.com/electronic-components/ht12d-datasheet
ABOUT RF module:
These modules are really simple to deal with. They just require a VCC (+5V), GND (0V) and the DATA connection. Some of them need ANTENA (ANT) connection as well. The module that I have used works on 433 MHz frequency to transmit data wirelessly.
Now the question which arises is that how to interface Rx/Tx with our Decoder/Encoder part. It’s really simple; just connect the data out pin of the encoder with the data pin of Tx and the data pin of Rx with the data in pin of the decoder.
You may also like:
Circuit Diagrams
Project Video
Filed Under: Circuit Design, Electronic Projects
Filed Under: Circuit Design, Electronic Projects





Questions related to this article?
👉Ask and discuss on EDAboard.com and Electro-Tech-Online.com forums.
Tell Us What You Think!!
You must be logged in to post a comment.