The Internet of things (IoT) offers several interesting applications, including an Internet clock. This timekeeping device uses an Internet connection to synchronize the time with a time server. This ensures highly accurate timekeeping, aligning with online servers’ coordinated universal time (UTC).
Most Internet clocks use NTP, a protocol designed to synchronize clocks over a network. Internet clocks maintain high accuracy by syncing with atomic clocks or GPS time. These clocks also automatically adjust to the correct time zone based on the network location.
In this project, we’ll design an Internet clock using ESP8266. The time and weather information is attained by the clock from WeatherAPI.com and is displayed on an SSD1306 OLED screen. Any display screen, such as one that’s larger in size, can be used to display the clock.
Components
1. ESP8266/ESP32 x1
2. SSD1306 OLED x1
3. Connecting or Dupont wires
4. MicroUSB cable to connect ESP with computer
5. Power supply for ESP8266/ESP32
Circuit connections
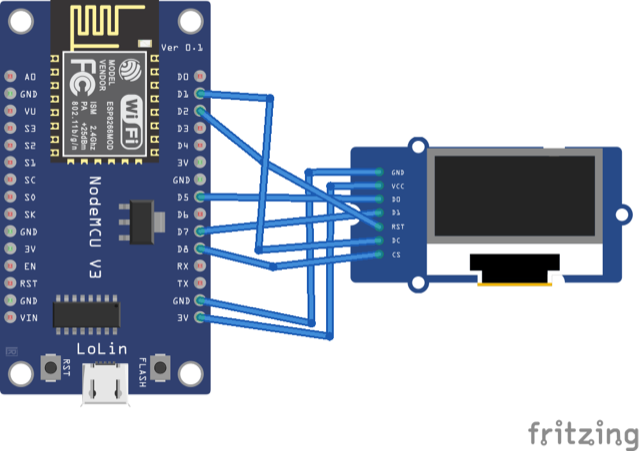
For this project, you’ll need to interface ESP8266 or ESP32 with an SSD1306 OLED. We’re building our project using ESP8266. The SSD1306 OLED display is a 7-pin OLED module with SPI and I2C interfaces. A 0.96″ OLED is in the below image.
 To interface SSD1306 OLED with ESP8266, make the circuit connections as described in the below table.
Remember to replace the SSID and network key in the sketch with those of your personal WiFi connection. Also, replace the API key with yours from WeatherAPI.com (which can be received by registering there).
How this project works
A microcontroller with Ethernet or WiFi capabilities (built-in or through an external shield or a breakout board) is necessary to build this Internet clock.
We use ESP8266 to build our clock, which has WiFi functionality, so it easily connects with any network. When ESP8266 is powered on, it connects with WiFi using the provided SSID and network password. Then, it makes an HTTP request to WeatherAPI.com for the JSON data from the Realtime API.
The JSON data that’s received is de-serialized, and the specific data about date, time, location, and weather are retrieved. This data is formatted and displayed on the OLED display in a user-defined template.
The code
The sketch begins by importing ESP8266WiFi.h, ESP8266HTTPClient.h, ArduinoJson.h, SPI.h, Wire.h, Adafruit_GFX.h, and the Adafruit_SSD1306.h libraries.
Here’s a summary of each process:
- ESP8266WiFi.h is used to connect ESP8266 to the WiFi network.
- ESP8266HTTPClient.h makes HTTP requests from ESP8266 to the web server, which is WeatherAPI.com.
- ArduinoJson.h parses and de-serializes the JSON data received from WeatherAPI’s Realtime API.
- SPI.h and Wire.h are used to interface SSD1306 OLED with ESP8266.
- Adafruit_GFX.h and Adafruit_SSD1306.h libraries manage the SSD1306 OLED display.
Next, the variables are declared for the pin assignments that interface ESP8266 with SSD1306 OLED. An object “display” of the Adafruit_SSD1306 class is instantiated. The variables are declared to store the SSID, the WiFi network password, and the API key from WeatherAPI.com. Then, some global variables are declared to store the temperature, humidity, wind speed, precipitation, date, time, formatted date, formatted time, and the day of the week.
The user-defined function dayOfWeek() is defined next to derive the day of the week from the Gregorian calendar date using Zeller’s Congruence algorithm. The user-defined function fetchData() is also defined so the HTTP request to WeatherAPI’s Realtime API is made, and the data is received as a JSON document.
The user-defined function parseData() de-serializes the JSON data, extracting the date, time, location, temperature, humidity, wind speed, precipitation, and weather conditions into respective variables. The date, time, location, and weather information are converted to the proper formats for display.
The user-defined function displayClock() places the date, time, location, and weather information on the SSD1306 OLED in a pre-defined layout. It’s important to note that the program in fetchData() is coded so that ESP8266 retrieves the data from the Realtime API via an IP lookup. The clock automatically detects the current location, and retrieves the real-time date, time, location, and weather information based on the location.
In the setup() function, the ESP8266 board is connected to the WiFi network, and the SSD1306 OLED display is initialized. In the loop() function, the fetchData() is called to retrieve the date, time, location, and weather information based on the IP lookup. This is then displayed on the OLED screen by calling the displayClock() function.
A five-second delay is provided before the clock updates. It might take additional time for the clock to update the date, time, and other information depending upon your network connectivity and response time from the WeatherAPI server.
Results
You may also like:
Filed Under: Electronic Projects, ESP8266.







Questions related to this article?
👉Ask and discuss on EDAboard.com and Electro-Tech-Online.com forums.
Tell Us What You Think!!
You must be logged in to post a comment.