Timers are one of the common hardware features in all microcontrollers. Timers and timer interrupts are of great use in microcontroller applications. The timer interrupts are often used when precise timing is required without a fraction of error. All MicroPython ports have one or more timers. Some of these timers may be reserved for specific functions like networking or Wi-Fi, while the remaining timers could be utilized within the user’s application. This article will explore timers and the implementation of timer interrupts in MicroPython. Then, we will examine timers available in ESP8266 and ESP32. Finally, we will use the aforementioned concepts to design an ESP8266 ticker.
MicroPython time-related functions
MicroPython provides a time module for time delays, intervals, and date-time maintenance. This module is a re-implementation of a CPython module of the same name. The MicroPython time-related functions are compatible with embedded ports, which use the epoch of 2000-01-01 00:00:00 UTC instead of the POSIX systems epoch of 1970-01-01 00:00:00 UTC. It is important to note that the setting and maintenance of calendar time depends upon the OS or RTOS installed on the supported port like in Raspberry Pico. A built-in RTC may manage this in the case of microcontroller ports. The time-related functions of MicroPython query the OS/RTOS or RTC for maintaining or setting date and time. The time setting can be done manually through a network protocol or a battery backup.
The time module provides the following time, date, and delay-related functions.
time.sleep(seconds): This blocking method provides a delay in seconds. Some ports allow specifying the delay time as a floating-point number. Once the method is called, the controller stops the execution of the user program for the set number of seconds.
time.sleep_ms(ms): This is another blocking method that provides a delay in milliseconds. Compared to time.sleep(), this method is more precise. A positive number or zero can be passed as an argument to this method. If it is used for a timer interrupt, the delay can extend till the execution of the interrupt service routine is finished. If 0 is passed as the argument, the delay will equal the time spent executing the interrupt service routine.
time.sleep_us(us): This is yet another blocking method that provides a delay in microseconds. A positive number or zero can be passed as an argument. If used for a timer interrupt, the delay can extend till the execution of the interrupt service routine is finished. If 0 is passed as the argument, the delay will equal the time spent executing the interrupt service routine.
time.ticks_ms(): This method returns the number of milliseconds passed onwards an arbitrary reference. It is somewhat similar to millis() function in Arduino. Though, the millis() function in Arduino returns a time interval in milliseconds from the boot-up of the Arduino board, the time.ticks_ms() assumes an arbitrary point of time for reference. The wrap-around value used as the maximum range is always in the power of 2 so that it remains the same across the MicroPython implementation irrespective of the port. It is called TICKS_PERIOD, which is equal to one more than TICKS_MAX. Therefore, a call to this function always returns a non-negative value ranging from 0 to TICKS_MAX inclusive, which is indicative of the milliseconds in mentioned range passed onwards an arbitrary point of time. It is important to note that, unlike Arduino, standard mathematical operators or relational operators, either directly or as arguments to ticks_diff() or ticks_add() methods on the values returned by this method or the ticking as mentioned above methods are not allowed. Such operations may lead to a syntax error (depending on the IDE) or erroneous results.
time.ticks_us(): This method is similar to time.ticks_ms() except that it returns time passed in microseconds from an arbitrary point of time.
time.ticks_cpu(): This method is similar to time.ticks_ms() and time.ticks_us() except that it returns the CPU clock cycles passed from an arbitrary point of time. It provides the highest possible resolution. Instead of clock cycles, another highest resolution unit provided by a built-in timer may be returned in some ports. It should be noted that this method is not available for all MicroPython ports. Therefore, the port-specific documentation must be checked before using this method in a MicroPython script.
time.ticks_add(ticks, delta): This method calculates deadlines for microcontroller events and tasks. Depending on time, it returns a deadline in a millisecond, microsecond, or CPU cycle.ticks_ms(), time.ticks_us() or time.ticks_cpu() is used as ticks parameter respectively. The delta argument can be an integer or a numeric argument. It is equal to the number of ticks, where ticks can be milliseconds, microseconds, or CPU cycles set as the deadline. For example, the following statement returns a deadline of 200 milliseconds.
deadline = ticks_add(time.ticks_ms(), 200)
The following statement returns a deadline of 100 microseconds.
deadline = ticks_add(time.ticks_us(), 100)
The following statement returns a deadline of 20 CPU cycles.
deadline = ticks_add(time.ticks_cpu(), 20)
time.ticks_diff(ticks1, ticks2): This method returns the difference between two ticks. The ticks difference may be in milliseconds, microseconds or CPU cycles depending upon returned by time.ticks_ms(), time.ticks_us() or time.ticks_cpu() functions are used as ticks respectively. The value returned is ticks1-ticks2, which can range from -TICKS_PERIOD/2 to TICKS_PERIOD/2 – 1. The time.ticks_diff() is useful in polling a timeout, scheduling an embedded task, or calculating a deadline.
time.time(): This method returns the number of seconds since epoch provided the RTC of the given port is set and maintained. The epoch is embedded-compatible, and the time returned is the number of seconds since 2000-01-01 at 00:00:00 UTC. The epoch may be a port-specific reference like time since power-up or reset in some ports.
time.time_ns(): This method returns the number of microseconds since the epoch. It is highly useful in determining the absolute time. The value returned by this method is an integer.
time.mktime(): This method returns a number of seconds passed between epoch (i.e., 2000-01-01 00:00:00 UTC) and a local time passed as an argument. The method takes in a full 8-tuple as local time, where the tuple is in the following format – (year, month, day, hour, minute, second, weekday, yearday) where tuple values must be in the following range.
| Year | year in AD |
| month | 1~12 |
| mday | 1~31 |
| hour | 0~23 |
| minute | 0~59 |
| second | 0~59 |
| weekday | 0~6 for Mon~Sun |
| yearday | 1~366 |
time.gmtime([secs]): This method returns date-time in UTC since seconds specified as argument. The time returned is a tuple in format (year, month, mday, hour, minute, second, weekday, yearday).
time.localtime([secs]): This method returns date-time in the local time since seconds are specified as the argument. The time returned is a tuple in format (year, month, mday, hour, minute, second, weekday, yearday). The local time may be set according to OS/RTOS or the RTC.
Using ticking functions
The ticking functions are handy when precise timing is required in a MicroPython user program. The ticking functions can calculate time spent executing an embedded task, set a deadline for an embedded task, set timeouts, and schedule embedded tasks.
Following is a valid example of calculating time spent in execution of a part of MicroPython script.
import time
start = time.ticks_us()
… # MicroPython statements to time test
print(time.ticks_diff(time.ticks_us(), start))
Following is a valid example of finding TICKS_MAX of a given port.
print(ticks_add(0, -1))
Following is a valid example of setting deadline for an embedded task.
deadline = ticks_add(time.ticks_ms(), 200)
while ticks_diff(deadline, time.ticks_ms()) > 0:
do_a_little_of_something()
Following is a valid example of polling an event with a timeout.
start = time.ticks_us()
while pin.value() == 0:
if time.ticks_diff(time.ticks_us(), start) > 500:
raise TimeoutError
Following is valid example of scheduling embedded tasks using ticking functions.
now = time.ticks_ms()
scheduled_time = task.scheduled_time()
if ticks_diff(scheduled_time, now) == 0:
print(“time to execute task!”)
task.run()
Problem with time-related functions
The ticking functions are fairly precise. The ticking functions are useful in calculating time intervals, setting timeouts for events, and even scheduling tasks. Though non-blocking, these functions are not often used to provide delays or schedule tasks. A major reason behind this is the dependence of the time module on OS/RTOS or RTC. Secondly, these methods can be interrupted by other higher priority events of the microcontroller.
On the other hand, the delay-related functions of the time module like time.sleep(), time.sleep_ms() and time.sleep_us() have two worth-noting problems. First, these methods are blocking in nature and stop the script when called. Secondly, these methods do not provide a precise delay. For example, a delay of a few seconds from time.sleep() method may have an error of a few milliseconds. These errors can be as high as 1 or 2 percent.
In such situations, timers come to the resort. The timers have their interrupts of higher priority that often cannot be overridden except with a reset. Their interrupts use underlying hardware, i.e., the timer registers that leaves no scope of any error. For setting timeouts or scheduling time-critical embedded tasks, timer interrupts are the best options. At the same time, the ticking functions can be used for setting deadlines or calculating time spent in the execution of critical parts of the MicroPython script.
What is a timer?
Each microcontroller has some built-in hardware features. The timer/counter is one of the important built-in peripherals almost present in every microcontroller. A timer/counter is used to measure time events or operate as a counter. A timer is linked to the system clock of the microcontroller, which enables it to track time highly accurate and precisely. There can be multiple timers in a microcontroller. Each timer is configured, tracked, and controlled by a set of internal registers.
What is a timer interrupt?
One of the important functions of timers is timing events. This is done with the help of timer interrupts. An event is nothing but executing a specific code block in a microcontroller. This code block is enclosed within Interrupt Service Routine (ISR) function. An ISR is executed when an interrupt is raised.
Usually, the microcontroller executes instructions in a sequential manner. When an interrupt is raised, the microcontroller skips through the current execution of code and executes the ISR first. Once the ISR is completed, it resumes with the normal code execution.
The timer interrupts are raised when the timer reaches a set count. A register updates the timer count often called the timer register. There is another register where the user sets the reference count. This is often called a compare and match register. There may be one or more registers associated with setting timer configurations. There is a register that maintains values of various interrupt masks. Whenever a timer interrupt is raised, its corresponding mask bit is toggled in the interrupt mask register. By tracking the interrupt mask bit, a timer interrupt is detected. This can provide a delay, set a timeout, or schedule tasks in an interrupt service routine.
MicroPython timer class
MicroPython provides a timer class for handling timers and timer interrupts from the supported ports. The timer class is a part of the machine module. It is imported in a MicroPython script using the following statement.
from machine import Timer
In case the port is WiPy, the following statement must be used.
from machine import TimerWiPy
It is important to note that if errors are raised in the execution of an interrupt service routine, MicroPython does not produce an error report unless a special buffer is created for it. Therefore, a buffer must be created for debugging when timer interrupts, or other interrupts are used in a MicroPython script. The buffer can be created using the following statements.
import micropython
micropython.alloc_emergency_exception_buf(100)
It is important to note that the buffer stores only the latest exception stack trace here. If a second exception is thrown while the heap is locked, the second exception’s stack trace replaces the original trace.
After importing the timer class, a timer object must be created. This is done by calling the constructor method. The constructor method has the following prototype.
class machine.Timer(id, /, …)
The constructor method takes the id of the timer as an argument. It can be a positive number 0, 1, 2, etc., for a hardware timer or -1 for a virtual timer, provided the port supports it. The other configuration parameters can also be set within the call to the constructor method. Otherwise, the timer object can be explicitly configured using the timer.init() method. The timer.init() method has the following prototype.
Timer.init(*, mode=Timer.PERIODIC, period=- 1, callback=None)
The mode can be set to timer.ONE_SHOT or Timer.PERIODIC. If set to timer.ONE_SHOT, the timer runs only once until the specified period in milliseconds is passed. If set to timer.PERIODIC, the timer runs periodically at an interval in milliseconds passed as the argument period. The argument period is the time period in milliseconds used as a timeout for executing the callback function once or periodically, depending upon the mode set. The callback is a callable executed on the expiration of the time period. The interrupt service routine is called to execute desired embedded tasks on raising timer interrupt. The callable can be a function or even a method belonging to a class object.
The timer class allows stopping the timer and disabling the timer peripheral. This is done by calling the timer.deinit() method. A call to this method immediately stops the timer if running, de-initializes the timer object, and disables the timer peripheral. It has the following prototype.
Timer.deinit()
If a disabled timer has to be re-enabled, a timer object of the same ID must be created again in the user program.
MicroPython interrupt handlers
The callback function specified as an argument in the initialization or creation of a timer object is the interrupt service routine that runs when the timer interrupt is raised. Interestingly, MicroPython does not expose register-level programming for timers. Instead, it uses timer interrupts to provide a timeout in milliseconds. The methods are available through the machine. Timers are commonly applicable to all supported ports.
The callback function or interrupt service routine for timer objects requires certain programming precautions to avoid runtime glitches. We have already discussed one of such cautions: defining a buffer object to store the latest exception error. Let us discuss some more recommendations for writing interrupt handlers in MicroPython.
The body of an interrupt service routine must be as short and straightforward as possible. The interrupt service routines are meant to execute time-critical actions. These should not be misused for the regular scheduling of embedded tasks. If any scheduling of embedded tasks is required within a MicroPython script, that must be done using micropython.schedule. There should be no kind of memory allocation within an interrupt service routine. Avoid floating-point values, inserting them into dictionaries, or appending items into lists. However, global variables can be updated within interrupt service routines.
Most microcontroller platforms do not allow interrupt service routines to return values. However, MicroPython lets interrupt service routines and return one or multiple values. ISR can return a single value by updating a global variable. If multiple values need to be returned, a pre-allocated byte array must be updated by the routine. A pre-allocated array object must be updated if the routine returns multiple integer values. However, this sharing of variables and objects between ISR and the main loop can cause a race condition, where both the main program loop and ISR race alter the value of the variable. Therefore, updating the value of these variables in the main program loop requires extra caution. Before updating the shared variable/byte-array/array in the main program loop, the interrupts should be disabled by calling the pyb.disable_irq() method. After updating the shared variable/byte-array/array in the main program, the interrupts can be re-enabled by calling the pyb.enable_irq() method.
Timers in ESP8266
In ESP8266, there are two timers – timer0 and timer1. The timer0 is used for the networking functions. The timer1 is available for use in ESP8266, but MicroPython does provide access to timers of ESP8266. Instead, ESP8266 provides an API for a virtual timer. This RTOS-based virtual timer has an id of -1. The following is a valid example of a timer interrupt in ESP8266.
from machine import Timer
tim = Timer(-1)
tim.init(period=500, mode=Timer.ONE_SHOT, callback=lambda t:print(1))
tim.init(period=200, mode=Timer.PERIODIC, callback=lambda t:print(2))
Timers in ESP32
ESP32 has four hardware timers with id 0 to 3. All the timers are available for the user. Following is a valid example of timer interrupts in ESP32.
from machine import Timer
tim0 = Timer(0)
tim0.init(period=2000, mode=Timer.ONE_SHOT, callback=lambda t:print(0))
tim1 = Timer(1)
tim1.init(period=1000, mode=Timer.PERIODIC, callback=lambda t:print(1))
Using ESP8266 timer for LED ticker
Let us now use MicroPython Timers for toggling the state of a LED.
Components required
- ESP8266/ESP32 x1
- 5mm LED x1
- 330Ω resistor x1
- Breadboard
- Connecting wires/jumper wires
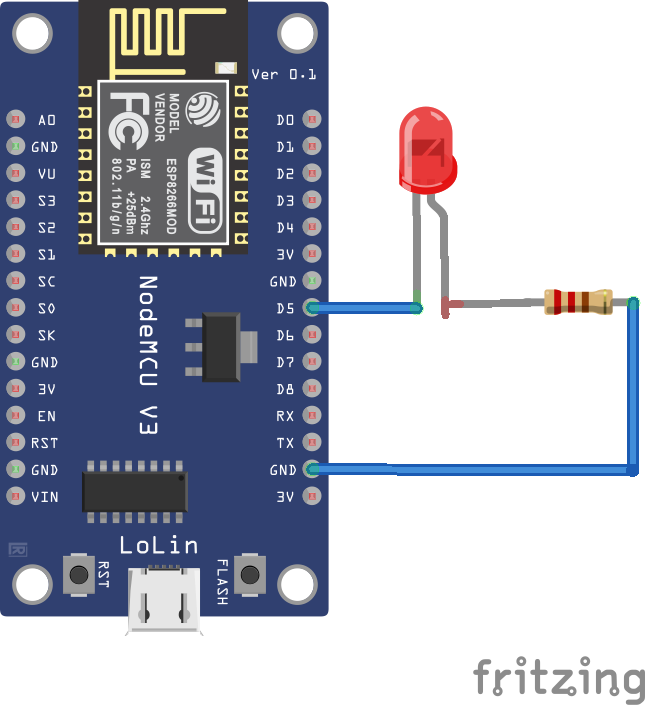
Circuit connections
Connect the anode of LED with GPIO14 of ESP8266 or ESP32. Connect a resistor of 330Ω with the cathode of LED and ground the other end of the resistor.
Toggling LED on ESP8266 using MicroPython Timer Interrupt
MicroPython script
How it works
LED is connected with GPIO14 of ESP8266 such that it glows when the board source current to it, while it is turned off when there is a low signal from the pin. The MicroPython script implements a timer interrupt every 1 second where the state of the LED is toggled, and the number of blinks are updated to the console.
Conclusion
From the above discussion, we can conclude that the ticking functions of MicroPython are useful in calculating timeouts and setting deadlines for the execution of parts of the script. The timer interrupts are useful when time-critical embedded tasks are to be precisely scheduled within the script, whether their execution is required once or periodic. The timer interrupts are far more efficient in producing exact delays and intervals.
You may also like:


Filed Under: Electronic Projects, ESP8266., Featured Contributions, Python, Tutorials

Questions related to this article?
👉Ask and discuss on Electro-Tech-Online.com and EDAboard.com forums.
Tell Us What You Think!!
You must be logged in to post a comment.