Engineers Garage

  • Projects and Tutorials
    • Electronic Projects
      • 8051
      • Arduino
      • ARM
      • AVR
      • PIC
      • Raspberry pi
      • STM32
    • Tutorials
    • Circuit Design
    • Project Videos
    • Components
  • Articles
    • Tech Articles
    • Insight
    • Invention Stories
    • How to
    • What Is
  • News
    • Electronic Products News
    • DIY Reviews
    • Guest Post
  • Forums
    • EDABoard.com
    • Electro-Tech-Online
    • EG Forum Archive
  • Digi-Key Store
    • Cables, Wires
    • Connectors, Interconnect
    • Discrete
    • Electromechanical
    • Embedded Computers
    • Enclosures, Hardware, Office
    • Integrated Circuits (ICs)
    • Isolators
    • LED/Optoelectronics
    • Passive
    • Power, Circuit Protection
    • Programmers
    • RF, Wireless
    • Semiconductors
    • Sensors, Transducers
    • Test Products
    • Tools
  • EE Resources
    • DesignFast
    • LEAP Awards
    • Oscilloscope Product Finder
    • White Papers
    • Webinars
  • EE Learning Center
  • Women in Engineering

How to interface RFID with PIC18F4550 Microcontroller- (Part 15/25)

By Amit Joshi

RFID (Radio Frequency Identification and Detection) is widely used everywhere from highly secured defense laboratories to school attendance system. By employing RFID, much secured entry systems can be developed without incurring huge costs. These are the reasons of excessive use of RFID technology. In this article, interfacing of an RFID reader module has been explained with PIC18F4550. The USART interrupt, an internal PIC interrupt, has also been explained. (For more details on USART, refer PIC EUSART)


As explained earlier (refer RFID interfacing with 8051 & with AVR), an RFID module consists of an RFID Reader, a line converter (usually MAX232) and a COM port. The line converter of this module converts the TTL logic voltage of RFID Reader to RS232 logic. Therefore, to convert the voltage level from such an RFID module, another MAX232 is used to interface it with a microcontroller.
 
One can also use an RFID Reader directly to interface with the controller, thus avoiding the need of voltage level converters. Here both the MAX232s have been eliminated from the circuit and RFID reader is directly connected with the PIC microcontroller.
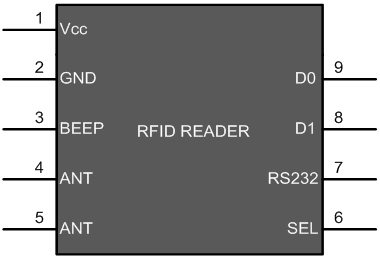
 Pin Configuration of RFID Module connected with PIC Controller
Fig. 2: Pin Configuration of RFID Module connected with PIC Controller
 
The following table explains the pin diagram of the RFID Reader module.
 
Pin No.
Name
Description
1
Vcc
Supply Voltage; 5V
2
GND
Ground (0V)
3
BEEP
Beep or LED drive
4
ANT
No Use
5
ANT
No Use
6
SEL
High is RS232, Low is Weigand
7
RS232
TTL output data
8
D1
Weigand Data 1
9
D0
Weigand Data 0
 
 
Fig. 3: Pin Number and Description RFID Reader module
 
Another part of the RFID system is RFID tag, which contains 12 bytes of unique data. As the tag comes in the range of the Reader Module, it gets activated and transmits this unique code. (For more detail on working of RFID system, refer the article on RFID) The objective here is to receive this 12 byte unique code and display on a 16×2 LCD using PIC18F4550.
 
With the RFID interfacing, this article also explains the USART interrupt which is an internal interrupt. (For external interrupts, refer PIC Hardware interrupts) The internal interrupts, unlike hardware interrupts, are associated with internal peripherals of the controller. To use the USART interrupt, following registers have to be configured accordingly.
 
1. INTCON (Interrupt Control Register)
Bit 7
Bit 6
Bit 5
Bit 4
Bit 3
Bit 2
Bit 1
Bit 0
GIE/GIEH
PEIE/GIEL
TMR0IE
INT0IE
RBIE
TMR0IF
INT0IF
RBIF

Fig. 4: Bit configuration of Interrupt Control Register in PIC18F4550

  PEIE/GIEL: This bit is used to enable/disable all the peripheral interrupts (Internal interrupts) of the controller. But GIE/GIEH bit must be set to high first.
1 = Enables all Peripheral Interrupts
0 = Disables all Peripheral Interrupts
 
GIE/GIEH: This is Global Interrupt Enable bit. This bit is set to high to enable all interrupts of the PIC18F4550.
1 = Enables interrupts
0 = Disables all interrupts
 
2. PIR1 (Peripheral Interrupt Request 1)
Bit 7
Bit 6
Bit 5
 Bit 4
 Bit 3
Bit 2
Bit 1
Bit 0
SPPIF
ADIF
RCIF
TXIF
SSPIF
CCP1IF
TMR2IF
TMR1IF

Fig. 5: Bit configuration of PIR1/ Peripheral Interrupt Request 1 in PIC18F4550

 TXIF: This is Transmission interrupt flag which is set to high when TXREG* is empty.
RCIF: This is Reception interrupt flag which is set to low when reception is complete.
*TXREG : EUSART Transmit Register (The data to be transmitted is stored in this register)
 
3. PIE1 (Peripheral Interrupt Enable 1)
 Bit 7
 Bit 6
 Bit 5

 
 Bit 4
 Bit 3
 Bit 2
 Bit 1
Bit 0
SPPIE
ADIE
RCIE
TXIE
SSPIE
CCP1IE
TMR2IE
TMR1IE

Fig. 6: Bit configuration of PIE1/Peripheral Interrupt Enable 1 PIC18F4550

 TXIE: This bit is used to enable/disable the Transmission (Tx) interrupt.
RCIE: This bit is used to enable/disable the Reception (Rx) interrupt.
Refer PIC EUSART registers for more details.
 
The connections of RFID reader module and LCD with the microcontroller are shown in the circuit diagram tab.


Programming Steps:
1. Set the baud rate of PIC’s USART of to 9600 bps.
2. Set the SPEN and CREN bits to ‘1’ (RCSTA Register).
3. Set the GIE and PEIE to ‘1’ (INTCON Register).
4. Store the 12 byte data into an array when Reception Interrupt is generated.
5. Print the all stored data on the LCD. Refer displaying text on LCD using PIC.


Project Source Code

###

// Program to interface RFID module using EUSART in PIC18F4550

// Configuration bits
/* _CPUDIV_OSC1_PLL2_1L,  // Divide clock by 2
   _FOSC_HS_1H,           // Select High Speed (HS) oscillator
   _WDT_OFF_2H,           // Watchdog Timer off
   MCLRE_ON_3H            // Master Clear on
*/

#define FREQ 12000000
#define baud 9600
#define spbrg_value (((FREQ/64)/baud)-1)
#define rs LATA.F0
#define rw LATA.F1
#define en LATA.F2
#define lcdport LATB

unsigned char rx_data();
void lcd_ini();
void lcdcmd(unsigned char);
void lcddata(unsigned char);
unsigned char data[]="Unique ID No.";
unsigned char card_id[12];
unsigned int i=0,pos;

void main()
{
	TRISB=0;			// Set Port B as output port
	LATB=0;
	TRISA=0;
	LATA=0;
	SPBRG=spbrg_value;		// Fill SPBRG register to set the baud rate
	RCSTA.SPEN=1;			// To activate serial port (Tx and Rx pins)                                    
	RCSTA.CREN=1;			// To enable continuous reception
	PIE1.RCIE=1;			// To enable the Reception (Rx) Interrupt
	INTCON.GIE=1;
	INTCON.PEIE=1;
	lcd_ini();			// LCD initialization
	while(data[i]!='')
	{
		lcddata(data[i]);	// To send characters one by one from 'data' array
		i++;
	}
	while(1)
	{
		i=0;
		while(i<12);
		lcdcmd(0xC0);
		i=0;
		while(i<12)
		{
			lcddata(card_id[i]);	// Print the 12 byte received data
			i++;
		}
	}
}


void interrupt()
{
	card_id[i]=RCREG;		// Store the received data byte by byte
	i++;
}

void lcd_ini()
{
	lcdcmd(0x38);		// Configure the LCD in 8-bit mode, 2 line and 5x7 font
	lcdcmd(0x0C);		// Display On and Cursor Off
	lcdcmd(0x01);		// Clear display screen
	lcdcmd(0x06);		// Increment cursor
	lcdcmd(0x80);		// Set cursor position to 1st line, 1st column
}

void lcdcmd(unsigned char cmdout)
{
	lcdport=cmdout;		//Send command to lcdport=PORTB
	rs=0;						
	rw=0;
	en=1;
	Delay_ms(10);
	en=0;
}

void lcddata(unsigned char dataout)
{
	lcdport=dataout;	//Send data to lcdport=PORTB
	rs=1;
	rw=0;
	en=1;
	Delay_ms(10);
	en=0;
}

###


Circuit Diagrams

Circuit-Diagram-of-How-to-interface-RFID-with-PIC-Microcontroller

Project Components

  • LCD
  • PIC18F4550
  • Resistor

Project Video


Filed Under: PIC Microcontroller
Tagged With: microcontroller, pic, pic18f4550, project, rfid
 

Questions related to this article?
👉Ask and discuss on Electro-Tech-Online.com and EDAboard.com forums.


Tell Us What You Think!! Cancel reply

You must be logged in to post a comment.

HAVE A QUESTION?

Have a technical question about an article or other engineering questions? Check out our engineering forums EDABoard.com and Electro-Tech-Online.com where you can get those questions asked and answered by your peers!


Featured Tutorials

  • Designing Gate Driver Circuit and Switching Mechanism for Modified Sine Wave Inverter – (Part 9/17)
  • Completing Modified Sine Wave Inverter Design with Full Bridge Circuit and Step Up Transformer – (Part 10/17)
  • Designing an Offline UPS – Part (12 /17)
  • How to reduce Switching Time of a Relay – (Part 15/17)
  • Testing MOSFET – (Part 16/17)
  • Driving High Side MOSFET using Bootstrap Circuitry – (Part 17/17)

Stay Up To Date

Newsletter Signup

Sign up and receive our weekly newsletter for latest Tech articles, Electronics Projects, Tutorial series and other insightful tech content.

EE Training Center Classrooms

EE Classrooms

Recent Articles

  • New automotive radar sensor enables reliable in-cabin monitoring system
  • TI breaks ground on 300-mm semiconductor wafer-fabrication plants in Texas
  • New wireless AR Smart Viewer reference design
  • Infineon launches scalable and wireless charging platform with configurable controllers
  • First single-core MPU with MIPI CSI-2 camera interface and audio

Most Popular

5G 555 timer circuit 8051 ai Arduino atmega16 automotive avr dc motor display Electronic Part Electronic Parts Fujitsu ic infineontechnologies integratedcircuit Intel IoT ir lcd ldr led maximintegratedproducts microchip microchiptechnology Microchip Technology microcontroller microcontrollers mosfet motor powermanagement Raspberry Pi remote renesaselectronics renesaselectronicscorporation Research samsung semiconductor sensor software STMicroelectronics switch Technology vishayintertechnology wireless

RSS EDABOARD.com Discussions

  • A circuit that can adjust a resistance and probing a voltage node
  • DC to DC buck converter
  • A circuit that can probe 2 currents and adjust the resistor
  • Microsoft Project 2019 dependencies
  • MOSFET ORing circuit simulation (LTspice)

RSS Electro-Tech-Online.com Discussions

  • Enclosure sought
  • Need help using a common power supply for two devices
  • Fletcher's Law
  • Setting the 18F24K20 to digital.
  • Multistage BJT amplifier
Engineers Garage
  • Analog IC TIps
  • Connector Tips
  • DesignFast
  • EDABoard Forums
  • EE World Online
  • Electro-Tech-Online Forums
  • Microcontroller Tips
  • Power Electronic Tips
  • Sensor Tips
  • Test and Measurement Tips
  • 5G Technology World
  • About Us
  • Contact Us
  • Advertise

Copyright © 2022 WTWH Media LLC. All Rights Reserved. The material on this site may not be reproduced, distributed, transmitted, cached or otherwise used, except with the prior written permission of WTWH Media
Privacy Policy | Advertising | About Us

Search Engineers Garage

  • Projects and Tutorials
    • Electronic Projects
      • 8051
      • Arduino
      • ARM
      • AVR
      • PIC
      • Raspberry pi
      • STM32
    • Tutorials
    • Circuit Design
    • Project Videos
    • Components
  • Articles
    • Tech Articles
    • Insight
    • Invention Stories
    • How to
    • What Is
  • News
    • Electronic Products News
    • DIY Reviews
    • Guest Post
  • Forums
    • EDABoard.com
    • Electro-Tech-Online
    • EG Forum Archive
  • Digi-Key Store
    • Cables, Wires
    • Connectors, Interconnect
    • Discrete
    • Electromechanical
    • Embedded Computers
    • Enclosures, Hardware, Office
    • Integrated Circuits (ICs)
    • Isolators
    • LED/Optoelectronics
    • Passive
    • Power, Circuit Protection
    • Programmers
    • RF, Wireless
    • Semiconductors
    • Sensors, Transducers
    • Test Products
    • Tools
  • EE Resources
    • DesignFast
    • LEAP Awards
    • Oscilloscope Product Finder
    • White Papers
    • Webinars
  • EE Learning Center
  • Women in Engineering